Intel Mac mini: Take Apart Guide (RAM & HD)
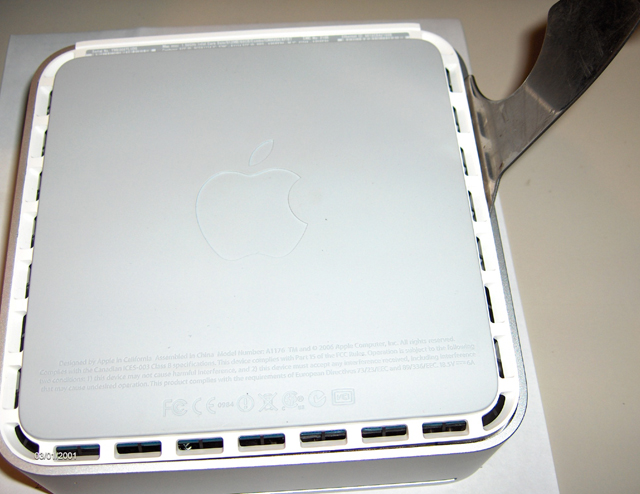
The Intel Mac mini's case is just like that on the PPC model and can be opened by prying upward with a sharp putty knife while working your way around the bottom of the case:
Once you have the lid off, you'll be presented with a very tightly packed computer:
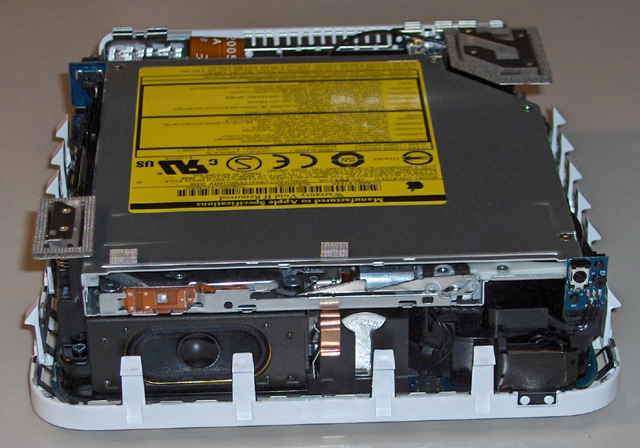
Beneath and around the optical drive is a black plastic frame, with a screw in each corner:

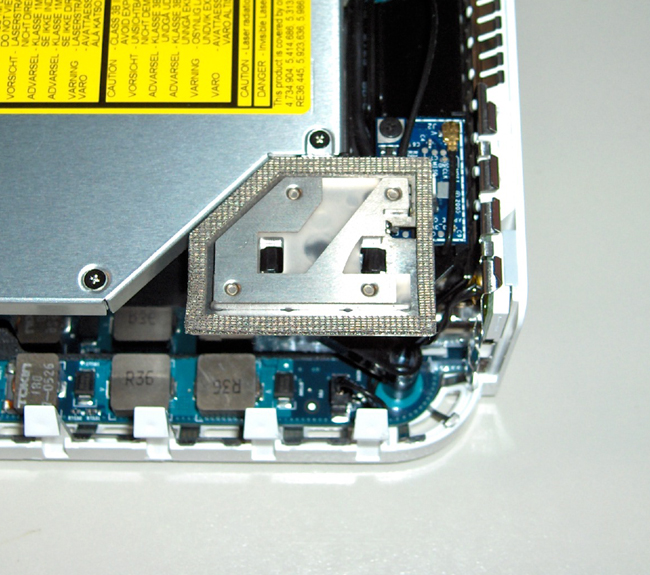
This frame, which holds the hard drive and the optical drive, needs to be removed if you are replacing the RAM or hard drive. Three of the screws are easy to access. The fourth is covered by the airport antenna. To remove the antenna, gently pry inward on the two black tabs that hold it in place and lift upward:
Next, there's a small cable on the front of the mini that needs to be disconnected:
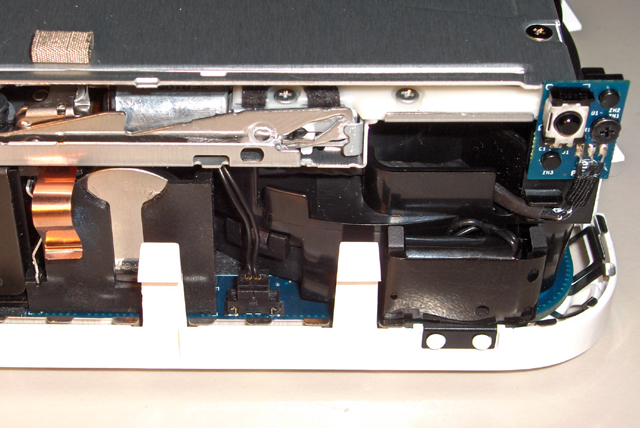
With this cable unhooked, the black plastic frame is only connected at the back and can be gently lifted out as if it were on a hinge, revealing the motherboard:
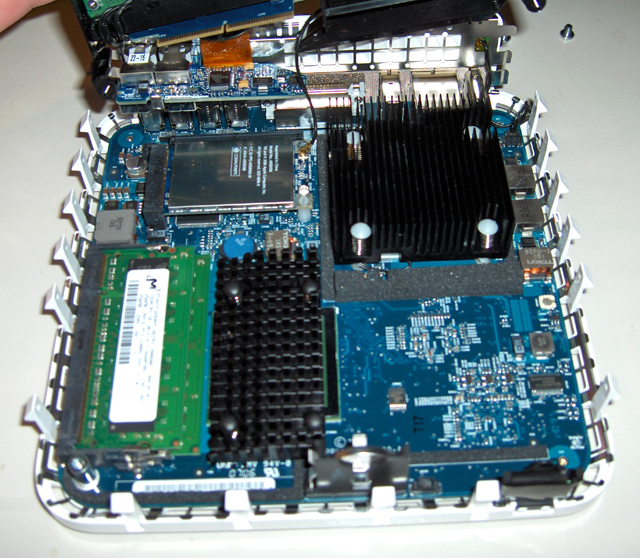
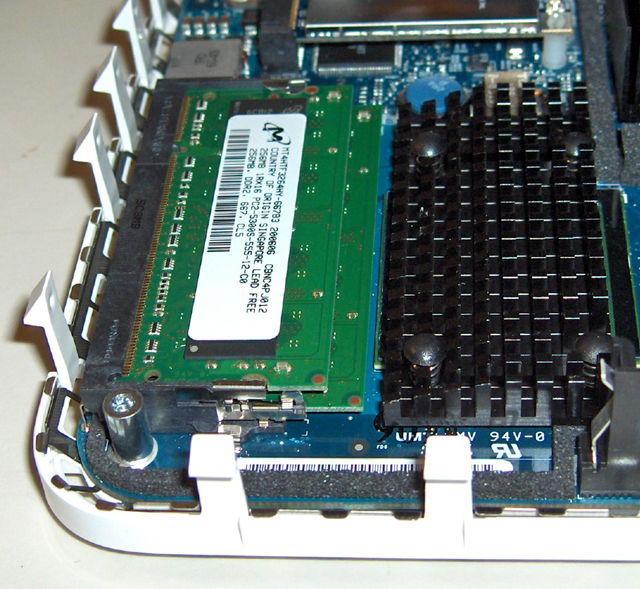
You now have direct access to the two DDR2 SDRAM slots:
If you want to replace the hard drive, turn your attention to the black plastic frame that's now lying upside down beside you mini's case. The drive is in it, held in place with four screws. Two are on the bottom:
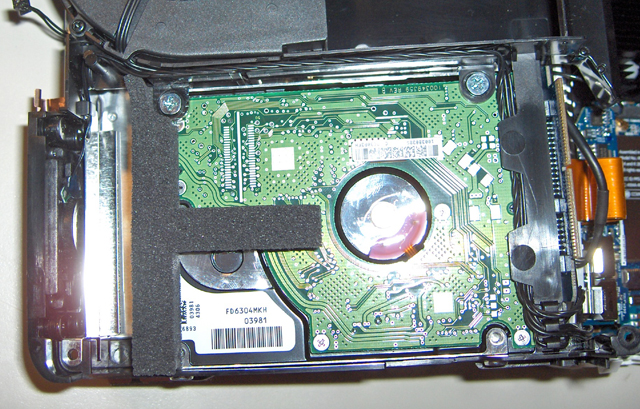
And two are on the side:

With the screws removed, the drive can be easily slid forward and removed:
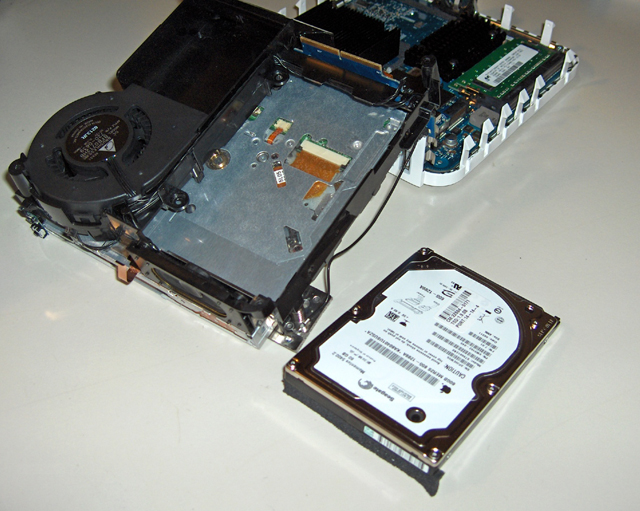
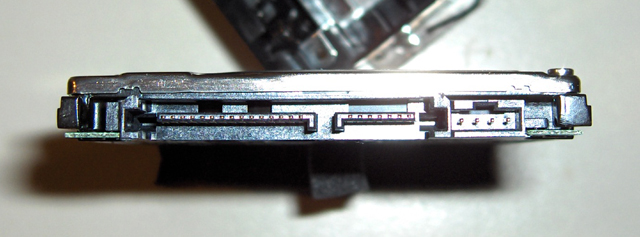
The hard drive is Serial-ATA:
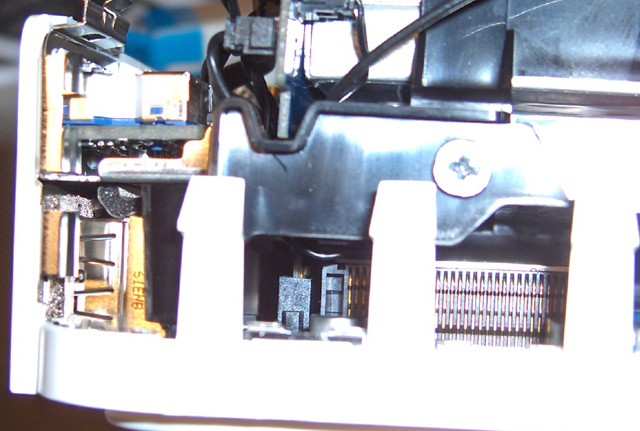
When you reinstall the plastic frame, ensure that the interconnect board is properly seated in its slot:
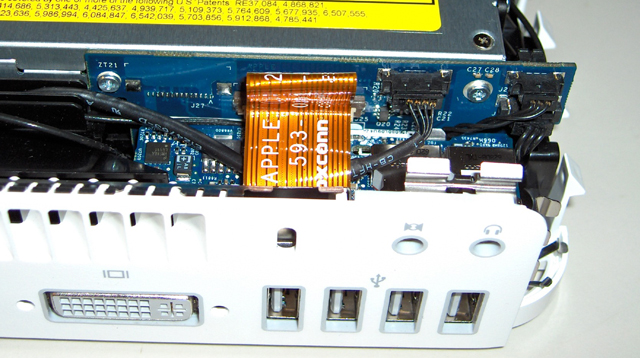
It's also likely that the audio board's cable became loose, so ensure that it's correctly seated:
Given what a pain it is to remove the cover, power the computer up and test everything out before you snap the case shut again.
| Attachment | Size |
|---|---|
| 13.89 KB | |
| 182.36 KB | |
| 246.63 KB | |
| 403.92 KB | |
| 281.02 KB | |
| 208.97 KB | |
| 347.53 KB | |
| 339.07 KB | |
| 330.58 KB | |
| 183.22 KB | |
| 250.86 KB | |
| 106.27 KB | |
| 184.23 KB | |
| 207.46 KB |
Comments
Nice takeapart. Stacked ho
Nice takeapart.
Stacked horizintal SO-DIMMs makes more sense to fit in the case, but I'd have been happy to have two full sized slots if they coulda squished things around a bit more. At least the RAM limit is bumped to 2GB now.
See Also
Core Solo Mini: System Profiler statistics.
IR sensor
Hey... Really nice guide, thank you very much!!! do you have any more details at all about the IR reciever? I'm assuming the other end of the cable snakes back around to the board that the internal drives are connected to, and that it is really just a USB port... (at least this is my hope) System Profiler will probably report it as a USB device.. no? if i am correct or probably correct about this... could you possibly provide more details/ extreme closeup photos, etc. of the IR board? I have hoped for a while that i could get close enough to one of the IR interfaces to replicate one and make it work w/ the apple remote. Then i wouldnt have to hack my Front Row install, as it should be recognized. I've already OC'ed my Mini (PowerPC) from 1.42 to 1.58GHz, so im not afraid of the iron.
Tom posted in the comment pre
Tom posted in the comment previous to yours a .rtf of the output from apple system profiler. Looking through it I found that the IR sensor IS in fact on the USB bus, the same usb bus as the bluetooth module in fact.
The thought of making a usb module that matches the specs of this thing, such that frontrow could be fooled into being fully "supported" on older hardware when it was attached is really an intrigueing one.
As for the guide - nice! I'm a bit saddened that apple hid the ram under the optical drive this time, but the move to laptop-ram was a no-brainer.
Mac Mini is daft.
I don't understand the mac mini concept:
The power supply is nearly as big as the computer - therfore, it's not really that small a computer, all things considered. Why not just put the computer and power supply in the one box, make the hard disk bigger, use cheap (non laptop) ram and dvd drive... make the box openable so you can install your own upgrades??? Possibly, they want to cripple their low-end computers so that people who want upgradabilty are forced to buy the so-called 'professional' computers? Once you throw in a monitor, keyboard, mouse, sufficient RAM and a decent sized hard disk, the imac is better value...if not very upgradable either - no second or third hard disk, no second optical drive ? I'm waiting for a cheap, upgradable mac that doesn't have the monitor built in... kind of like a boring pc box would be great.
It seems that you want a PC t
It seems that you want a PC that runs OS X. Basically, you are the target market that Dell was thinking of when they wanted to bundle OS X86 on their systems...
I don't "get" the super expensive gaming PCs, but I understand their market. They just aren't what I want. I do want the mini. There is a certain aspect of the mini that many people either don't "get" or desire, and that is both the size and noise. Everything for my mini, from the mini to 19" LCD monitor, to kb/mouse and external FW HDD all takes less space than just the 21" CRT monitor I used to have. Plus, the mini is nearly silent. If you can deal with a computer that does what you really need and can deal with the limitations of not having multitudes of expansion possibility that 99% of people never ( no, really ;)) use, and you'd like a system that makes less noise than the sound of your own breathing, then you could deal with running a mini.
It's all a state of mind. Huge loud hot "gamer" PC vs tiny quiet cool Mac mini. The choice depends on goals and needs.
fair enough...
> It seems that you want a PC that runs OS X
fair enough... can't wait! i don't care what my computer looks like!
I fear you might be waiting f
I fear you might be waiting for a very, very long time.
IR Progress
OK... i asked a few posts ago about the profiler stuff on the IR interface... i did download the file and took a look at it.... now, as far as supporting it on our macs.... ive made a BIT of progress this evening... by route of Microsoft. Now, the XBOX is actually a computer, and the controller ports are actually USB ports... so, in that line of thought i was thinking about getting unofficial-offical support for front row on my mini, so i was trying to figure out how to hack some of my home IR hardware onto the USB bus, after about ten minutes of thinking, i looked over at the "DVD Playback Kit" plugged into my XBOX and got a silly idea. I removed the playback kit (really, just a USB IR interface with an awkward plug) jammed some strands of cat 5 into it to connect to the pins (if it works, ill take it apart and build it more safely) and then tied them into a cut apart usb cable. it shows up in system profiler (it doesnt know what it is, it says "USB Device" then gives the rev #, the device id# and product id #) now all i need to do is to figure out how to spoof the system to cross reference the device/product ID's of my MS reciever against the ID's shown in the mini's profiler report. It is my theory that when i can cross reference them, that the Apple IR remote will work!! (fingers crossed)
NOTE: anyone with a Philips Pronto and a new Apple IR remote can help me out alot. i havent bought tthe remote from apple yet, but if this works, i most definetly will. So, any pronto users out there, if you could make sure your apple remote is set for Computer instead of iPod and then captue the codes from it and send me the .CCF i will be able to test. remotecentral.com has a few files posted, but im pretty sure that it is the iPod codeset, not the Computer codeset.

\
bill
EDIT: OK, so its a few minutes later, and its not the apple remote.. but using the XBOX HID Driver, and Gamepad companion, the xbox remote was recognized, i mapped the "menu" key to "apple+esc" the arrow buttons to their respective keyynoard keys, and the center "select" button to the spacebar.
works mint!! (but i still want to make this recognize the apple remote, and have the system think it is an apple interface. However, i am MUCH more optomistic about this now. you know, i think maybe my rants dont belong attached to this post anymore. maybe they should be moved to a thread called "IR Remote Hacking" or some other thing?
Errors?
I just got my Intel Mini (1.66GHZ) and found a couple of either errors in the instructions or differences in my version that you might want to point out.
In order to get the optical drive out there are TWO very small screws on the back of the circuit board that must be removed before the drive can be removed. They are a bit difficult to remove and an even bigger pain to get back in due to the angle of the screwdriver in the enclosed space. After doing this I belive that it MAY not be necessary to remove the opticl drive to get to the RAM slots. ALSO there is another "antenna on the opposite side from the airport antenna that must be gently pried out of the way to get the optical drive out. Pushing in/out on the little leg near the spring did not release it as it did on the other antenna. Suggestions?
in THIS step:
>With this cable unhooked, the black plastic frame is only connected
>at the back and can be gently lifted out as if it were on a hinge, revealing the
>motherboard:
This is NOT the case in my Mini. There are 4 small black screws at the four corners of the plastic frame. They attach the fram to the motherboard. Note the one by the speaker is larger than the other three. They all must be removed to lift the frame and expose the RAM slots.
Also NOTE that the plastic frame does not actually just hinge up. It is important to note that the daughtercard/riser that carries the connectors to the drives is seated in a connector on the motherboard and must come STRAIGHT UP before the plastic frame can be "hinged" back out of the way. If you attempt to just hinge it back after undoing the black screws you run the risk of damaging the motherboard and the drive daughtercard/riser.
I would have provided photos but my attempts to get close in to show the details I mentioned look like crap. My camera is not suited to extreme close-ups.
None of this takes away from the excellent HOWTO you have here as it was able to get me to a point where I could figure out the differences in my Mini. Hats off to the original author!
Re: Errors?
A minor correction to this paragraph
The larger screw is NOT the one by the speaker it is on the front of the unit on the other (right) side.
Also if you don't have a magnetized screwdriver like me a small dab of glue on the tip of your screwdriver works wonders. I used a gluestick that is usually used to glue paper.
SATA + 3.5" HDD
Is there a different connector for "laptop" SATA and conventional full-size desktop SATA? Will this new Mac Mini work with a desktop SATA drive or do we need an ugly hack to get a 3.5" disk connected?
a simple clearer annotated guide
Hi, Thanks for this guide.
While it is helpful- it takes some guesswork for me to follow it properly.
I have an annotated version based on my own trials- can I post it here so tht it may be helpful to those who are not so experienced?
thx
Good idea... Go right ahead.
Good idea... Go right ahead.
Not all Gamer PCs are hot, lo
Not all Gamer PCs are hot, loud or ugly. I guess you don't go to LAN parties much. I have an Antec Lanboy that makes less noise than all the Macs I have ever owned and it TOTALLY outperforms the Mac in games. Notice I said games. Macs have their advantages. Games however is not one of them. That said, not all PCs suck. Just most prefab cookie cutter PCs suck. I have never seen a pre-fab that I liked except for an Apple product.
Re: Mac Mini is daft.
Well, for one, the computer itself sits on your desk. The power supply can be hidden away out of sight on the floor, so you don't have to look at it. Using a full size HDD, DVD drive, RAM, and etc. would make the box quite large (probably around the size of a Shuttle or an iDeq or a G4 Cube at the smallest.) and defeat the purpose of the mini. It's designed as a teeny computer with a small footprint, to be cute. It's target market are those who 1) have never had a computer, and want one that JustWorks(tm) (ie, grandmothers, those who just want to do word processing, listen to music/fill their iPod, get photos off of their digital camera and email them to people. This is a cheap, elegant, easy solution for that. Nobody there is really concerned with upgradability, or expandability. That said, there are other markets too. I personally love the mini, and would buy one in an instant, but for the hideous Intel Extreme integrated graphics they're using now, sharing system RAM. I'm going to wait for them to go back to a standalone graphics solution with dedicated RAM before I grab one.
I don't think they sell any really "crippled" computers. The specs of the Mini are really rather impressive, and hardly "crippled." If you want to talk about lack of upgradability, Apple's been doing the whole "un-upgradable" thing on entry level computers since 1998 (iMac)
I don't think you're going to see the cheap, expandable, upgradable mac in the future. Macs are never really going to be cheap as long as Steve Jobs is around, he's overengineered everything, gone overboard on styling, and turned macs into a status symbol. the Mini is a compromise to put a computer in everyone's hands, and entice them to buy something bigger and better from Apple.
I personally really like the concept of the Mini, going to wait another few revisions before buying one, and then use it in my living room as the hub of my entertainment centre. Plug a nice LCD HDTV into it, and kick back to enjoy a few movies
anyway, that said, I've probably incited a flamewar, and contradicted myself several times, having posted over time while working, feel free to correct me, or point out flaws in my logic, however keep in mind, that this is a totally subjective post, one man's opinion of the state of things
CCC
Mac Mini performance
The Mini is an appealing product at the right price, but the performance? I played with several at the local Apple store, and they were total dogs. I could chew on my sandwich between Web page views. The staff blamed it on the in-store LAN, but even launching local applications was slow. A PC with these specs would be far faster.
Friends who are Apple fanatics said the Mini is just for little old ladies Web browsing. So, Mac experts, what's going on? Was my experience misleading, or is the Mini really a dog?
malcolm
IMHO
IMHO, it's probably the HD causing the lag.
The mini uses a laptop HD. Less-expensive 4200 RPM laptop drives are considerably slower than the 7200 RPM drives you might find in a desktop (Mac or PC).
Even with a faster processor, faster bus, more RAM, etc. etc., you can only read and write the data so fast on a slow HD.
I received my Mac Mini Core D
I received my Mac Mini Core Duo 2 weeks ago. I ordered the Mac out of frustration with my Win XP PC, because it got infected by trojan that non of the major virus scanner or spyware killer can detect yet. I do Unix/Windows sys admin for living for 12 yrs, so I know to do careful traces of what the trojan was doing, just didn't know what it was! Anyway, after trying to clean it in safe mode, one of my Sata disk disappear because of driver problem, and I couldn't get it mounted anymore. I could recover the files using disk recovery tools, but Windows just won't recognize my 300G disk, and keep asking me if I want to format it as 127G. Anyway, I got to the point everytime I log in, I get blue screen of death.
Enough of my frustration of PC, I don't think I need to go back to my PC anymore except to get the data out of my disks.
I am so impressed with the packaging of the Mac mini. THe plastic wrap around the mini is so beautiful, like nothing I have ever seen for any type of electronic or computer devices. The packaging for the engagement ring I bought for my fiance at Tiffany doesn't even come close to give me that feeling. I don't think it cost that much more to make the beautiful packaging, but it's the mentality that makes the different. You have to hire a designer/engineer anyway for any package designing work. It not necessary cheaper to hire a designer that produce low quality work, if you don't demand for higher quality. Anyway, the whole thing is just so beautiful.
Then when I switched it on, I am again impressed. The last Mac I had was a IIcx, which I bought used 13 years ago which die not long after . It's really emotional. And I really can't forgive myself for not owning another Mac in all these years. I can't forgive myself how much time I have allowed myself to be wasted because of Windows crashes, virus, etc.
The Mac Mini is not underpowered at all. It is running a very stable unix kernel, with lots of possibilities to fine tune. But without even toughing the technical side of it, remember nowadays on any PC, you have to run a virus scanner, maybe a spyware killer and firewall software. Everytime you start a program, the virus scanner kicks in. Everytime you download a piece of mail, the virus scanner kicks in. I can get a pretty powerful PC for the base price of $800, but if I runs Windows, I will need to add in all those overheads, and it will come out really not that much faster. No body do bench mark with virus scanner running. We don't usuallt get the full story from reports from magazine or web reviews.
re mac mini vs pc
Agree with aliko. My PPC mac mini is so far much more reliable than any PC I'vd owned or used in the workplace. And I too wasted countless hours with Microsoft junk software. I installed the latest Virtual PC with xp included to have the software and with a few tweaks can run Photoshop CS2 on it at least as reliably as it ran on a 700 mghz PC and much faster which is interesting since I used a 10,000 rpm (Barracuda?) scsi scratch disk for photoshop. Further now I have a back up of the xp system with updates to date on a DVD drive so restoring won't take the usual two days updating xp and office etc all over again when xp crashes takes about 20 minutes. Recently installed Ubuntu (linux) virtual machine as well just to check it out. So far a bit slow but it worked on the second install try. So whatever speed drawback there is it is more than made up for by hours/days/weeks saved not crashing. Without knowing the technical differences re PPC chips etc sad to see them go as I wonder about the move to PC 'quality' hardware. Will probably add a higher speed USB drive (or firewire) to the mini before I get another machine or intel mac. If anyone would like to explain the chip difference between PPC and Intel glad to read it. Anyway doubt I would have had the success installing three operating systems on any intel PC I've seen or used since xp would have crashed before I ever got that far. It is too bad MAC doesn't use faster drives on their intro models though...would blow people away. -at least 7500 rpm. I moved to PPC mini after last PC crashed as usual when I really needed it which happen about twice a year.
slow web
surprised to hear the web page views were slow. were they on a lan or dial-up? sounds like lan was a real mess if it was one. also Safari does have a built in page display delay that can be fixed(removed) with safarispeed_source1.2.1 which makes it significantly faster on that front. I use a cable modem and found no difference in web performance from previous PC set-ups which were also very fast. so whatever was going on at the Apple store is an anomoly I would think unrelated to the mini's themselves.
nice pics and guide
Great pics of the take apart. Took apart the PPC mini while back to put a Gig chip in and was easy again compared to messing with a large box pc even though it seemed when I started it appeared 'delicate'. Worked fine. Wish I could get two gigs into that one slot though.
daft
daft? Australia or Britain?
Problems starting up
I'm having the weirdest problem after upgrading the ram in the mini. The computer boots up fine when the cover is off. but when I put the cover on it won't boot, it just blinks its light and does nothing, anyone have an idea as to what could be wrong? I've reassembled it 4 time now and the same thing every time....
Memory Question on Intel Mini 1.6GHz
I've purchased an Intel Mini 1.6GHz with 512MB of RAM and am interested in upgrading my memory to higher memory configuration. Two questions:
1) Does that mean I need to purchase two 1GB memory for each of the slots and throw away the 512MB that came with the system?
2) Do I have to add the memory in pairs or can I just purchase one 1GB slot and keep the 512MB in the machine for a 1.5GB config? Does performance suffer because I'm adding memory in pairs?
Re: Memory Question on Intel Mini 1.6GHz
It's preferable to have paired RAM in the Mac Mini and MacBook, because having a pair of identical modules allows the motherboard chipset to run in dual-channel mode. This is particularly useful for these particular models because the video circuitry steals a substantial hunk of memory bandwidth. There's a measurable performance loss when running with different-sized modules.
Also, just to note, I'm pretty sure the stock Intel Mini RAM configuration is two matching 256MB modules, not a single 512MB, for the reason stated above.
--Peace
removing/seating the memory modules
Taking it apart and uncovering the SDRAM slots was easier than we're led to believe - 5 minutes.
But, removing and replacing the modules! - it's a tight fit, and I can't seem to get the top one reseated correctly. Does anyone have any hints on how to do that?
mini mac reassembly
Many thanks for an excellent guide to opening the minimac. I did fine, except my airport antenna got disconnected and I am not sure where to reattach it. In your fourth photo, it looks like it goes to the chrome-like box next to the heat sink? Any help would greatly appreciated. My airport still works, but is weak...and if I put the cover on it (even temporarily), my signal gets very weak.
For jrjung (a little late) an
For jrjung (a little late) and anyone else who accidentally disconnects the airport antenna ... http://www.123macmini.com/forums/viewtopic.php?t=10853
I found installing a new hard disk a little tricky because the hard disk doesn't sit on anything but has to be lifted before being slid into position. To solve the problem I cut a slice from a large antistatic bag to make a sling to fit under the disk. I can then hold the disk up and slide it easily into place.
my experience...
Great guide - best to date I have seen.
I previously read the official apple manual for the PPC mini and viewed a video on the Intel mini takeapart. click the links for the right size video lower right on the page at OWC. Some suggestions:
Apple recommends a cheap putty knife and sanding a bevel on it. Cheap ones have relatively thick and bendy blades and you see the tech guy struggling to get the blade in on the video. I have a taper ground high quality paint scraper that is much thinner and stiffer and doesn't need sharpening. I used a 4 inch wide one, which works beuatifully. Fine enough to easily slide down the gap in the case. Just keep the blade away from the case corner curves to avoid marking the aluminum. I found working around the three sides in a circle in steps worked better than trying to pry open the back end from opposite sides, just because the tension on the opposite side is too great with the plastic base crooked in the aluminum frame.
The video shows the guy wriggling the airport antenna to get it off, which is a bit less scientific than simply unclipping those two black clips you show nicely on the photo. On my Mini, the antenna covers the tops of the clips, so gently squeeze the tops of long black stems under the airport card and it will spring off.
The flexible orange ribbon cable at the back (audio board cable) is easily removed from the vertical circuit board - gently slide the two tiny black tabs on each end of the cable clip up in line with the cable (about 1.5mm) releases the tension and the cable easily slips out of its connector with a gentle wiggle. This frees the black frame completely and avoids damage to the ribbon cable in manipulating the two parts of the chassis. Reinsertion is simply a reversal of that. (Trying to reseat without unclipping seems a bit hazardous to the cable which could get kinked trying to do that.)
(And yes, as one poster found out - check the airport antenna cable is properly seated.)
On the memory question - barefeats.com did some benchmarks of ram in matched pairs versus uneven so you can see where the performance drops if unmatched.
http://www.barefeats.com/mincd.html
I recycled 512MB that came out of my MacBook Pro 15" 2GHz, since they use the same SODIMMs - so my mini has 768MB and runs way better than on 512 without me having to spend more money on RAM at present.
Have just put an extra 1GB in the mini, now at 1.5GB. My 1.66GHz Mini benchmarks with Xbench nearly identical to my 2GHz MacBook Pro with 2GB! Some things the mini does significantly faster (Quartz graphics) despite the shared video memory.
cracking the mini
first of all, thanks to THRINT for his comment below about using a glue stick with the tiny screwdrivers. That was brilliant, and I would never have been able to do this RAM install without it.
I think it needs mentioning upfront that you will need a tweezers to remove and replace the cable shown in picture 5, and that it must be grasped by the very upper quadrant of the rectangular nub it is attached to. This is not quite easy to see for those of us nearing 50!
Also the airport antenna in the Core Duo 1.6 is not exactly like the photo, so it should be mentioned that the 2 black plastic clips you squeeze are done from underneath.
Thanks for the excellent informational post - this is my 20th year with Macs and the people are still the best part of it!
Thanks Great information
Just upgraded the Ram to 2GB and my Drive to a 160GB in my new Mac Mini It was a breeze with the information and feedback on this page. One thing I found is the Airport antenna will just pop off if you squeeze the 2 black supports together a bit, no need to pry it at all. Also it's easier to replace the hard drive if you disconnect the flat copper coloured FoxConn Cable from the drive assembly. It comes off just like the keyboard cable in some Powerbook G4s. Just make sure you put the plastic cable wedge lock back in the cable plug on the outside. It is easier to do this with the drive assembly upside down before you put it back in.
Forgot.. All the screws in my Mini were aluminum so go buy a glue stick before you start working. I used a very small bit of silicone caulk worked fine too. ;P
Thanks to everyone for their input.
Take Apart Guide
Not a "Techie" in the slightest, great guide, installed 2 Gig, everything worked perfectly and didn't break anything.
Thanks again for a great guide.
I tried to use a video from O
I tried to use a video from Other World Computing to remove the drives assembly from my new mid 2007 Mini (Core2Duo 1.83 mhz). This was supposed to be quite simple by removing 4 screws at each corner of the assembly. I cannot for the life of me find all 4 screws.
I am going to try again using the instructions in this thread, assuming that there have been no changes to the hardware since this thread was started.
I have 3 gigs of Samsung ram from OWC which are guaranteed to work with this model mini.
2.0GHz Core2 Duo
I just used this article as a guide while replacing the RAM in my 2.0GHz Mini (purchased August 2007) and didn't find any differences. One thing I would add is that if you power up your Mini with the cover off and the fan is much louder than you've ever heard it before, that's not because the cover is off. It's because you forgot to reconnect the small black cable shown in picture 5. Don't ask me how I know.
As for the question of cases, I would like to have a Mac with a case similar to what the Mac Pro has but a price tag in the area of $1200. I've worked on a Mac Pro before, and it's much easier than a Mini. You don't need detailed instructions to work on a Mac Pro. However when it came to a choice of spending $800 or $2500, obviously I went with $800.
FIXED: Screwed up during RAM upgrade
I was upgrading a Mac Mini (core 2 duo 1.8 Ghz)
The RAM went in OK, I had some minor problems putting the frame back in, but I thought I had managed.
When I rebooted the Mini, the screen is overly purple, after some checking I can see that the computer is not putting out any yellow.
I am not sure I want to take it apart again, but if anyone has any suggestions, they will be appreciated.
I was going to give this as a gift in 10 days.
Sorry Code18 (18" from the keyboard), I was being so careful with the cover off, that I did not push the DVI connector all the way in. Case closed the upgrade was a success.
Mac Mini Memory Upgrade to 3GB
Followed your pic-torial and all seems to have gone without a hitch. Prying the lid off was the most nerve wracking part of the whole operation. Sliding the unit back into the casing was also a bit tense, but completed without issue.
I notice the fan seems to run just a tad louder than before. I'll watch that and see if it appears to be an issue.
Thanks!
Mac Mini Memory Upgrade to 3GB (Fan noise update)
I made the fan comment a bit early I think, it ran silent for a bit, then seemed to 'rev up' for a few minutes then settled back down to its normal quietly running self. I can definitely tell the difference between running @ 1GB -vs- 3GB. Nice unit!
Well first ever post here..He
Well first ever post here..Hello!
Thanks for the TUT very nice...
took about 10 mins to change the RAM to some nice Corsair, and fit a 7200 rpm 120 hdd! not sure it will make much use of the 3 Gbps,but the 8Mb Cache should go down well!
Reading through i noticed a few comments about the TUT and it's accuracy,or if people could follow it! well take it from me it's so easy you could probably train a monkey to do it! Only pointer i would make is when inserting the putty knife(s) dont try to push any further than about 7mm..when you hit the lip your in,any further in any your destroying you earth strap! RAM is cheapest it's ever been and Hdd's are so cheap you may aswell while your in there...
Good luck and thanks for the thread..
Spelling!!!
seating the memory modules
when installing new ram, one of the sticks has not been detected properly, any help would be great
Ok Silly question: How did you move your data?
Ok I have a Silly question. I am about to upgrade my Mac mini Core Duo to 2Gb ram and replace the 80 gb drive with 7200 rpm 160gb drive. My question is how did you move the data from your old disk to the new one after you installed it? Did the disk come with some software to help? Did you have to install the old disk in another machine in order to have them both running at once to move the data? I only have 1 mac mini so I'm scratching my head trying to figure out how I'm going to get the new drive to look just like my old one only with more space.
What are some of the methods you all used?
Get an external drive enclosu
Get an external drive enclosure ad clone the original drive over to the new one. Cheap and simple. External enclosures are about $20 and Carbon Copy Cloner and others are free downloads.
A couple other points
Mostly in agreement with Jon above, with a couple extra points:
• Make sure you get a SATA enclosure for the old drive. An IDE enclosure won't work, unless it includes a SATA adapter of some sort.
• Carbon Copy Cloner is good, as Jon states, but my best results have been with SuperDuper. It all comes down to your own preference, and others may have good suggestions too.
I thought I did so well - no sound in the headset after RAM inst
Did a RAM upgrade on new Mac Mini dual core 1.8. Followed all the great instructions (thanks). Worked nicely. The orange ribbon came loose, but was easy to reset after loosening the brown clamp and gently centering/inserting and locking down the brown clamp again. Everything works, bluetooth, wireless, USBs, but I get no sound in the headphone outlet. When I plug the mini-RCA contact in the little speaker jack on the back, the built in speaker shuts off, but there is no sound in the headset. The computer recognizes that something is going on. The sound in the little built in speaker works fine. I have tried the orange ribbon a few times, but it seems to be well in place. Does the little speaker work independently of the soundboard? When I plug the speakers in the computer switches to the headphone outlet, so card is alive and at least recognized as present. Did I ruin the soundboard or is it still not connected? Suggestions appreciated! My daughter is mad!
Mac Mini sounds like a lawn mower now
Great guide! I put in the memory and everything works like a charm mostly... the computer sounds like a lawn mower now.
Is is possible I didn't seat it properly and that's why the fan sounds so loud?
Has this happened to anyone else?
sounds silly but...
... i haven't had to pull a computer apart since i switched to mac almost 7 years ago. can someone guide me as to what kind of ram i should buy before doing this?
Tools
Pancake turners work very well.
This is a great piece to help
This is a great piece to help losers like me with take aparts on some cheap used Macs and boken Macs. I love take aparts with more than 5 pics - really good work.
Pages