Fixing the Epson 'Prints Blank Pages' Problem
Recently, after changing out the blank ink tank on my finacee's Epson CX5400 multifunction inkjet printer, the printer began printing nothing but blank pages. Even after doing multiple head cleanings and test prints, pages would emerge from the printer completely blank. After some research, a number of fellow CX5400 owners have reported having the same problems, to the extent that the term "design flaw" became a common theme.
I've owned several Epson printers and have had, generally, good luck with them. I was always somewhat suspicious of Epson's philosophy of making the print heads a permanent part of the printer and having the only replaceable part be the ink tanks, but it produced good-looking prints so it didn't bother me. Now I know, unfortunately, that this system is both a blessing and a curse.
Before we delve into how to fix your blank-page-printing problem, a quick explanation on how Epson's ink delivery system works (or, rather, how it appears Epson's ink delivery system works, because Epson isn't exactly willing to divulge its trade secrets) is in order.
There are a few components to the delivery system. First, you have the ink tanks. Early Epson tanks were just that; plastic boxes with a sponge inside saturated with ink. Newer tanks have a small PCB with a flash chip on it, so the printer can tell if a tank is new or used, or if it's an Epson brand cartridge or a generic replacement. In either case, the basic functionality is that it's a holder for the ink.
Next in the chain are the ink tubes and primer. I've heard conflicting reports on how Epson printers get the ink out of the tanks; some believe that the tanks are positively pressurized when first installed, so that ink shoots out of the tank when the printer needs it. Other reports say that the printer puts negative pressure on the cartridge to draw ink out of it.
Once the printer has the ink out of the cartridge, there are two places it can go, to either the print heads or to the purge tube. The print heads are what makes the ink spray onto the paper; the purge tube is where the ink goes when the printer primes new cartridges and cleans dirty print heads.
Many cases of the "prints blank pages" problem occur right after installing new ink tanks. People have literally removed empty tanks from printers that work perfectly, and installed new tanks to find that the printer delivers blank pages (this happened to me). Since it's highly unlikely that the print heads have become clogged during the 5 minutes it takes to swap out the cartridges, the problem has to be elsewhere in the ink delivery system. So here's what happens when you install a new ink tank:
1. The new tank is installed, the printer recognizes that it's a new tank, and begins the priming sequence.
2. The printer starts to prime the tank. Ink comes out of each tank and is directed to the purge tube.
3. The ink flows through the purge tube into the internal absorbent pad.
4. After a couple seconds, the printer stops the priming sequence and probably does a quick print head cleaning.
Now, a few people have done some in-depth troubleshooting and found that the "prints blank pages" problem is actually caused by a clogged purge tube. While this may not immediately make sense (you may be thinking, "so what if the tube is clogged, the ink will just spill inside the printer elsewhere"), here's what my research suggests happens when the problem occurs:
1. The new tank is installed, the printer recognizes that it's a new tank, and begins the priming sequence.
2. The printer starts to prime the tank. Ink comes out of each tank and is directed to the purge tube.
3. The tube is blocked, so the ink has nowhere to go.
4. After a couple seconds, the printer stops the priming sequence.
Epson's ink delivery system appears to be a sealed system, so when the ink has nowhere to go in step 3, little ink has actually escaped the new ink tanks. This means they're not primed correctly, and won't deliver ink as they need to when the printer goes to print. So unless the purge tube gets cleaned out, you can swap tanks and perform head cleanings until the cows come home and it won't do any good.
Now that there's a basic understanding of what's going on, here's how to try to fix the problem.
This guide is meant to be model-agnostic; I did this procedure to a Stylus CX5400 multifunction, but it should be similar for most Epson inkjets made in the past few years. It's unknown if new Epsons still have this problem, as it usually takes a year or more to surface.
The first thing you need to do is prepare your work surface. You'll need a big table, preferably one you don't care too much about. If all you have is your good kitchen table, then it's a good idea to slice open a tall kitchen garbage bag to make one large sheet, and tape it to the table to protect it.
Next, you'll need the following tools and supplies:
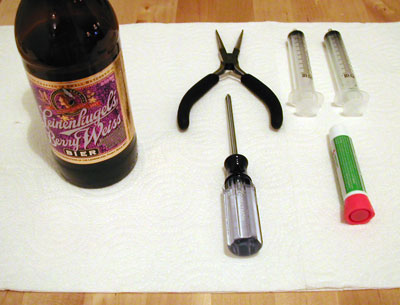
You'll need:
1. Needlenose pliers
2. Philips screwdriver
3. 10mL syringe (preferably two) -- see note on this below
4. Superglue for when you break something (you probably will break something, like I did)
5. Paper towels, lots and lots of paper towels
6. Your sanity-maintaining drink of choice
7. Two plastic cups (one filled with water, the other empty, not pictured)
8. An assistant, if you have one (not pictured)
9. Several hours to spend wrestling with the printer and getting ink all over the place (and yourself)
10. The willingness to buy a new printer if you end up breaking yours attempting the repair, or if the repair doesn't fix the problem (this is a big one)
Here's the note about the 10mL syringes: If you don't live with a chemist as I do, you can probably find 10mL syringes at a pharmacy or medical supply store. You need just the syringe itself; do not buy hypodermic syringes (the kind with the needle attached). You need to be able to attach the syringe to the tubing inside the printer. (I used a Becton Dickinson 301029 10mL Luer-Lock slip-tip non-sterile syringe, and found it to fit on the tubing well. The catheter-tip version may work better, though, as it ultimately has a narrower tip, which may allow it to be fitted to some of the smaller tubes.)
So here's the step-by-step:
1. On your computer, tell the printer you're going to replace the ink tanks. This is to get the printer to move the tank/print head assembly out of its home position, and also allow you to remove the tanks. Once the printer has moved the assembly and is waiting for you to replace the tanks, unplug the printer. If you try to turn the printer off with the button first, it will move the assembly back, so what you need to do is simply pull the power cord.
2. Disconnect the printer from the computer, remove the paper from the printer, and put the printer on your work surface.
3. Take out the ink tanks and set them on some paper towels out of the way.
4. Most likely you'll need to remove at least the printer's top cover in order to access the purge tube. If your printer is a multifunction, you'll have to remove the scanner assembly first. On the CX5400, it was a matter of removing two screws on the back by the hinges, then removing a panel on the left side and disconnecting the data cables. The scanner assembly then just lifted off and away. Your mileage may vary depending on the model you have, but I suspect the process is similar amongst the multifunction.
5. Most newer Epsons have two-part casings: a beige upper part, and a dark grey lower part. Usually it's just a few screws to remove the upper part. There may be a couple cables that need to be disconnected (for the power light and buttons, etc.) so check for this before you completely lift away the top cover.
6. You should, at this point, be looking at the printer's guts attached to the bottom cover. The purge tube is going to be on the right side of the printer (the right side is typically the home position; it's possible some printers may be different). On my CX5400, there's a white plastic tray that slides left and right based on which tank the printer is priming. Here's a pic of what the tray looks like when slid all the way to the right:
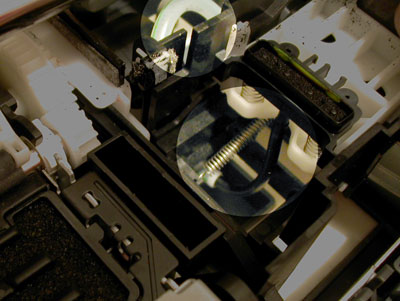
Notice the black hose coming from the bottom, and the clear hose that the black one connects to. This is the purge tube. From now on, things will be getting messy.
7. Look at the routing of the purge tube. It should come out of the ink tray, probably loop around some stuff and eventually empty into a waste ink storage area in the middle of the printer. If you can't see the entire path of the tube, you'll probably need to disassemble the printer further. Don't try to remove or disassemble any part of the printer's guts; just remove the guts from the bottom casing (this is done easily by removing a few screws).
8. Disconnect the tube at the ink tray and discharge end, and if the tube is segmented and easily removed from the printer, remove it. In the case of the CX5400, there are three parts to the purge tube -- there's a small black tube from the ink tray that connects to a longer, thicker clear tube, which then connects to a thinner clear tube mounted in the bottom casing of the printer. The thicker clear tube connects to the bottom tube via a hose clamp, illustrated below:
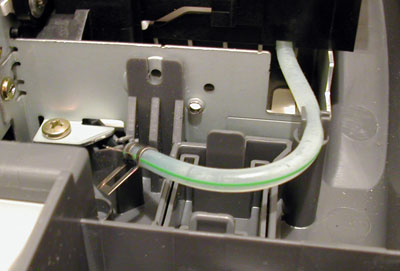
I had to remove the printer's guts from the bottom tray. I was able to remove the small black tube from the ink tray to the thick clear tube, but the thick clear tube was not removable.
9. Draw 10mL of water into one of the syringes. The thinner tubes are probably going to be too small to fit to the end of the syringe, but if you're careful, you can press the end of the tube up against the nozzle of the syringe and get a decent seal. Work over a sink, and shoot water through the hose. A surprising amount of ink may come out.
10. Repeat with whatever other purge tube segments you can remove from the printer. Keep moving water through the tube until the water comes out the other end clear.
11. If you can't remove a segment of tube from the printer, then you'll need to clear the tube in place. Attach a filled syringe to one end of the tube, and hold a cup under the other end. Slowly apply pressure to the pluger of the syringe. If you get resistance, apply more pressure. Be careful, though, because if you apply too much pressure, either the clog in the tube will clear in a rapid fashion and spray ink everywhere, or the syringe will fly off the tube and spray ink everywhere (both of which happened to me). If this happens, do your best to clean up what you can. If you regularly wear socks around the house, take them off -- I inadvertently stepped in some spilled ink and ended up tracking ink all over my kitchen floor without realizing it. Thankfully, Pergo laminate flooring doesn't stain easily, and I was able to wipe up the spilled ink without a problem.
12. If you can get water to move through the tube, continue to move water through it until it runs through clear. If you can get some water to move through it but it takes a good amount of pressure to do it, try reversing which end of the tube you attach the syringe to. You could also try attaching two syringes, one at each end, and move water back and forth in a push-pull fashion until the clog clears.
13. Once you have the tube cleared out, reassemble the tube pieces, and put the printer back together.
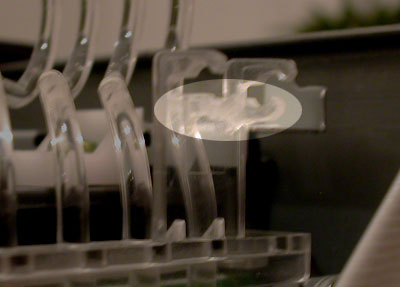
14. I made a mistake when putting my CX5400 back together and broke off a couple internal clips. The clips hold a plastic lever in place that tells the printer if the cover is open or closed. This is where you'll need the superglue. Here are the clips I broke off:
15. Put the casing back together in reverse order of how you disassembled it. Then reinstall the ink tanks and plug the printer back in. If all goes well, the printer will pick up where it left off -- it'll think you've installed new tanks and will run through the priming sequence. If not, either use the printer's control panel or the software on your computer to start the tank swap process again.
16. If you get error messages when you turn the printer on, check to make sure that all internal cables got put back where they belong. If that doesn't help, it's probably time for a new printer.
17. If the printer finished the priming sequence without a problem, try printing a test page. If it comes out blank, try cleaning the heads once. If that doesn't help, it's probably time for a new printer.
18. If you get output after printing a test page, then your problem was at least in part due to a clogged purge tube. If the output is poor, try removing and reinstalling the tanks again, or clean the heads a couple times. The output quality may return to normal. If that doesn't help, it's probably time for a new printer.
In my case, I got output after reassembling the printer, but it was poor. I cleaned the heads a few times and got the black, cyan and yellow working fine. But no matter what I did, the magenta barely printed any, even with a new tank. After wrestling with the printer and making an inky mess of my kitchen, I hurled it into the trash with disgust. The next day I bought a Canon Pixma MP450, which uses traditional cartridges (with the print heads built into the tank).
Ultimately, this technique can work for some, but not all. I read reports of it working successfully for some users, but not helping at all for others. Considering that the only other options are to replace the printer or take it to a repair facility (which would probably cost more than a new printer anyway), you don't have much to lose by trying this. Good luck!
| Attachment | Size |
|---|---|
| 27.86 KB | |
| 32.04 KB | |
| 23.4 KB | |
| 18.46 KB | |
| 3.91 KB |