Power Mac G4 (MDD) ATX Power Supply conversion
I've just picked up a mirror-door G4 for cheap, sold as a "won't power on" unit.
After a quick test, and it does power up with a re-wired ATX power supply.
I picked up a better PSU, with a rating closer to that of the original, and wanted to know if there was any interest in having the process documented.
There isn't too much out there on mirror-door to ATX conversions, despite their flaky power supplies, so if there's some interest, I'll snap some photos while I'm doing the wiring and installing.
From what limited info I've found on the MDD conversion, the 28V is only necessary if you're going to use the ADC conector, and probably firewire. I'm not planning to do either.
Here's where I started:
(thumbnails are clickable for larger image)

One dead MDD power supply. When I opened it up, I found the fuse was blown. Tried replacing it, but the new fuse blew as soon as it was connected to the mains. There's nothing visibly wrong that might have been an easy fix, and the PSU is pretty densely packed and has a lot of silicon caulk applied to keep components from shifting. Better to start from scratch...

This is the ATX extension I'll be using for the connector. I'd considered cutting the ATX connector off the new PSU and soldering wire to loom from the MDD PSU, but thought this would be a bit cleaner and gives me the option of salvaging the new PSU if something goes wrong.

The wiring loom has been cut from the old power supply, and is ready for soldering. I used heat-shrink tubing to cover the solder joints. It's nicer looking than my old stand-by, black tape, and makes a stronger connection.
I picked up a 500W Cooler Master PSU that has a nice 120mm fan and an open grill at the back that should allow for good ventilation inside the case. The PSU will be mounted above the optical drives...which is as far as I can tell the only place a regular size ATX PSU will fit in that case.

The wiring in progress. After double-checking the wiring here and here, it's down to connecting the right colours together.
There are more 3.3V and 12V lines on the MDD PSU than are provided by the ATX PSU, so I've attached two MDD wires to one ATX wire in a couple of spots.
The only issue I had here was the 4-pin extension. I didn't have a female connector for that, so I relented and cut the ATX supply wires and used some spare wire to make an extension that would keep those 4 wires the same total length as those going through the ATX connectors.
If I need to salvage the ATX PSU at some point, it's only 4 wires to reconnect.
And the link where I got my inspiration from:
http://efeion.blogspot.com/2007/12/power-supply-fun-part-2.html
I've now got the power supply installed.
Based on the Twilight in Efeion blog linked above, and from my own test fitting, a regular ATX PSU will not fit in the case anywhere except above the optical drives.
I decided to use cable ties, as they're strong enough to do the job, and easier than making brackets and using rivets or tapping threads in the case metal.
With the case on its side and the motherboard up out of the way, I drilled four 7/32" holes, roughly eyeballed to where the case will be sitting underneath. I made a starter hole using a small bit first, as a larger bit will wander around the case metal before getting a bite.
The case was given a good vacuum and any metal flash still stuck to the drilled holes was knocked off. Don't want little bits of metal falling off onto the mobo once it's all back together!

It took six cable ties in total to wrap around from the top to join up under the PSU once it was in place. Cable ties do chain together nicely.

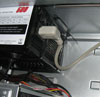
A view from the inside of the case.

Installed!
I threaded the power cord through where it would have connected to the old PSU. That's got to be addressed, as I want the G4 to look stock from the outside. I've got an idea for that...
One more check of the wiring, and then I transfered over my two hard drives from my Digital Audio G4.
OS X 10.4.10 boots fine, but waitaminit...OS 9 won't boot! What's going on???
Turns out the Mirror-Door G4 had its own special install of OS 9 and none other will work with it. Fortunately, I found I had the two-DVD install/restore discs kicking around.
I didn't want to mess up my OS 9 drive, so I installed the MDD OS 9 to a spare drive, then copied over just the system folder to my work drive. All better now.
Nearly done. Just have to work out that power supply connection to the outside of the case.
I've now finished the power supply, and the power cord plugs into the original location on the back of the G4.

Looking at the orignal power supply parts, I thought I'd be able to cut the casing up and connect a spare power cord to the old power connector.
note: to anyone considering this, the rest of this post deals with 120 VAC wiring, and care should be taken. Don't try this if you don't have experience with AC wiring. You can not only fry your computer, but yourself as well.

Here's the old casing cut up, and the cord that will lead from the ATX supply to the back of the case.
I used a jigsaw to cut the old case, then filed any flash and sharp edges with a file.
The cord is a right-angle one from a monitor, which should give me some extra room around the PCI slots.

Wire splices are done...in my case the two hots were black on the cable, and brown on the PSU; white and blue for neutrals and two greens for the ground. Verify your connections with a meter! Don't just trust the colours when working with 120 volts.

...and supported with cable ties. The pigtail connectors have also been wrapped in black tape for extra protection. The cable ties should prevent the pigtails from being moved or stressed.
There's only one hex-head nut that threads in from the back of the case to hold this on. Seems strong enough for me, but it wouldn't hurt to reinforce it.

Not much to see once it's installed. The wiring is hidden and protected by the old PSU's casing, and it looks stock from the back. Larger PCI cards will hit the power supply, but my SCSI card clears it and the power cord.

Back in business!
It looks completely stock from the outside, and I've managed to upgrade from my 867 MHz overclocked DA to Mirror-Door 1.25 GHz with a faster bus speed for a very reasonable price.
Original thread with discussion is located here
| Attachment | Size |
|---|---|
| 3.58 KB |
Comments
Very nice! I'm interested
Very nice!
I'm interested in how your modification changed the temperature characteristics of the case. The old PSU had two small fans that vented air to the outside. As you indicated in your forum posts, you thought about putting in a duct or attaching in a fan to the grill at the back. Since you first assembled the ATX PSU conversion, have you noticed an increase in heat that would lead you to doing one of those things?
-
Drew
Measuring the difference betw
Measuring the difference between stock and the ATX PSU is a bit tricky, since I received the G4 in non-working condition.
Depending on how accurate you believe the internal temperature sensor to be, I'm still getting good readings that don't seem to go above 37C. That's fine by me, so I haven't been motivated to add any ducting or additional fans.
MDD heat
See here also on that subject:
http://www.applefritter.com/node/23903
Nice! It's funny how much you
Nice! It's funny how much you can squeeze out of those used macs with a little effort. I mean, you can pick up one of the old Quicksilvers for under $200 in some places. Really nice article.
hi it is interest to me.recen
hi it is interest to me.recently,I also changed
my atx power for g4/400 motherboard to pc case,but I have a question
how to match the pc case led,reset and power,I use power plug but
boot fail.can u provide ur experence??
As long as you've correctly c
As long as you've correctly changed the wiring from the ATX power supply according to this link, you should at least be booting properly.
If you've done that correctly and it's still not working, I'd re-check your connections with a multi-meter.
Another wiring guide for the Sawtooth is here
Follow that link to page three, for wiring up the power/led buttons.
MDD power supply
Excellent how to, I considered an inexpensive MDD with the same problem. After reading about your repair I could kick myself for not buying.
MDD pin out
the pin out for MDD displayed at the link is incorrect (http://www.outofspec.com/frankenmac/wire.shtml) this is from the repair manual
This shows the correct config
http://www.xlr8yourmac.com/tips/MDD_ps_mods/MDD_PS_Mods.html
ATX in MDD 2003 single 1.25,Video output issue
I had the power supply in a 2003 G4 MDD fail 14 months after Apple store replacement. This is a single processor , no FW800 OS 9 bootable tower. I determined the PSU was junk. I found this and other links to replacing with ATX PSu. I purchased a Thermaltake TR2-430W unit. I also bought a 24 pin extension cable for the PSU. Wired according to posts. The Mac boots but the display is showing only vertical alternating black and red bars. I think this may have something to due with the stock video card lacking 24v input to the logic board? I installed an old ATI Xclaim 3D video card in one of the PCI slots and the machine will boot using Disk Warrior CD(rebuilt the directory (volume wrapper was damaged) or booting into single user mode and I can run fsck -y or Applejack, but on reboot machine hangs at gray screen with silver apple logo, spinning sunflower stops and machine is locked up. OSX 10.4.11, Video card is stock 4X AGP ATI Radeon 9000 Pro. This card has DVI and ADC ports. I tried using a DVI to VGA adapter and got no video output. I have repeatedly gone over the wiring. I have tried two different know working LCD displays with same result. any ideas?
Re: MDD pin out
The first link is the logic board connector, the second is the PSU connector. Both are correct for what they represent.
OK
Thanks for the clarification. Yes I see it now that you pointed it out. The xlr8 identifies the PSU supply cable. I'm not sure if the frankenmac site link explains that it is displaying the pin out on the logic board. I will be the first to admit I'm not an electronics genius. I used your post and did a cut and solder splice into the original psu cable. Matched color and voltage per pin designations/color/voltage.
I'm just trying to figure out the issue with the video display after wiring in the new ATX PSU.
The frakenmac site seems to indicate the need to supply the logic board with a + 24V dc input. Does anyone out there concur?
more to see
You need to check out this thread too if you haven't already:
http://www.applefritter.com/node/23451
It's partnered with this thread and addresses the 24v pin question.
re:more to see
I had already checked this thread. It doesn't really address the pin 14 issue. If the ATI Radeon card is pulled from the slot USB is dead.no keyboard or mouse response. There is no FW 800. The radeon card has ONLY DVI or ADC. With no voltage on pin 14 the display is red and black vertical lines. A small separate rectangle of the same will follow mouse movements. No usable image is displayed or even ghosted on the screen. If you check my previous post you will see the setup and explanation of what is going on.
>Eeun didn't bother providing power to the 28v connection, so evidently it's not needed for the MDD--or at least, not his MDD
That statement isn't a solution or clarification of the pin 14 usage. Look at the block diagram for the MB. There may be more to it than is appears. I will just walk away from this if I can't find a solution. I can't see spending another 30 bucks for a 24v wallwart if it isn't going to resolve the display issue. HEck it may be the card. I have another MDD I can use to test the card in. AS you can sense I am feeling a bit frustrated.
Thanks for the suggestion.
Yep, I hear what you're sayin
Yep, I hear what you're saying. The whole 28v pin question has never been really addressed conclusively. After Eeun's MDD conversion it seemed that the MDD might be different from the earlier G4's and didn't need any power going into that pin. There was always the question of how much power needed to go into the pin. Some were saying you could simply tap one of the 5v lines and it would work, so you might try that. Maybe having ADC on the video card is what makes the difference. With a quick scan here, I don't see if Eeun mentioned what kind of card he has in his machine. Maybe a non-ADC card means you can get away without power to the pin. I'd read others saying that without voltage to the pin, the machine won't even turn on, so that couldn't be true for the MDD. If it's is the ADC on the card that makes the difference, and tapping a 5v lines isn't sufficient, then instead of buying a wallwart for $30 to jolt your ADC card, you could buy a used PC Radeon 9800 for $30 and flash it with a Mac ROM and have a better card and problem solved. I haven't needed to experiment yet since all my QS and MDD psu's are still running fine.
Re: yep
Thanks for your thoughtful response.
I guess the thing bothering me most is the system seems to work. Startup chime is fine, I was able to get the system to boot in single user mode, and I have video output using the outdated ATI xclaim 3D card, yet when I boot using startup drive, this card in the PCI slot, the startup process 'hung' at the gray apple screen. I can only assume some sort of panic. I know the vid resolution is at whatever the default would be after resetting nvram. Again if I pull the card from the AGP 4x slot USB also dies. I am gonna give it a rest for now.
Yep and more
Like a dog with a bone. I have a MDD dual 1.25. Has the same AGP card. Pulled and installed card from singe MDD. Black and red vertical lines. The card is bad.
I just ordered an AGP card from applemacanix on ebay. A cheap one to check that things will work. I'm not confident yet that the new card won't get smoked.
I'm a bit gun-shy at this point. I'll post the outcome.
You mention FW800 not working
You mention FW800 not working, and I wondered if that architecture may be slightly different than my non-FW800 MDD.
I've never tried mine with a different video card, since the stock card was better than anything else I had on-hand.
I do have a flashed Geforce IImx, but you'll have to wait at least two or more weeks for me to test it once I'm out of being indisposed for a lengthy medical process and back at home. Thank God for mobile wireless and the eeepc...they've saved my sanity.
RE: FW800 not working
Actually it was USB that seemed to not be working if I pulled the stock card but...
Anyway this machine is a single 1.25 without FW800. Sorry for any confusion.
I would have liked to keep the stack card but it generates only vertical black and red bars...
It is the same Radeon 9000 Pro 4X agp card that is in my dual 1.25 MDDFw800 rig.
2003MDD single 1.25
It is now working , I will go into more detail. I installed a card bought from AppleMacanix. It is now working. Had a USB 2 PCI card that caused a kernel panic. Removed card, booted , all is well. Shut down, moved the card to a different PCI slot booted and viola', its all good. Now the problem is my second MDD FW800 dual 1.25. I move it over to let the wife use it and now it doesn't want to power up after I turn it off(unless you unplug the power cord and re plug) New pram battery, CUDA reset, power management stuff, everything I could think of. Had a power surge in the hood but I'm on a APC UPS so it didn't blink. I am getting tired of the hassles .
Advice to anyone wanting to put ATX PSU in MDD. Take out the video card before you do any mods. Make sure no cards are going to hit the PSU when closing! Make sure no cable are hitting cards also.
Not all MDD can boot into 9
If you have a Firewire 800 port, you will never be able to boot into 9. And a retail install of 9 should work on any Mac capable of running 9. I've never heard of any MDD that wouldn't install 9 from a retail disc.
hello, I have question,recent
hello, I have question,recently,I need assist someone for use atx power to this one.now,video card,I found dvi and vga all in one.and 16mb.can I use this one for machine???if I change atx power for this one.I know dvi's problem.how to affect in it???thx
DVI and VGA okay. ADC not okay
The problem is not with DVI, but with Apple's ADC connector, which powered the connected monitor as well as supplying the video signal. Since the ATX supply in my version is not supplying the 22-24V, the ADC connector on video cards will not have any power to drive a monitor.
If your card has a DVI and ADC connector, with the ATX conversion the DVI connector works fine. This is the setup I have. I'm using the DVI port with a VGA adaptor.
OK,I have another question.ur
OK,I have another question.ur answer remind me about dvi setup.by account,someone provide me mdd for dvi video card.he needs me to change atx power.so I know ur mean.and now,I just to acquire atx power to change pinout.don't worry about video card problem.right???
Yes, DVI will be okay.
Yes, DVI will be okay.
hello,about power,what kind o
hello,about power,what kind of atx power fit this machine??P4 or P5.I know it needs 300W. what is ur suggestion about power for me??thx
The original MDD PSU was 338W
The original MDD PSU was 338W, so you'd want at least a 350W ATX PSU. The ATI Radeon 9800--a video card that you could put in the MDD--requires at least a 350W PSU. The PC version of the Radeon 9800 is easy to flash a Mac ROM onto. Instructions here:
http://themacelite.wikidot.com/
The PC 9800 flashed to Mac will give you both a working DVI and a working VGA port, and since it is a PC version, it will not have the ADC power connector problem.
The type of PSU is simply dependent on how many available necessary power lines it has which you will have to rearrange to the correct pinout. You already know about the pinouts from your previous thread:
http://www.applefritter.com/node/23054
ATX PSU size
The power supply I'm using is 6" wide (as viewed from the front of the G4), 3.5" tall and 5.5" deep. That is standard for a regular ATX power supply. Mini and Micro-ATX supplies are available, but you'll still have similar mounting and clearance issues.
The power supply is pushed against the side of the G4 opposite the door. As others have mentioned, test fitting to make sure the video card does not hit the power supply is very important. Check the power supply cables as well for this.
hello,I have problem about G4
hello,I have problem about G4/400,recently,I acquire two video cards of agp interface.this card is adc and vga.when I plug slot.but it will not show screen.I don't know why??do I need to configure any program??thx
I just open new power supply for 350W.I found a problem.this one without white line.u know G4 MDD need to plug white line for 28V.if I don't connect this line.can I use this computer???
my computer is 300W psu
You should start a new thread
You should start a new thread in the PowerPC forum about the video cards. Not here.
Eeun says if you're not going to use ADC then you don't need the 28v line. ATX PSU's don't have 28v lines. If you intend to use an ATX PSU and ADC, then you're going to have to supply at least 24v to that line from an external power source. If you're going to do this conversion you really need to follow Eeun's instructions exactly. You could fry your motherboard otherwise.
Apple offered a replacement PSU for the MDD long ago because the originals were so noisy. The ideal would be good to get one of those if you can.
hello,go through one night ex
hello,go through one night experiment.the result is machine has no power up.match original power and website instruction.pinout is corrent.so If it is not plug white line.I guess it should not affect it.check it over and over again.I have no idea.last,I guess motherboard's problem.do u have any suggestion for me?thx
hello,I appriciate ur assist.
hello,I appriciate ur assist.this machine has inspected.I found mtoherboard's problem.and now.I am looking for another one for this machine.in truth,I learned a lot knowledge from here.especially this article,in taiwan,these informations are not easily found.so just ask this forum.since I became user.I have got many assists from every cyberfriend.so this time I can solve this case.you are always my hero.thx
ATX Power supply
Does anyone have a Specific PSU that works best? Also does any ATX PSU work? I'm looking at having a tight squeeze with my graphics card so I was wondering if there were any out there that are a little skinier and better suited for the MDD?
Any ATX-standard PSU should w
Any ATX-standard PSU should work. I can't remember the wattage of the original MDD PSU, but you'd want to match that or better.
You could conceivably shoehorn just about anything in there. There's mini-ATX supplies, but for their intended use they tend to be low power. All Electronics has a 300W server PSU that's a similar profile as the original PSU. Note that since they don't list dimensions I have zero idea if that would actually fit.
Re: Any ATX-standard PSU should w
Update to this hack:
Still running, still no problems thermal or otherwise.
I've received two MDD G4s, both with the same 2003 1.25 GHz specs as mine above, but completely stock.
What amazed me was how LOUD the stock PSU fans are! I'd read various sites referring to them as "wind tunnels", but I'd only ever used stock MDDs in fairly loud office/production environments, where there's more than enough noise to drown out a computer no matter how loud its fans are. But in a quiet home...yeesh!
I thought my modified G4 was noisy once the 120mm fan gets going, but it's got nothing on the stock PSU fans.
So, I'm sticking with my modified power supply for now, or perhaps I'll try some of the mods I've seen that swap out the stock PSU twin fans.
Either way, I've been shown an additional benefit of the ATX PSU hack.
Re: Any ATX-standard PSU should w
Pretty nuts, yeah? How'd they sell these things? I think I remember Apple offering a quieter replacement PSU for the MDD at one time. I wonder if anyone can confirm that? Sometimes my wife's G5 tower, while asleep, has a problem where the fans' controller defaults to max speed. That's something to hear. It's like your on the airport tarmac. I run to pull the plug.
My conversion
350W ATX in P58.jpg