Cracking Open the Time Capsule
Like most computer users, I used to only back up my data occasionally (if ever). Maybe once a year I'd burn a DVD with my most important files and stick it in a drawer somewhere, but that was about all the more protection I gave myself against data loss. It's not that I didn't care about my data; I simply didn't have the time to spend to set up a full backup solution. When Apple's Time Capsule -- a wireless router with a built-in hard drive -- was announced at the 2008 Macworld Expo, I knew I needed one. It would work with Time Machine, the built-in backup software in OS X 10.5, to quietly and seamlessly back up the hard drives in both my own and my wife's Macs.
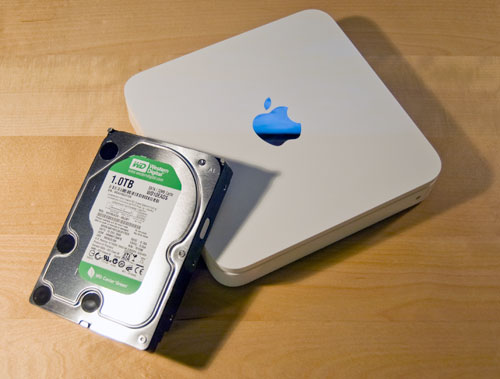
Overall, Time Capsule is a great product -- a draft-802.11n wireless router, 3-port gigabit Ethernet switch, and hard drive all in one compact unit. It even sports a USB 2.0 port for connecting a printer or external hard drive to share over the network. I picked up a 500GB model as soon as they hit store shelves; I could have opted for the 1TB unit, but felt that almost $500 for it was a bit excessive. When I got it home and set it up, it worked perfectly, except I soon realized that the internal hard drive, which Apple calls "server-grade," was fairly noisy and ran hot.
My Time Capsule sits on my desk; I didn't want to stuff it in a corner somewhere, as I didn't want to reduce its wireless range (especially since there are no external antenna ports to which I could attach high-gain antennas, as I had with my previous Linksys wireless router). I lived with the noise, and worried about the hard drive's longevity due to the heat it produced, for about nine months before deciding to do something about it.
First, some background on the Time Capsule's innards. It is, more or less, an AirPort Extreme base station with an internal single-channel SATA bus. The firmware for the Time Capsule is set up to dedicate the internal drive solely for Time Machine. All of the Ethernet ports are of the gigabit variety, as large backups over 100Mbit would be, well, unbearable. The unit has air vents around its base, and has an internal fan, in an effort to keep the hard drive cool. Unfortunately, the airflow through the case still seems to be pretty poor, so when the hard drive has been running for a while (say, during Time Machine's initial backup), the fan ultimately needs to run full speed and is thus quite noisy.
Depending on the model of Time Capsule you buy, you'll end up with one of two drive models: a 500GB Seagate ST3500630NS or 1TB Hitachi Deskstar 7K1000. Apple markets the drives in the two Time Capsule models as "server-grade;" I've read a number of blog posts claiming that these models don't qualify as being "server-grade." So, perhaps to throw some logic into the argument, let's take a closer look at the 500GB Seagate drive that Apple uses.
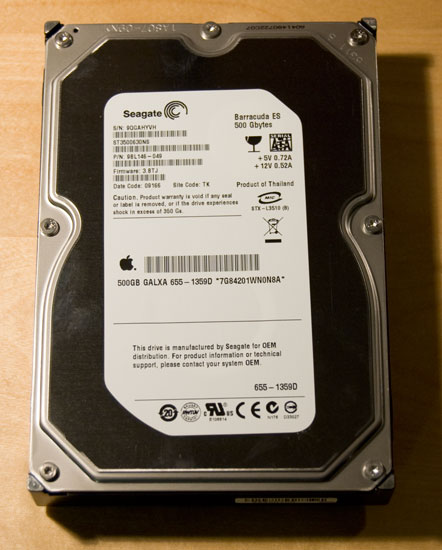
Figure 1. Seagate ST3500630NS SATA hard drive, as found in the 500GB Time Capsule.
There are four choices of interface that you can choose from when buying a hard drive from Seagate (or most other brands): ATA (also called IDE); SCSI; Serial ATA (SATA); and SAS (Serial Attached SCSI). The latter two have some interoperability (SATA drives will work with SAS controllers and SAS drive backplanes, and many low-end SAS drives are actually SATA models with a few changes to their controller boards), and both are quickly taking over as the interface of choice in servers. SAS drives work best in RAID arrays, not as single drives, so it's quite rare to see them used in workstations. Thus, I think it's fair to say that any SAS drive could be safely called "server-grade."
SATA drives exist in a kind of limbo. While they're a direct successor to ATA, their enhanced performance and simplified interface connection has expanded their role in computing. The vast majority of laptops and desktops being sold today use SATA hard drives, but many low- and mid-range servers offer them as well. Specifically, Seagate offers two categories for its 3.5" SATA drives: AS and NS (you can tell which category a Seagate drive belongs to by looking at the end of its model number, which will end in one of those two suffixes). Seagate also separates SATA drives into several product lines, based on various factors (such as intended market or controller board generation; for example, at the time of this writing Seagate had four product lines for its AS-series 3.5" drives: 7200.9, 7200.10, 7200.11 and 7200.12). In the end, though, the category a drive is in determines, roughly, its intended purpose.
AS-series drives are, for the most part, considered for desktop use. They have the lowest MTBF (mean time before failure) and the lowest cost. NS-series drives are the next step up, offering longer MTBF and are better-suited for running 24x7, but at the cost of noise and heat output. Seagate rates the ST3500630AS drive as having an MTBF of 700,000 hours; the ST3500630NS -- the same drive that came in my Time Capsule -- is rated for 1.2 million hours.
So, at least for the drive in the 500GB Time Capsule, it seems pretty accurate to call it "server-grade" since it's effectively the best SATA drive Seagate makes (at least for now), and in my own experience is very popular for use in data centers.
But there's an even better question to ask: Does Time Capsule even need a "server-grade" drive to begin with? Those Seagate NS drives are rated for 1.2 million hours MTBF, which, if operated continuously, would mean a drive would fail, on average, every 137 years or so. Even if run continuously, a Seagate AS-series drive would run, on average, for 80 years before failing. I'm not sure about you, but my Time Capsule will likely have long since been removed from duty by the time either 80 or 137 years rolls around. (The reason higher MTBF is important in servers is that most of them have more than one drive. RAID arrays are designed to be redundant in that a drive can fail without affecting the integrity of the data on the rest of the drives, but in many cases, two simultaneous drive failures is enough to lose everything. Higher MTBF, simply enough, makes it less statistically probable for multiple drives to fail within a limited period of time from each other.)
So, MTBF doesn't really matter from a statistical standpoint when it comes to Time Capsule. It also doesn't really matter from a practical standpoint either, in that Time Capsule itself is designed to be a backup of data that exists elsewhere. Just by owning a Time Capsule and using Time Machine, the hard drive in either your computer or Time Capsule can fail and your data will be safe.
One factor that does affect hard drive longevity is heat. Apple actually negated the benefits of using a "server-grade" hard drive in the Time Capsule by implementing poor case ventilation. "Server-grade" drives are intended to be installed in servers that have well-designed internal ventilation, and many of those servers are installed in climate-controlled data centers. Desktop-class drives run cooler and are designed for use in systems with less ventilation.
While not a concern when it comes to longevity, noise is also a design consideration that Apple had with the Time Capsule but ultimately contradicted with its choice of hard drive. Its internal fan is variable-speed and temperature-controlled, so it will only turn on when the hard drive gets to a certain temperature, and even then will only spin as fast as necessary to keep the temperature below a certain threshold. A drive that runs hotter to begin with will make the fan run more often and faster, and thus be more noisy. Also, "server-grade" drives are also often designed without regard to their noise output as, again, most will see duty inside a data center, where noise level doesn't really matter.
There's also one more, somewhat minor concern with using a "server-grade" drive in Time Capsule: Power draw. Time Capsule was designed, thankfully, with an internal AC power supply, meaning that a "wall-wart" AC-to-DC transformer isn't necessary. However, the power supply inside Time Capsule is pretty small; I certainly wouldn't want to try to power a 15,000-rpm SAS drive off of it. "Server-grade" drives will tend to draw more power than desktop-class drives, which would cause Time Capsule's power supply to work harder and run hotter, which would cause the fan to run more often...you get the idea.
So, since we've thoroughly dissected why "server-grade" drives in Time Capsule actually can be counterproductive, let's look at the qualities we'd want in a drive ideal for Time Capsule:
1. Large capacity. One of the best features of Time Machine is that it not only grabs a "snapshot" of everything on your hard drive, but it will also back up changed files every hour. That means, if your computer's hard drive dies, you can restore your data back to a point in time no later than an hour ago. Also, you're able to restore individual files back to any point in time, so if you're working on a file, save a change, and suddenly realize you just overwrote other parts of the file you wanted to keep, you can restore just that file from the last time it was backed up -- again, no later than an hour ago. But having a large-capacity drive in Time Capsule is useful for storing not just the "snapshot" of your whole computer, but also all of those incrementally-changed files that get backed up every hour. Add to that the fact that one of Time Capsule's main selling points is that you can back up multiple Macs to it, and suddenly it becomes even more important to have a large drive. 500GB is the bare minimum size I'd want in Time Capsule; 1TB is much better.
2. Cool-running. For reasons explained above, an ideal drive would need to run with a minimum of heat generation.
3. Energy-efficient. This is one of the buzzwords bantered about all the time these days, and it can get a bit annoying. Yes, it would be nice for a hard drive to use less power so as to help the environment. But an energy-efficient drive also makes Time Capsule's power supply work a little less hard.
4. Quiet. Unless the drive runs hot, Time Capsule will not start its internal fan, meaning any noise you hear from it is being generated by the drive itself. If your Time Capsule sits within earshot (like mine), a loud hard drive can be distracting, especially when it spins up and down.
5. Performance doesn't matter. Generally with computing, you want to get the best bang for your buck. The faster, the better. But in the case of Time Capsule's hard drive, speed doesn't matter at all, as any drive you put in it will never reach its maximum throughput. This is because all of the data in and out of Time Capsule goes through gigabit Ethernet, which has a theoretical maxmimum of 125MB per second. In reality, though, that figure is much lower. In a real-life test, I got a maximum of 12.58MB per second in a transfer of 700MB of data from my iMac to Time Capsule via gigabit Ethernet. Even the slowest SATA drive on the market won't impede backup performance, so there's no reason to sacrifice the above four qualities for speed that you won't even use.
So now that I've made you read all that, I can tell you that ultimately I chose to replace the drive in my Time Capsule with a 1TB Western Digital WD10EADS. It's the second generation of their "GreenPower" series of drives, and is far superior to its predecessor, the WD10EACS, in many ways (while only costing about $10 more). It also meets all of the above qualities for an ideal Time Capsule drive. 1TB of storage is plenty for my needs, and at a cost of $110, the upgrade cost is pretty reasonable (considering Apple charges an additional $200 for a 1TB Time Capsule over the 500GB model, and by upgrading yourself you get to keep the drive you pull out of your Time Capsule too).
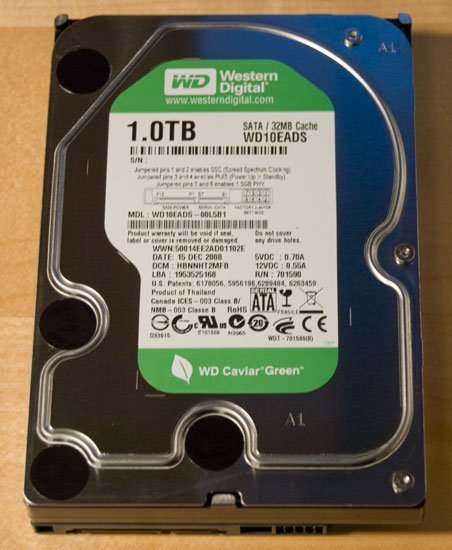
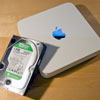
Figure 2. Western Digital WD10EADS 1TB "GreenPower" SATA hard drive.
Swapping the drive is pretty simple, but a little tricky without guidance. Here's how to do it.
First, if you plan on selling or giving away the old drive from your Time Capsule, or otherwise don't want the data it contains to be accessed by anyone, skip to step 15 below to see how to format it. Then come back here.
1. Set something down on your work surface to protect Time Capsule's casing from scratches -- a towel or even an antistatic bag should suffice.
2. Disconnect all of the cables from your Time Capsule and lay it upside-down, with the ports facing you.
3. The screws that we need to remove are hidden underneath the rubber base of the Time Capsule. The base is held on with a simple layer of strong, but removable, adhesive. Getting the adhesive warm helps soften its grip, so use a hair dryer or heat gun to gently warm the rubber base. Don't get it too hot, just get it reasonably warm. I got my heat gun at Home Depot for $30 in the paint section. No matter what, do not use a chemical adhesive remover (like Goo Gone), as the metal plate underneath is perforated and it'll end up dripping inside.
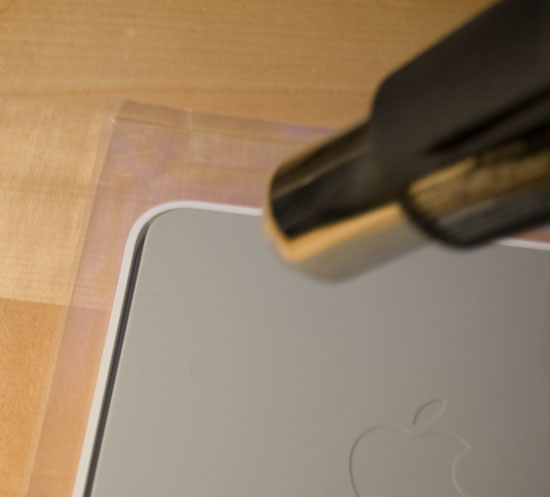
Figure 3. Use a hair dryer or heat gun to warm the rubber base and soften the adhesive securing it.
4. Pry up a corner of the rubber base and start to slowly peel it away from the metal plate underneath. Don't pull too hard or too fast, or let the adhesive get too cool, or else the rubber base can tear (trust me on this). If necessary, reheat the area where the base and bottom plate are still stuck together as you peel the base off.
5. If you applied enough heat when peeling the base off, most of the adhesive will have stayed on the base itself and can be reused -- it's pretty sticky stuff. Set the base aside for reinstallation later.
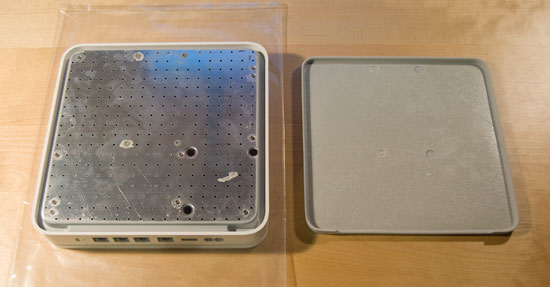
Figure 4. Time Capsule with rubber base removed.
6. Use a #0 Philips screwdriver to remove the screws circled here. This is the only size screwdriver, and only other tool, you will need for this project. (My #0 screwdriver is a Craftsman model 41649.)
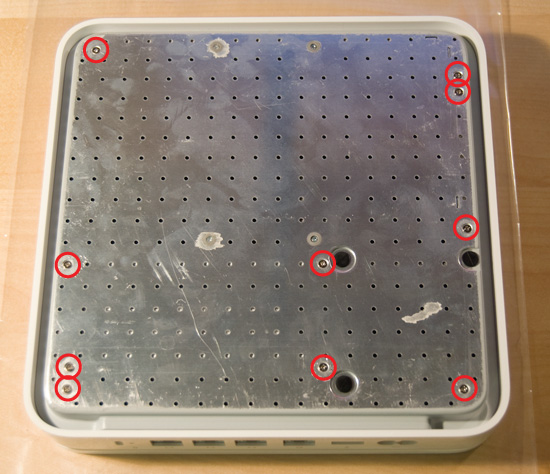
Figure 5. The screws to remove so the Time Capsule can be opened.
7. Carefully pick the metal base plate up and hinge it to your right. Be careful -- the fan is still attached to the bottom plate, and the cable connecting it to the Time Capsule is short. You'll end up with your Time Capsule splayed open like this:
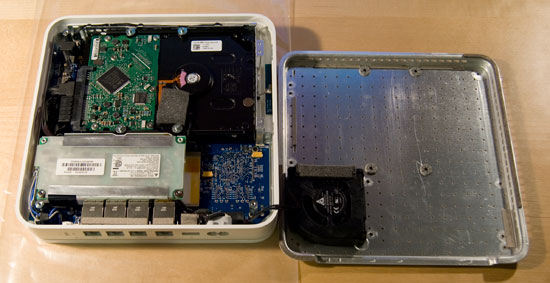
Figure 6. Time Capsule with base removed.
8. Before you can pull the old hard drive out, you need to remove the thermal sensor Time Capsule uses for the fan. It's held to the drive with a plastic bracket, stuck down with a piece of self-adhesive foam. Carefully peel the foam off of the drive, and the bracket will come with it. The adhesive on the foam is also strong enough to be reused on the new drive. Here is what the foam and sensor, removed from the drive and flipped upside-down, looks like:
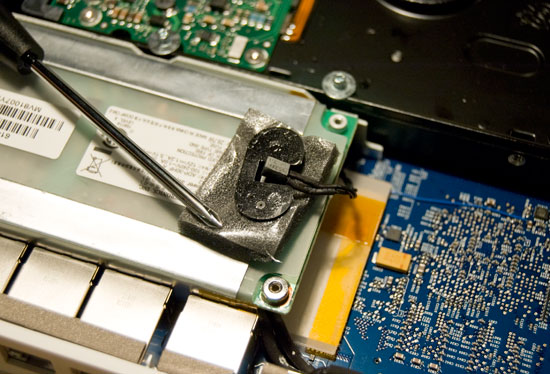
Figure 7. The thermal sensor that controls Time Capsule's fan operation, with #0 screwdriver for scale.
9. Pick up the edge of the drive closest to the front edge of the Time Capsule (that is, the edge facing away from you) and tilt the drive towards you. The power and data cables for the drive are short, so you don't want to damage them. Both cables' plugs are just friction-fit onto their respective connectors on the drive.
10. With your screwdriver, remove the four standoffs from the bottom of the old drive. When Time Capsule is sitting right-side up, these standoffs fit into rubber grommets in the metal bottom plate, which helps isolation-mount the drive to mitigate vibration (and thus, noise). Install these standoffs onto your new drive.
11. Connect the new drive the same way you disconnected the old one, and lay it into the drive cavity.
12. Depending on which replacement drive you're installing, you may have to reinstall the temperature sensor in a different area on the drive than where it came off of the old one. I'd recommend reinstalling it closer to the middle of the drive (where the spindle motor is) than the outside edge, so the fan will kick in sooner rather than later as the drive heats up. Remember to keep the flat side of the thermal sensor against the surface of the drive casing.
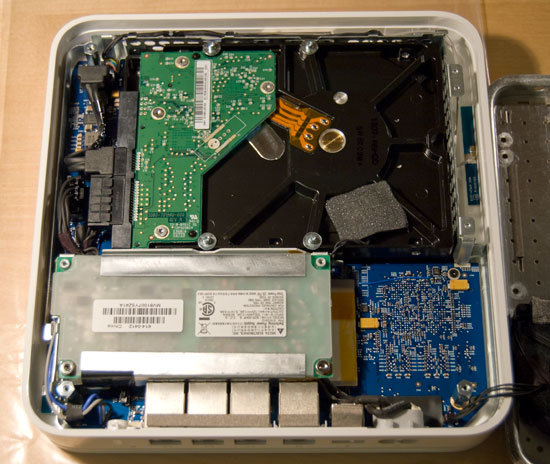
Figure 8. Time Capsule with new WD hard drive installed.
13. Flip the metal bottom plate back into place, and reinstall the screws. All of the screws for the bottom are the same size, so you don't have to worry about getting them back into the same holes they came out of.
14. If the adhesive on the rubber base is still sufficiently tacky, simply line up an edge of the base and press it back into place. If the adhesive is trashed, either some thin double-sided tape or rubber cement (applied to the rubber base, not the metal plate directly) should be enough to keep it stuck on.
15. You're all done with the hardware portion of the upgrade. Now, all you have to do is plug the cables back into your Time Capsule, and after it boots, launch AirPort Utility from the Utilities folder on your Mac. Select your Time Capsule from the left pane, then click the Manual Setup button.
16. Click on the Disks tab at the top, and you'll notice that there's nothing listed under "Time Capsule Disk" in the disk list, though the "Capacity:" field to the right should list the size of the hard drive you installed. You need to format the drive before it can be used, so simply click on the Erase button.

Figure 9. AirPort Utility's drive configuration page.
17. Now, give the drive a name in the next dialog and choose Quick Erase. If you're formatting the old drive before removing it, the Zero Out Data option is more secure, in that it will prevent casual snoopers from getting any of the backed-up data you may already have on the drive. This option will take significantly longer than Quick Erase -- several hours or more, depending on if you have a 500GB or 1TB Time Capsule.
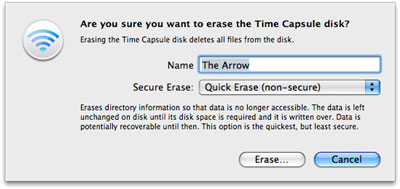
Figure 10. Formatting options for Time Capsule drive.
18. When it's done formatting, you're all set!
After installing the WD10EADS in my own Time Capsule, the fan never turned on during the initial backup of my iMac, about 250GB of data. The top of the casing feels much less warm with the drive running than it did when the original Seagate drive was installed, but the biggest improvement is in the noise output. I used to be able to hear the Seagate spin up, seek, and spin down very clearly, even from 4 or 5 feet away; with the GreenPower drive, I have to be within about a 1-foot radius of the Time Capsule and be paying attention in order to hear it at all. I also haven't noticed any change in backup speed from the old drive to the new.
Overall, I still think Time Capsule is a good product; while $300 is a good chunk of change to drop on a draft-N wireless router with built-in 500GB hard drive, the fact it ties in with Time Machine so nicely, and works with multiple Macs, makes it worth it. Drop another $100 on a cool-running, quiet terabyte drive, and you'll not only save $100 over Apple's 1TB Time Capsule, but get a superior end result -- and a spare 500GB hard drive to boot.
| Attachment | Size |
|---|---|
| 3.67 KB | |
| 31.64 KB | |
| 46.97 KB | |
| 53.72 KB | |
| 21.12 KB | |
| 28.52 KB | |
| 92.77 KB | |
| 40.88 KB | |
| 65.63 KB | |
| 72.4 KB | |
| 29.96 KB | |
| 20.08 KB |
Comments
Reports [url=http://www.tuaw.
Reports are surfacing of Time Capsule power supplies dying when the unit is about 18 months old. The #1 killer of power supplies (other than due to a power spike) is heat; unmodified Time Capsules are known to run pretty hot. So here's proof that you can benefit from replacing your TC's drive with one that runs cooler.
Hi everybody: I just upgrade
Hi everybody:
First of all, thanks for this fantastic guide!
I just upgrade my 500Gb Time Capsule with an 1,5 Tb WD Caviar Green 32Mb.
All the process was fine but i see a difference with the stock HD:
With the Seagate stock HD, when i didn't access to the disk for 1-2 minutes, the HD entry into standby mode and stops spin.
Instead, the WD HD never entry into standby mode and always is spin.
I try another Seagate HD (Barracuda 7200.11 with 320 Gb) and go to standby mode too (like the Barracuda ES).
I think the WD should go into standby mode to further reduce the heat.
Someone with the same problem?
Re: Cracking Open the Time Capsule
Dilbird:
Trying to replace the HD in my (new-ish) time capsule.
(Old HD died)
Power supply is fine.
Really. all voltages show up fine on the new drive pins.
From bottom-up 12, 12, 12; 0, 2.4(floating), 0; 5.1, 5.1, 5.1; 0,0,0; 0,0,0,
New drive won't show up on set-up.
Applefritter:
In regards to your Time Capsule question, do you know if the drive is actually spinning up when the TC is supplied power? If the drive spins up, open up AirPort Utility, click the Disks tab and see if your window looks like this:
http://www.applefritter.com/files/utility1.jpg
Since it’s a new drive there won’t be any TC-usable volumes on it, so no volumes will appear in the list. However, if the Time Capsule is working OK hardware-wise, you should be able to click the Erase button and that will format the new drive so the TC can use it.
Dilbird:
Thanks for response.
I followed the on-line write up exactly.
The OLD drive did not spin up.
The new does spin up but does NOT allow an erase (format) function from Airprt Utility.
Nothing comes up there where it should on the right side.
For the heck of it, I had a good used SATA drive swapped out from an old MBPro.
Strange to see that it also did not spin up (or was too quiet to hear)
And, it also didn't show up in Airport Utility -disk -erase.
Apple now says they'll send me a new TC, provided the old one is untampered. ahem..
Either way, I now have a spare drive.
I ordered the WD10EADS to match the article.
I see I was actually shipped the WD10EARS, which looks the same with a larger buffer.
I would think it would have worked after looking at the specs comparisons.
Applefritter:
Ah, so you were trying the upgrade with one of the EARS drives...those are a newer breed of drive that use larger sectors and have caused compatibility problems with many operating systems. I can’t say I’m surprised to hear that the Time Capsule has problems with them too.
Should you decide to give installing that drive a go again, it sounds like you can jumper pins 7-8 on the drive to have it switch back to the previous sector size, which presumably would get it working in the Time Capsule. Here’s a doc from Western Digital that explains what the new sector size is all about:
http://products.wdc.com/Library/Flyer/ENG/2178-771123.pdf
Dilbird:
That's really useful info. I much appreciate it.
I saw that notice on the drive, but according to it Mac OS use..
"NA No additional preparation required. Drive is ready to use as is."
Looks that's not quite true.
I still am surprised that the Fujitsu MHY2120BH serial ATA drive from my old MBP wouldn't work either.
Shouldn't it have?
I couldn't ever hear it spin.
The EARS one definately did.
Applefritter:
Time Capsule itself doesn’t run Mac OS, but rather a customized build of NetBSD. Seeing as when it was originally designed the Advanced Format drives didn’t exist, Apple never built in support for them.
Not sure why your MBP drive didn’t want to work — one would think that it should.
Dilbird:
It can be so hard to find good tech support.
It really is great to get this kind of help from people who really do know. THANKS.
Re: Cracking Open the Time Capsule
Thanks for this great step-by-step guide. Very useful.
I replaced my 500GB with a 2.0TB Seagate Barracuda LP SATA II 32MB Hard Drive (which cost me $105 at macsales.com). I put my old 500GB drive in a OWC Mercury Elite-AL Pro Oxford 934 FireWire & USB 2.0-1.1 Enclosure Kit for $50 (firewire 400 not 800) and transferred the time machine data over to the new drive. Not including the transfer time- the whole process took about 20 minutes.
Now I can back up multiple computers on 2TB time machine without running out of space and have a 500GB drive. And as others reported- my new drive is whisper quiet. I can't even tell it's backing up.
One note on the instructions- on step 10, my #0 screwdriver wasn't able to loosen the screws. in fact it started to strip them. I used needle-nosed pliers that had grippy teeth and gently loosened them.
Re: Cracking Open the Time Capsule
is there a difinitive source that says what is the maximum size of an upgrade drive for each model of Time Capsule? I know to avoid the Advanced Format 4k sector drives...
Re: Cracking Open the Time Capsule
I don't think any manufacturers make non-4k sector drives larger than 2TB, unfortunately.
Also, it looks like someone at Apple might have seen this guide, look what the most recent version of Time Capsules ship with as drives:
http://www.hardmac.com/articles/402/page2
Re: Cracking Open the Time Capsule
Thanks to this well written guide, I cracked open my Time Capsule (Model A1254-Originally 1TB. Firmware 7.5.2) and replaced the drive with a 2GB green WD (EADS). Spent more time taking off the rubber backing than anything else. Thank you so much!
I keep my TC in another room, so can not hear if it is spinning up/down - or if the fan is going on/off. IMHO, the case definitely feels hot - I can feel the vibration of the drive spinning, every time I check it.
Is there a way to test whether it drive spins down without disassembling again? Can the fan be tested without direct observation?
Thanks!
SilverDuke
Re: Cracking Open the Time Capsule
I wish I'd read this a few months ago, before my TC power supply went kaput. As it is, I was able to use the first half of these instructions to salvage the drive itself, put it in a $15 enclosure from Amazon and presto, have a half gig USB drive. Thank you!
Re: Cracking Open the Time Capsule
Killer work man! You did a very good job of explaining the process. I was able to take my old time Machine and upgrade to a 1 T back up for $100.
Thank you very much.
Re: Cracking Open the Time Capsule
Thanks a lot for your profound instruction, dr. Webster. It took me no more than 5 minutes and the result is very good! This kind of tuning makes the time capsule a very good and affordable product indeed.
Keep on going!
Egreer
Re: Cracking Open the Time Capsule
This guide was very thorough right down to the reformatting of the internal drive which most sites are sorely lacking. I am currently trying to format the new drive (Samsung Barracuda Green HD105SI) that I bought in the Time Capsule. Currently the Airport is stuck on "Finishing Disk Erase". It's been "finishing" for the past 4 hours. Quite honestly, I don't believe that "finishing" should take longer to perform than the actual erasing which last all of about an hour. The only other information that I can add is that the drive sounds like it's "snagging" a consistent clickingesque sound that happens in an intervals of about 30 seconds. Any suggestions? My only other thought would be to get a different drive, or purchase an enclosure and try to format it and then install it. Any assistance that can be offered would be greatly appreciated!
Thanks,
~Shane
Re: Cracking Open the Time Capsule
I've just fitted a 2TB WD20EARX to my TC (this is the current model from WD as of 2013). All went very easily and backing up beautifully, but I think I have the problem of the drive not spinning down - I think! I have done the cooling fan mod to my TC so not sure if it's fan noise I can hear. I'll be investigating this further and will update soon but I have read elsewhere that putting the TC into Spotlight Privacy will help stop the drive been kept awake by Spotlight. So I've done that but as soon as I wake my Mac from sleep spotlight Privacy pane is blank.
Re: Cracking Open the Time Capsule
After recently replacing my 1st gen Time Capsule (the one listed above) with one of the new 2013 models, I hooked the old one up separately so I could have it securely wipe the drive. While the GreenPower drives do run cooler than the original Seagate drives that shipped with these units, they still generate a considerable amount of heat. Long story short -- I wasn't willing to have the drive run for a full 7-pass reformat at the temperatures it was generating. The easy solution is to force the internal fan to run at full speed, which is done by simply disconnecting the hard drive temperature sensor from the logic board. Internal temperatures fell to a much more acceptable level afterwards.
If you keep your Time Capsule out of earshot, it might be worthwhile to do this mod and just leave the unit that way.
That said, if your original Time Capsule has failed or is threatening to fail -- just buy one of the new models. They're superior in every way, including noise and cooling.
Thanks!
Thanks so much for posting these thorough instructions. I just disassembled my 2008 TimeCapsule (power supply died years ago) and hope to recover the files when the new housing arrives in a few days.