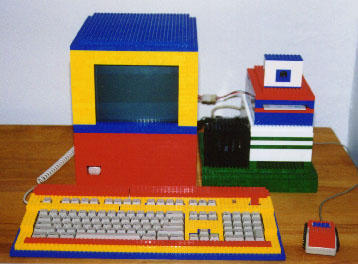
Compubrick SE
Apple's Jonathan computer could have revolutionized the industry. Instead of placing everything inside the main chasis, the Jonathan would have a backplane into which "books" containing different componets could be inserted. A user could start out by purchasing the bare minimum, and then add cards to the system as their needs grew. The Jonathan would even be able to accept cards containt different operating systems, making it a truly cross platform computer. But alas, the Apple executives were concerned that such a capability would result in users switching to MS-DOS, and so the Jonathan and its componet-based design were killed. It is a concept, however, that lends itself quite well to builing blocks...
It started life as an ordinary Macintosh SE. It had a rough life this, Mac SE. Not only was the case in horrible, but a look inside revealed that the computer was on its second crt, as well. Barely worth the $5 I paid for it, the Mac SE sat neglected in the summer house for months. And then, one day, it was called upon to become the next Compubrick...
At first, I had planned to have the cathode ray tube and power supply as seperate entities. However, the power supply connects only to the analog board, so there's really no point in seperating it from the monitor. Additionally, the power supply's cable would have been a real pain to lengthen.
The monitor/power supply was by far the hardest componet to make. As can be seen in the top-most picture, the analog board extends signifigantly further down than the crt does. This makes for lot of wasted space in the final unit. Next time I work with a compact Mac, I may try cutting the analog board down so that it fits better.
This is the back of the unit. The black square above the power supply is where the fan is, covered in an erector set piece. To the left of the power supply is a lot of empty space. The log cable coming out of the center provides power to the motherboard. It originally wasn't long enough, so I had to extend it myself. The shorter cable provides power to the hard drive.
The motherboard proved incredibly simple to design. It fits perfectly upon the baseplate I had. I just had to run some bricks along the sides, and then do the top. The roof proved a bit unsturdy, so I ended up glueing those pieces into place.
By housing the speaker seperately, it can be placed in whatever position sounds best. Seeing as this is a stock Mac SE speaker, it probably won't sound especially good anywhere, but that's besides the point.
The hard drive turned out especially well. It uses external SCSI for simplicity's sake, but still relies upon the Mac SE's power supply for power. This makes the hard drive case smaller, and removes the need for another thick, heavy power cable.
Instead of using the disk drive in the Mac SE, I adapted an external model as it already had the cable attached. The drive I used was a genuine Apple drive with a Sony mechanism, and I removed the case, so there is essentially no difference. If you look at the drive above, you'll notice that the brick to the right of the drive's opening is angled. That's so the eject button can be reached - but only with a paper clip, of course!
What a mess! Building the Compubrick SE took countless hours and sixteen bins of MEGA BLOKS. To anybody in the York area looking to buy MEGA BLOKS: the KB Toys in the West Manchester Mall still has a few bins, but otherwise, good luck!

