I got an A2 Astec AA11404 PSU. Not the later -B version
It was dead, so I did a total recap. In and several that I have done in the past that was all that was needed. But those were all -B units.
When I pluged this one in to test votages, the fuse made a relitivly large exposion !! it made 3/4" burn mark on the mettal case with a rectifier in the way!
Well, obviously somethig is wrong.
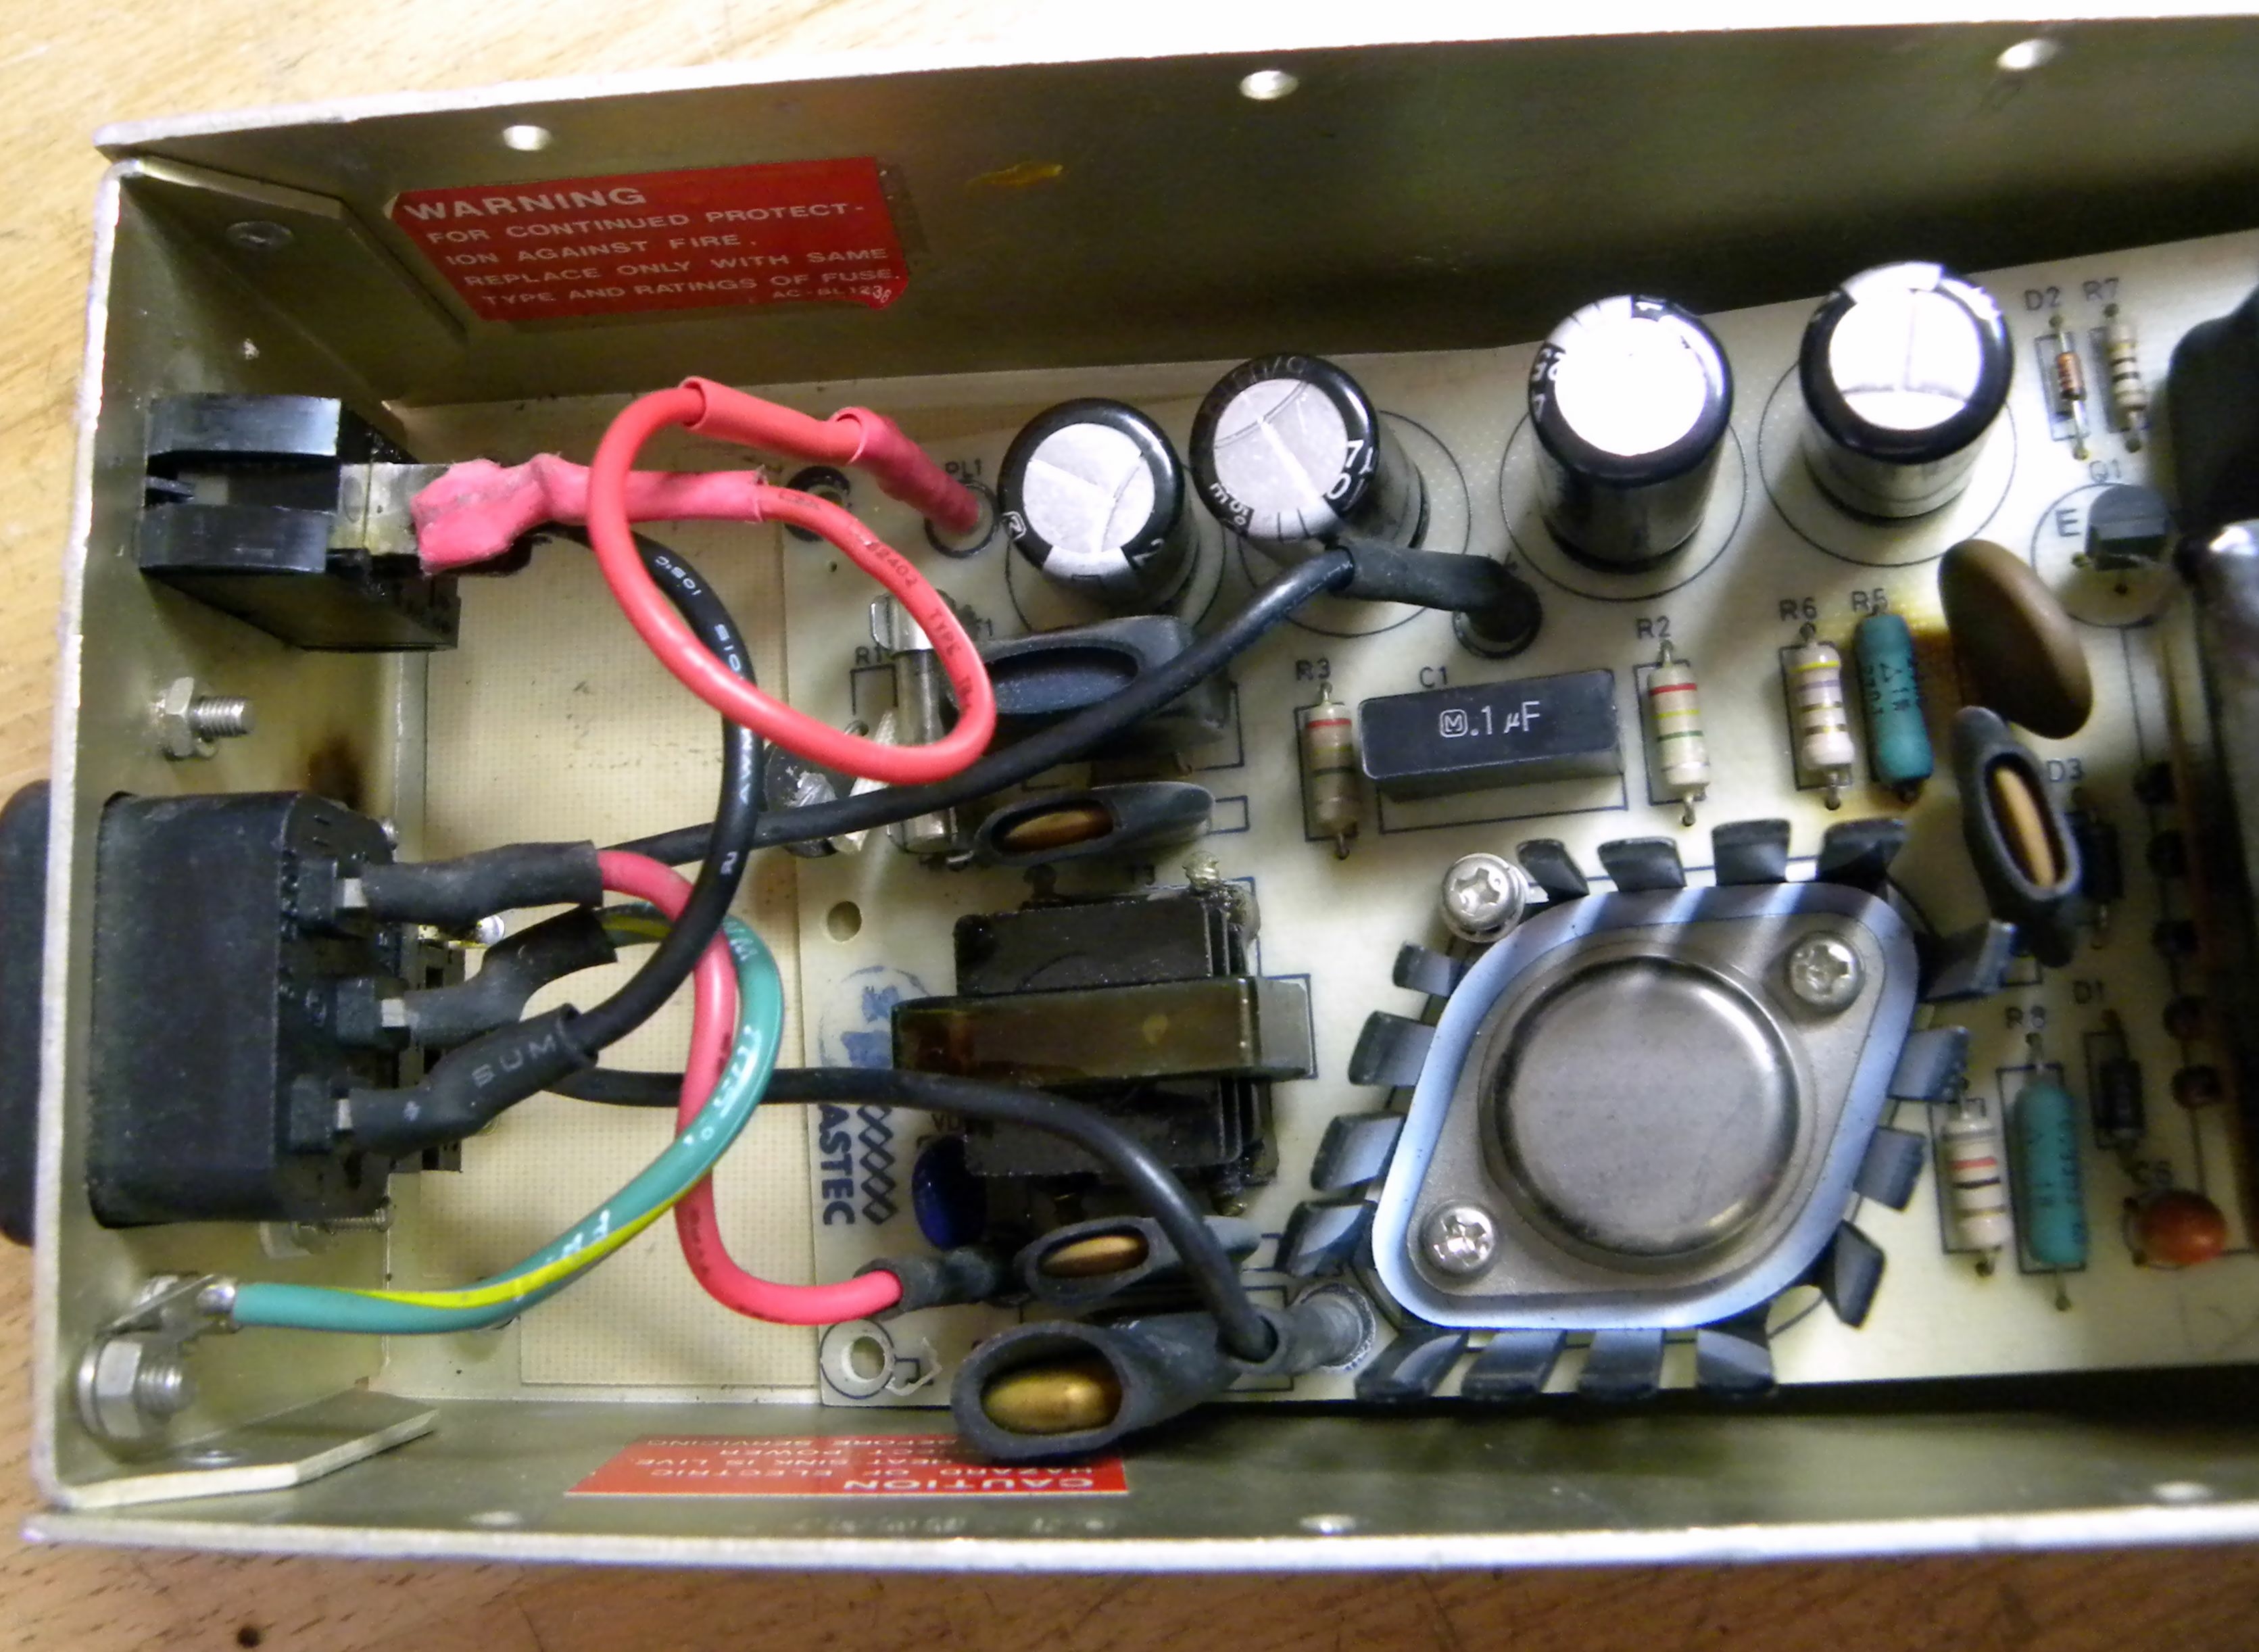
I looked more closely at the mains IN wiring. Looks like some one bypasted the 240/115 voltage selctor switch.
So I'm a little lost on how this should be wired correctly.
The voltage switch is still connected with black wires to the further towards the center PCB connecntons. But not connected to Mains. The switch is in the 115 position.
The 3 coming in from Mains seem correct but not sure.
Could some of you EE types that are a lot smarter then me take a look and see what is wrong so I might correct it?
Many thanks
The voltage selector switch is not supposed to be connected to the power inlet terminals.
It is just a SPST switch (open or closed) between two wires that are connected to the PCB in the positions pictured. When set for 115V, the two wires are connected together. When set for 230V, they are not connected. The purpose of this switch is to increase the voltage in the primary side of the supply to a similar level when run on a 115VAC system as on a 230VAC system.
The base case is when the switch is set to 230V (it is open and disconnected). When the supply is fed by 230VAC mains, the incoming AC power is simply rectified by DB1 (a full bridge rectifier block) to around 320 VDC. This is then smoothed by the primary side capacitors C2, C3, C4, and C5. (Note that these capacitors, charged to over 250 VDC and with 47 µF each, are definitely lethal if touched.) The circuit arranges C2 in series with C3, and C4 in series with C5. Since the capacity is halved when put in series like this, it is the equivalent of two 23.5 µF capacitors in parallel, or the equivalent of one 47 µF capacitor. The voltage between the + and - rails is also greater than each cap's rating (320V > 250 V), so putting them in series allows them to withstand higher voltage when balancing resistors are used, as they are here (R2 and R3, 2.2 MΩ).
When the switch is set for 115V (it is closed and connects the two points PL3 and PL4 together), that same circuit is repurposed in an interesting way. The node in the midpoint of the capacitors and balancing resistors described above is connected to the inlet Neutral (PL2). This effectively re-uses the diodes of DB1 as a Cockroft-Walton voltage doubler, so that the DC voltage on the primary side caps, instead of being 160 VDC if wired as above (115V * sqrt(2) ), can rise as high as 320 VDC from voltage doubling. On the other hand, these types of circuit tricks have a downside: a major risk if the unit is plugged into the wrong mains voltage without checking the operation of the selector switch.
But on the whole I don't think that this circuit is related to your problems. Since you looked at the switch, I will assume that you made sure it was set correctly for your country before connecting power. A more likely culprit, in my opinion, for a fuse blowout are the nearby components, the NTC thermister R1 (should measure 4 Ω cold), and the surge suppressor MOV labeled "VDR1", as well as the bridge rectifier DB1 itself. Plus I wouldn't discount that some errors were created during capacitor replacement, such as backwards polarity or short circuits from solder blobs. A full rundown with a multimeter is obviously necessary before connecting power again.
Take a look at this one - same PSU and similar problem:
https://tinkerdifferent.com/threads/repairing-apple-ii-plus-astec-aa11040-power-supply.1414/
Honestly after doing a few of these supplies, I'd just go with either Reactive Micro's replacement board or a Mean Well PT-65B and 7905 using Uncle Bernie's methods with a plexi base. I've done several Astec and Dynacomp supplies with the Reactive Micro board and it is super easy. I did an Applied Engineering supply with a Mean Well PC-65B and it was almost as easy and a lot cheaper. For around $30 all in to go the Mean Well approach I realy don't think it is worth messing around with re-capping those old boards anymore.
Okay...
"But that trick never works!"
Seriously, the post leaves a lot to be desired in terms of electronics understanding. A high-ESR capacitor is not the cause of a blown fuse.
Where in that entire post did you see a high-ESR capacitor even being mentioned??
He's got one leaky capacitor there, which is why it's getting hot.
Is the markings you described what can be seen as carbon scaring below the power connector? If so, do you have a better picture of that switch? From the little I can see, I'd suggest you should check or replace that switch if what I think I see is what is reallly there. It's not a great picture, so really hard to tell what could have happened. Are all terminals of supply voltage switch wired or is one terminal not connected?
Why did you get a new bridge? Is there a problem with the one you have? I have never seen problems with this part myself, but in the last week this is the second time somoene has mentioned one shorting and failing. Is/was there anything loose in the supply? I'm a little surprised so few failures for so long, then so many so quick!
When you say you plugged it in to test, was it connected to a motherboard? That's a risky move given an unstable supply can cause damage to the motherboad downstream.... I hope you didn't cause additional damage to the motherboard. This supply is special in that it can't regulate at all wihout a load and will continually reset if you try to power it up unloaded. You'd need a dummy load to stand in for the motherboard if you wanted to test it.
The OP didn't say he replaced the rectifier, only the capacitors. The voltage switch is only connected by two terminals, since it is either open or closed.
While reading the 1982 "Astec Power Supplies" manual, I found some inconsistencies in part numbers. For example, the layout diagram of the AA11040 on page 2 cannot be trusted: it labels the common-mode choke T3 (as it is numbered in the schematic and part list) as T1. The actual layout of the AA11040 units (as shown in the OP's photo) appears to be much different from this manual page.
I think that for a glass fuse to explode, it must have drawn an extremely high start-up surge current. The Littelfuse catalog rates most of its glass fuses to interrupt 10,000 A at 125VAC, without exploding. But the NTC R1 should prevent such a surge from occurring (unless a "hot start" condition pertained). So R1 needs to be checked.
If one of the diodes of DB1 was shorted, then high current will flow since there is nothing to block it. Note that Astec wrapped the rectifier in shrink tubing to prevent it from exploding if overloaded. DB1 definitely needs to be checked and replaced if it fails forward/reverse bias tests on any combinations of its leads.
A working bridge rectifier blocks DC in either direction when a DMM in diode mode is connected to its input ~ pins, displaying OL on the meter. If any one of the four diodes is shorted, it will instead read about 0.5 V in one of the two directions. This is the simplest test because it also is true in-circuit, for a normal rectifier topology. Out of circuit, you can also test the output pins: With the red probe on the + pin and the black probe on the – pin, the meter should also read OL. With the probes reversed, it should read around 0.9 V, which is the forward voltage drop of two silicon diodes in series. Probing from any ~ input pin to an output (+ or –), one direction should read 0.5 V and the other direction should be OL. These out-of-circuit tests won't work with the rectifier installed, because the reservoir caps absorb the DMM's test current. The in-circuit test also won't work with the voltage switch on 115V, so you need to move it for the test.
Sigh, I wrote too soon before checking what I was saying. The only way to properly check a rectifier is out-of-circuit.
Using a variac you could dial the input VAC up slowly while watching, with a thermal imager, to see if DB1 was getting hot, but the shrink tubing makes it more difficult to notice.
If this was directed at my comment, I may have been confused. I read this in the OP as the rectifier was getting replaced:
If that's not what they meant well, I'd stand corrected. I am also not sure if the "fuse" mentioned is the Rifa, which WE know isn't a fuse or did the real fuse blow and make the mark on the case, if so that's a big flameout! =)
I wasn't saying the bridge was blown, but if that's what happened, it would make sense the fuse could blow. Since it sounded like the supply didn't work after recapping and the scoring, I figured it was worth mentioning to check the fuse. I didn't think they said the fuse expoloded, so that's my problem. I wasn't clear since the one in the picture looks to be in one piece, but can't see if the conductor has melted. Is that a replacment? I guess that would make sense.
I prefer workign with the 4 diode bridges over a single part rectifier cuz it's easy to troubleshoot when you got access to each diode!
Yes there are typos in the '83 Astec supply docuement, most I've run across were easy to identify and figure out.