OK,
So I got a white 6502 that needed a little TLC. One leg fell off when I removed it from the antistatic foam. It happened either shipping (in a bubble pack, not box) or being removed from a socket in it's past where it got weak and simple being pulled from foam broke it. Needless to say even though the package was insured you go and try to find another white 6502 for anything less than your first born and some luck.
Anyway... I repaired the leg using the following process (BTW, if the leg was missing I would have sacrificed a ceramic 6820 with gold pins as they are easy to come by)...
Took an spare 40 pin socket (you will melt it at some point) and lightly placed the broken leg piece in so that it stands up strait but does not need a lot of force to remove it.
Next I took the 6502 and gently positioned it using a toothpick to align the broken parts and inserted it also into the socket slightly.
Next using a temperature controlled digital soldering iron at 600 degrees I quickly soldered the break and smoothed out as much of the solder as I could giving time to prevent overheating the chip.
After the chip cooled and I cleaned the area with IPL, I attached the ground strap from a gold electroplating system to a long 2 foot wire and then to the socket pin that the "repair" is in contact with (this prevents burning from having the ground too close to the electroplating pen). I used 24k gold to electroplate the repair. I cleaned the repair again with IPL and polished it with a very small piece of "Never Dull" polishing wad on the end of a qtip (with fuzzy removed). I was careful not to get any static electricity generated, I also had the repair in a socket with a grounding wire hooked up to the pin being polished. Then I cleaned again with IPL.
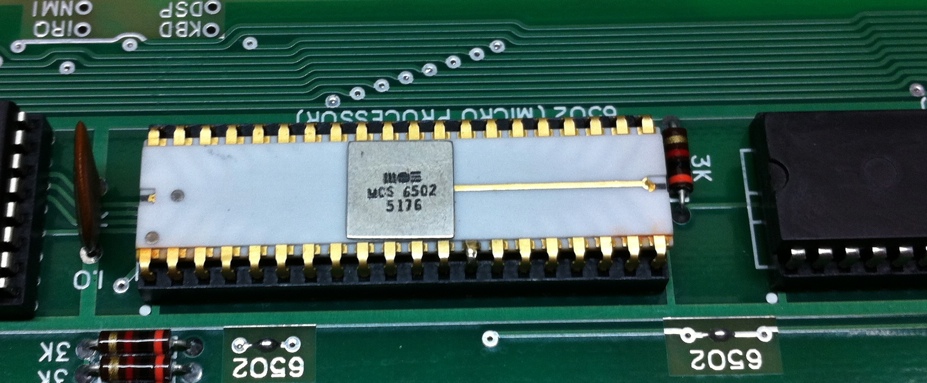
While the repair is visible in closeup photo graphs because it reflects the "flash" differently in normal light you have to look for it.
Next up was the fact the logo/lettering on the chip had worn off. Basically all you could see was the clean spot where the logo was and to see that the light had to be just right.
I created new artwork using a closeup picture of a 6501. I traced the logo and lettering/datecode using Inkscape on the Mac and then by hand cleaned it up so that it was a match to the 6501. Then I created a matching "2" to make a 6502. I chose the 6501 because there are very good closeups online and it looked identical to the 6502. I printed the logo out at 1200 dpi to check it and determined it needed some tweaking on the spacing. After that I used my Brother label printer to make a clear label I could overlay and test the logo and lettering placing them on top of the "clean" spot representing the old logo. After some more tweaking it matched perfectly.
Next was the big decision, do I order a stamp made up or do create a water slide decal...
Well after my experience doing stamps doing my MMI ROMs and how hard it is to get a clean logo and lettering I decided to go with the decal. BTW: In case anyone is interested it looks like MMI had to change their logo because they themselves couldn't get a clean logo stamped on to their chips in the mid 70's so luckily in my case my "poor" logo matches most of the chips out there. On the 6502, MOS didn't have that problem.
So I created a bunch of decals on water slide decal paper I bought for $3 from my local hobby store. The only problem is I have a laser printer and it was for inkjet. No open appears to stock laser versions of this unless you order online. I figured I'd give it a shot testing it on a scrap piece of brass. Well after a bunch of playing around I found the only way to get a permanent transfer was to take the paper and "fix" the toner using a heat lamp just hot enough not to yellow the decal paper. Then score the back of the paper, Next soak the decal in water, didn't want to risk the acid based transfer fluid, then using a tweezer I positioned it on the 6502. I smoothed it out carefully not touching it with my bare fingers. After a few minutes drying I used a heat gun at a distance on low to dry it some more. Then using a fine art touchup brush typically used to touch up rock chips on cars, I carefully used 99% IPL to get close as I could to the logo and text dissolving the edges of the decal paper so that it blends in. Carefully I cleaned the rest of the chip with IPL and using the heat gun at a distance dried the logo and lettering some more. After about an hour this is the results...

It looks even better in person as my florescent light and flash combine to produce some weird results in the picture. I will take a normal lighted shot over the weekend.
Hey Corey, you are getting more skillful in making your Mimeo as close to real Apple 1 as possible. Nice job!
Getting there, still need a bunch more 1975 Fairchild chips.... That could take a while to locate...