Tools:
- Walmart clear plastic tub of appropriate size for your item. As clear as possible.
- 12% hydrogen peroxide (I had about a gallon of 12%, and a gallon of 3%, had to dump them both all in the tub to fully cover the piece I was retrobriting. So I reckon I have 7.5% hydrogen peroxide now?)
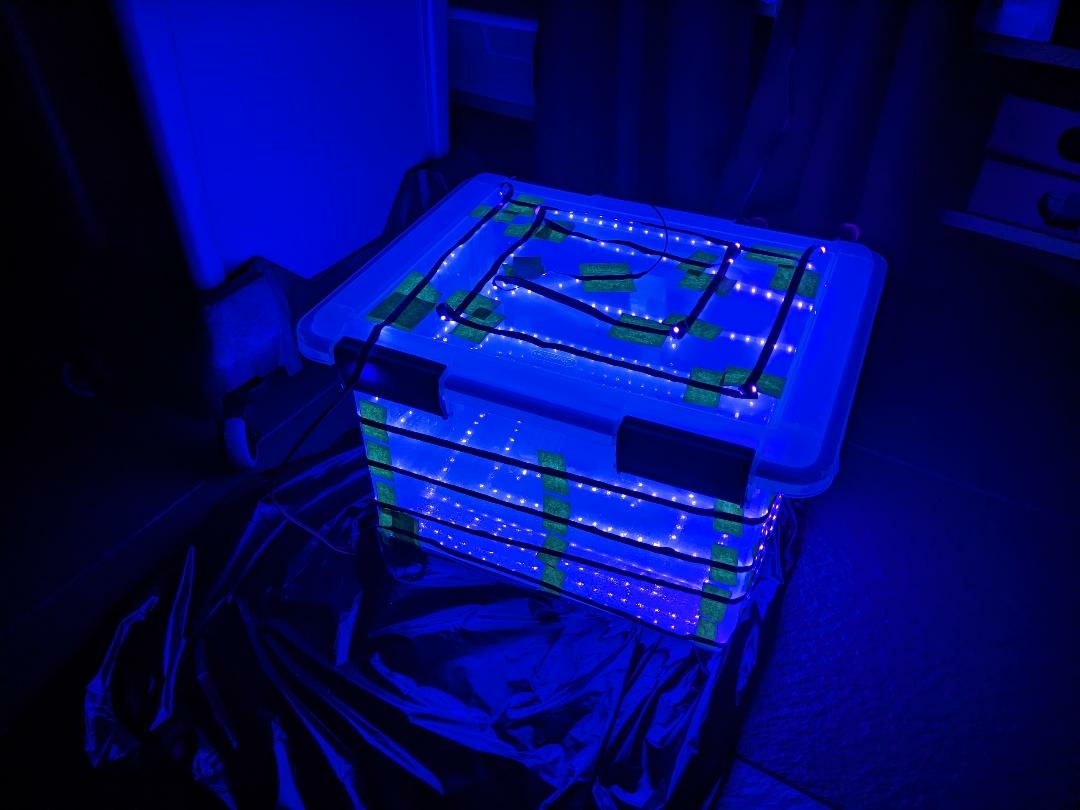
- LED black light strip kit "32.8 ft LED Black Light Strip Kit 385-400nm https://www.amazon.com/dp/B07D7RKJYS?psc=1&ref=ppx_yo2ov_dt_b_product_details)
- Masking tape
- Clip-on stainless steel magnets (for clipping onto objects and forcing them to sink)
Instructions: Tape the LED lights on all six sides of the box. Spread them out as evenly as possible. Pour the hydrogen peroxide in the tub. Bubbles will make your object rise along with the apparently low density of hydrogen peroxide compared to the object (or maybe a chemist can explain why my stuff is floating). Clip on something heavy to weigh the object down, but be sure the clip doesn't cover any area on the object you want to brighten. Throw the stuff in the tub. Check periodically to make sure your item isn't floating to the top.
Yes indeed, normal sunlight will work just fine. This box helps spread the light more evenly around the object (sun can only come from one direction unless you install reflectors), and also I can run this box 24/7 instead of waiting for the few hours of sunlight we have in the north during the winter.
Please note, the internet tutorials on retro-briting state that the yellowing will come back and more quickly the second time around. You can apply protectorants to try to slow the yellowing process, but the protectorants need to keep being re-added. Also to clarify, you have to dissassemble the computer and just put the plastic case in the tub, sorry you can't submerge the whole computer to my knowledge :-). Before and after results are as below:
retro-before.jpg
retro-after.jpg
There are many different opinions on the internet regarding the yellowing phenomenon, its causes and remedies.
There is not even a commonly agreed mechanism for the color change. Some of the earlier tutorials blamed brominated flame retardants such as polybromine phenyl ethers, which supposedly are degraded by UV light to release bromine, which attaches to the plastic resin and turns it brown. But not all plastic exposed to UV turns yellow, and some plastic kept in sealed boxes indoors has turned yellow too. I am also not aware of any chemical analysis to verify the presence of a specific flame retardant in a yellowed plastic part. What is known is that ABS (the copolymer of Acrylonitrile, Butadiene, and Styrene) is almost always the plastic affected.
(For example, most of the keys on the IIc are shot in PBT, which does not yellow, but the space bar is ABS. This is typical in most keyboards because the space bar needs more toughness so it won't crack.)
As for the retr0brite process itself, there are nearly as many differing opinions. The same early tutorials called for a mixture of peroxide and TAED (tetraacetyl ethylenediamine) which will work differently from peroxide alone. Some have used peroxide and heat with no UV at all and reported good results. Some reported that yellow returned in less than a year; others have gone a decade without new yellowing. Some suggest the process irretrievably damages the plastic itself, exposing fresh resins that will quickly react with UV and oxygen in the air. Others find no change to the surfaces strength or texture, only a reduction of yellow tint.
Do you have access to a narrow-spectrum UV power meter to test the performance of the lights you are using and the %transmission through the bin?
Excellent summary. For those who are purists, may be best to do nothing and leave the yellow there :-). I do not have access to a power meter, so I'm not sure how much is getting lost through the plastic. To that end I have no idea the luminosity or power of the lights themselves to begin with. I also don't know how to estimate how long the tank and/or the hydrogen peroxide will last before it all needs to be replaced. Not a lot of science here, for once I just said "eh, let's just try it".
I definitely did not have luck with the gel. Lots of streaking and really couldn't figure out how to make it work out well. Dunking it in liquid hydrogen peroxide seemed like a nice and lazy way to get even results.
If you UV LEDs aren't hot to the touch they are low lumen, and given what you're using it's also safe to say the are low lumem.
I do have a question for anyone that may know... Original "white labeled" IIe keyboards, did they discolor in the same way that retrobrite will help?
I've got keys that have an orange tint and I'm not sure of their history and don't know if this is the same problem. Anyone know?
IMG-0839.JPG
It's a valid method of retrobriting - the immersion method.
But for my money, the brush-on method with 6% - 12% liquid peroxide (20 volume or 40 volume or a mixture of the two) that has been thickened with xanthan gum and activated with a small amount of oxygenated laundry detergent booster (like "Resolve" powder) combined with sunshine and attention to detail always yields the best results.
By attention I mean re-brushing the thickened solution every 20 minutes and rotating the piece so that it receives even sun exposure. Rebrushing keeps the solution from drying out and also distriubutes it evenly so that you adoid streaking.
Your method doesn't require supervision, but also doesn't always yield perfect streak-free results.
My favorite retrobrite method is the no chemicals, just direct sunlight approach. It works really well for keys, but most importantly it works for the infamous Apple IIe yellow spacebar. (What's up with that???)
This approach takes much more passive time, but much less active time. Here is the result of a controlled experiment I did for a total of 6 full clear days during the summer. It works in the winter too, but it takes longer since the outside temperature is also a factor. The before and after applies to the left allow key, the Enter is just for comparison and has been sun-brited previously:
20220913_113735.jpg
20220930_111829.jpg
@CVT you're saying you just put the keys out in the sun and the yellowing just disappears?
Yes, but it has to be direct sunlight, not through a window. Good ol' UV from the sun!
That's surprising as most commentators (including some professional conservators) point to UV light as the culprit in turning plastic (particularly ABS) yellow. But those keys look like PBT and not ABS.
baldrick: It's hard to locate products with bleach activator (TAED) in the US. From a patent search I saw that its function is to react with hydrogen peroxide to form peroxyacetic acid, a stronger bleaching agent which is effective at lower temperatures. So if it's not available an alternative approach is to use heat to ensure the bleaching reaction of the plastic resin can proceed.
Not sure about the material, but the sun only method also worked miracles for the spacebar of my Apple IIe. Here is the picture from the original eBay listing, and then after I cleaned it up and sunbrighted the spacebar for several days:
From eBay.jpg
Later.jpg
Thanks, it definitely looks worth trying!
It looks like tartaric acid is a possible alternative for the bleach activator. But it would have to be used in larger amounts to get the same effect.
I am reasonably sure those LEDs aren't adding anything to the process, especially filtered through plastic. You are just using time and peroxide.
The sun adds heat and it's own mild bleaching effect which speeds it up.
The transmission of light in polycarbonate really dips bellow 400 nm, if this is what this box is made of. However with so many LEDs and fairly thin walls, looks like enough makes is though.
I have similar crates and I am quite certain the plastic is not polycarbonate. The ones I have are labeled polypropylene.
I don't know the UVA absorption characteristics of PP (searches turned up only irrelevant articles) but it is rather sensitive to photodegradation from UV exposure, which should be kept in mind.
Sorry to hijack an old post folks. This box has been working o.k. I think a light in the garage door that shines on it during the day actually does the trick. Summer turned to fall here this year and all of a sudden my tank wasn't "bubbling" any more. (I don't know the science, but the more bubbles, the faster my stuff seems to brighten). Could it be less ambient summer light coming through the garage window? Could it be cooler temperatures and a colder garage floor?
So, ran down to Walmart and bought two items:
Installed the heater flat to the bottom of the tub with the included suction cup, plugged it in. Arranged the flexible grow lights around the tank. I still use the little UVA LED light strips I bought. My tank is bubbling again (and so much so that I'll have to keep a close eye on this and make sure I don't overdo it).
Not sure if it's the heat, or the extra light, that fixed the problem. Photo of new setup attached.
PXL_20231012_014453776.jpg
PXL_20231012_014507523.jpg
The activity of H2O2 is strongly correlated to temperature, so it's the extra heat that is causing it to bubble. The lights are "selectable spectrum" in that they use both red and blue LEDs and can switch on either or both. Grow lights use red and blue (and not green) because plants reflect, rather than absorb, green light. That's why plants look green. I don't think they are doing much in your setup.
The dependence of H2O2 on temperature is also the reason that laundry boosters like Oxyclean work best in hot water, or as a pre-soak in a bucket full of hot (135° F) water.
Totally side note, but since I noticed I asked before about the white keys I thought I'd provide an update since this had some activity.
I tried to retrobrite the keys and acidenlty ended up bleaching the keys which was unfortunate. But I was able to remove the bleaching with tricks from auto detailing and the final results I thought are pretty good. But I don't want to do all that again!
The starting look:
before restore.jpg
The restored look:
after restore.jpg
Are those really before/after photos? Unless you are some kind of Jenga mastermind I'm having trouble believing that they were moved apart and put back on the table in the exact same orientation.
These are in fact 2 different pictures. Just laid out very, very similarly. Comparing side by side I quickly found 3 obvious differences. I'm sure there are more if I kept looking.
Compare.jpg
I have simplified this process a lot for myself, without LED strips, UV or sunlight and containers. I just brush on 8% hydrogen peroxide with what women paint with, wrap it in stretch wrap and put it in a warm room for 2-3 days. I did my first experiments with this 3-4 years ago, and so far I don't see the yellowness coming back or any other side effects.
FB_IMG_1698086903466.jpg
FB_IMG_1698086907929.jpg
FB_IMG_1698086894554.jpg
FB_IMG_1698086898671.jpg
LOL, Yes they are before and after, and I may be insane, the before picture was total crap for doing the comparison!!!
I painstakingly recreated the original layout by hand and not all the keys that face away were the same keys, in fact I'd be surprised if any were the same! I'm not sure if I mentioned it earlier but I bleached the keys and while they looked ligher they also looked like the platinum coloring which was wrong. So I removed the bleaching. It was a labor of love and I was most happy that the H key (I think it was H) with the nubs was visible along with the spacebar because you can see there was no strong abrasive used to remove the belached layer. The nub remained as it was, and you can also see the same texture on the space bar.I documented the whole thing on video because I was sure I would fail, but with the success I may share what was done. And no, I didn't document reconstructing the original layout but that would have been funny!
That pizza box look much nicer after the work! I just got one recapped to play with the IIe card and in the process discovered a few other problems (HD ultimately had the sticky head problem which I fixed amazingly with the freeze it method and never thought that drive would work again. Then the 3.5 drive wasn't working so I tried to fixer that but ended up overextending the metal head spring.... got a way to fixer that now too, but need some more samples to perfect the process (hint: any mac sony 3.5" samples with head spring problem are welcomed!) and just got it all going with a blue scsi. Looks like now I need to bathe it in retrobrite bath.Did you use a gel or is that just the liquid held to the surface with static-cling? Gel, right?
Thank you for the kind words! Yes it's the gel from the barber store. 9% not 8%, I made a mistake. I apologize, I'll attach a picture so we can understand each other better. I tried the same 12℅, it's not the best. You have to remove the Apple logo or the oxygent can damage the paint. No such problem with the 8%.
IMG_20231029_152942.jpg
I think this is what I managed to do when trying to retrobright my keys. What was the auto detailing method you used to fix it please? The keys look like they have cloudy white chalk all over them. When you put them in water they look normal again, but as soon as they dry they look chalky again. It even appens (under?) over the letter decals on the keys which makes them look faded until they're wet.
I'm sure he will reply, but what is called a "chalky" appearance is caused by the surface getting etched. In other words, it's a result of the surface texture being microscopically roughened. To reverse this, you want to smooth the texture, which can be done by rubbing with polishing compound.
Sorry to hear that, and it sounds like the same probem, just too long in the bath. Like robespierre mentioned you've basically etched the plastic.
Before attempting to recover it's important to first understand the construction of your key before accidently wiping away the lettering.There are two basic styles of //e caps the single-plastic and two-plastic contruction. AFAIK The other II keyboards all use the single plastic caps and only the //e keys come in the two-plastic construction.
The original white letter keys are two-plastic construction, but when they switched to grey keys with black printing they also switched to a single-plastic construction with markings were printed on the keys. Apple returned to the two-palstic construction with the platinum keys. The single and tow plastic construction seen here:
IMG_5894.JPG
Why this is important... with the two-plastic construction the markings are embedeed throughout the key, they can't be rubbed way. With the single-plastic construction the lettering is just printed on the surface and can be removed.
So if you have the two-plastic caps you could try what I did which is similar to what robespierre mentioned, polishing compounds to remove the top layer. But I used tools like random orbital polisher, polishing pads and compounds. Even then it was a lot of work, I can't imagine doing the same by hand, but I'm sure it's possible!
... I had the same effect when retrobrighting a few key cap sets of old Apple II keyboards. I'm not so sure it is actually over-etching of the plastic due to long bath exposure. I control every parameter like concentration, temperature, and time very closely and got different results which depended on the particular keycap set: most came out fine, some were cloudy. The cloudyness could be hidden by applying water (as mentioned in some post above).
The solution I adopted is to buy some "plastic parts refurbishment" spray from AutoParts which is meant to recondition deteriorated plastic panels in old cars. This stuff is sprayed on and then gently rubbed in with a soft, clean cloth. Keys came out fine, with the cloudyness gone. Alas, this has been years ago so I don't have the can anymore to tell you which one it was. I remember I had a long discussion with the clerk in the store (who, surprise, surprise) was knowledgable on these magic potions and steered me away from the type which is silicone oil based and leaves a slippery "wet" feel.
These keyboards were laying around for years now, rarely used, but the new "finish" is still looking good. So I can tell it lasts the time, but can't tell what would happen if the keyboard was used often.
A word of caution on using polishing products based on abrasive powders, regardless how fine: the reason why I opted for the magic spray instead of a polishing process was that I noticed, under magnification, that the keycaps which were affected by the "clouds" had a fine, textured surface which was intentionally applied, presumably to make them less glossy and/or less slippery. I feared that any mechanical polishing process could destroy this fine surface texture and make matters worse. Ironically, some sets of key caps did not have that textured surface, were glossy / slippery for finger tips but none of those got the clouding.
- Uncle Bernie
That's funny not too long ago while looking for a rust treatment/protector for my //c shield I went to an Advance Auto store. Without revealing why I needed a rust treament/protectant the guy helping me started talking about how he used two products to remove / treat the rusty metal in his Amiga computers! I've been back several times since and I doubt he remebers me, and while the discusssoins always start with car parts, we end talking about fixing the vintage computers. I think I should ask him about plastic restorers!
That's a great point @greenclaws, don't just use any scratch removing compound look for a polishing compound and still be gentle. I too was worried about the subttile texture to the keys, and tried to provide enough detail in my orignal pictures to show while it may have had an effect, for me it wasn't very mild and acceptable given the alternative. I used the finest auto polishing compounds and pads and the random orbital polisher rather than direct drive polisher because RO provides indirect drive with a little slip to keep friction (heat) to a minimum but I also have a bit of experience with the tools and materials used.
The silicone-based spray would be "Armor-All™" and its competitors. It's indeed the case that many detailers don't like these. In fact across many fields, such as leather care, woodcraft, and electronics, silicone oil-containing products are frowned upon.
The type of plastic coating that Uncle Bernie is describing sounds like "Griots Vinyl & Rubber Dressing", again I'm sure there are multiple brands largely comparable. There are also some special polishing compounds for plastic, such as the Novus #1, 2, 3 system (used for e.g. car headlights)