
| Attachment | Size |
|---|---|
| 329.76 KB | |
| 340.62 KB | |
| 365.39 KB | |
| 282.14 KB | |
| 330.72 KB | |
| 344.17 KB | |
| 339.25 KB | |
| 270.09 KB |
Hello all.
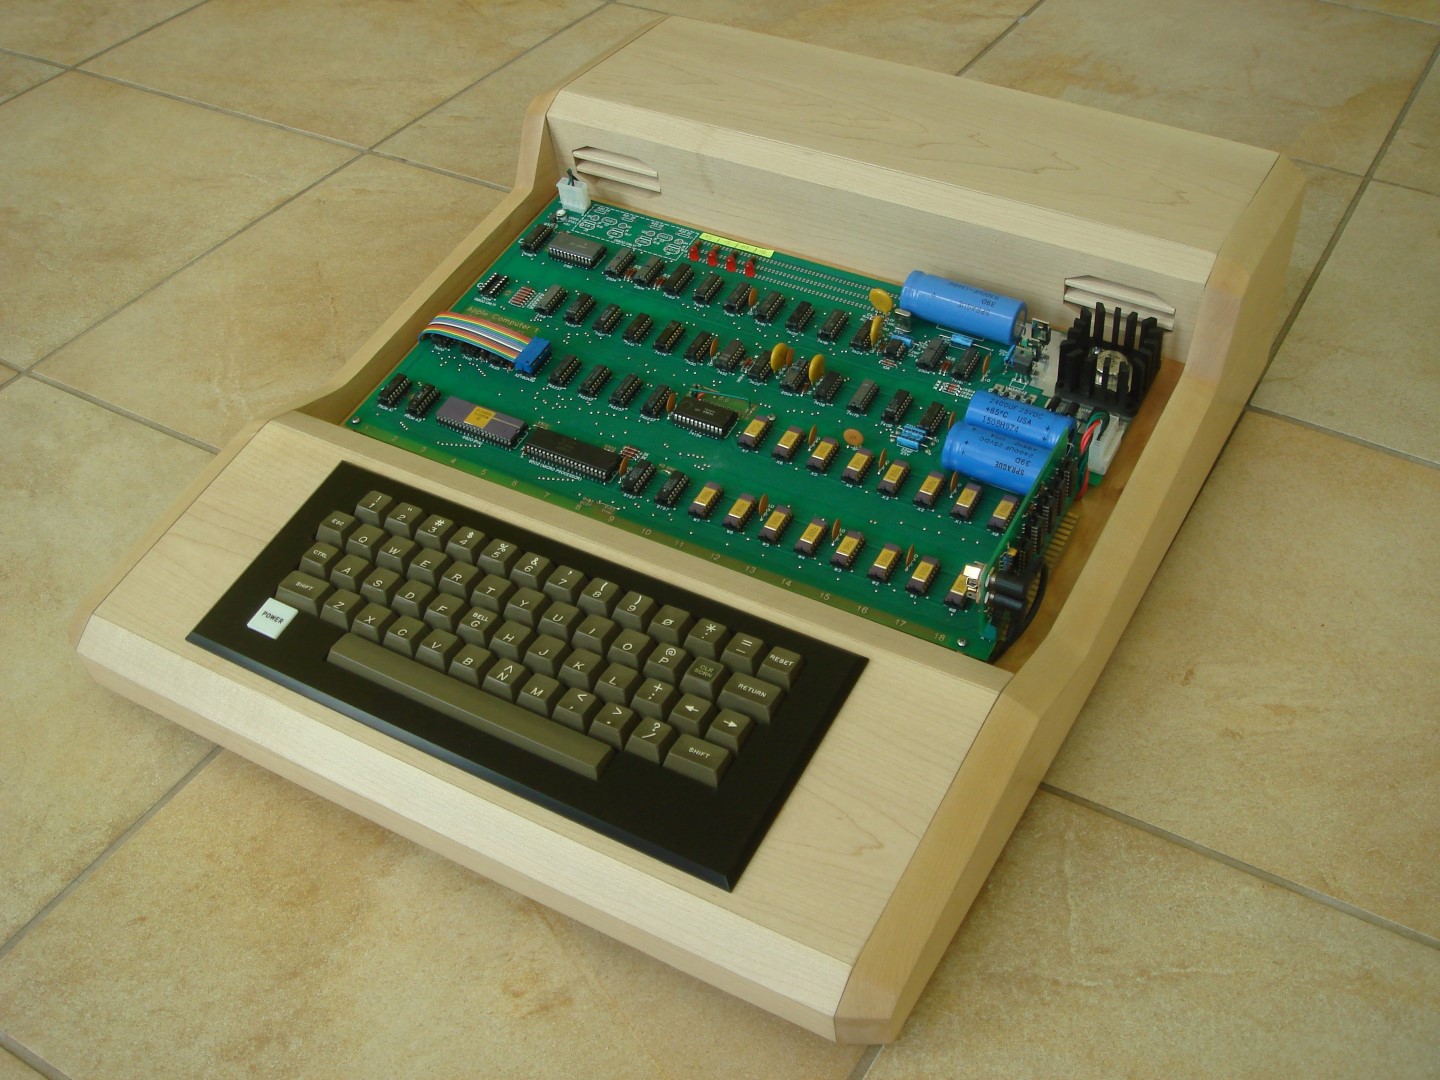
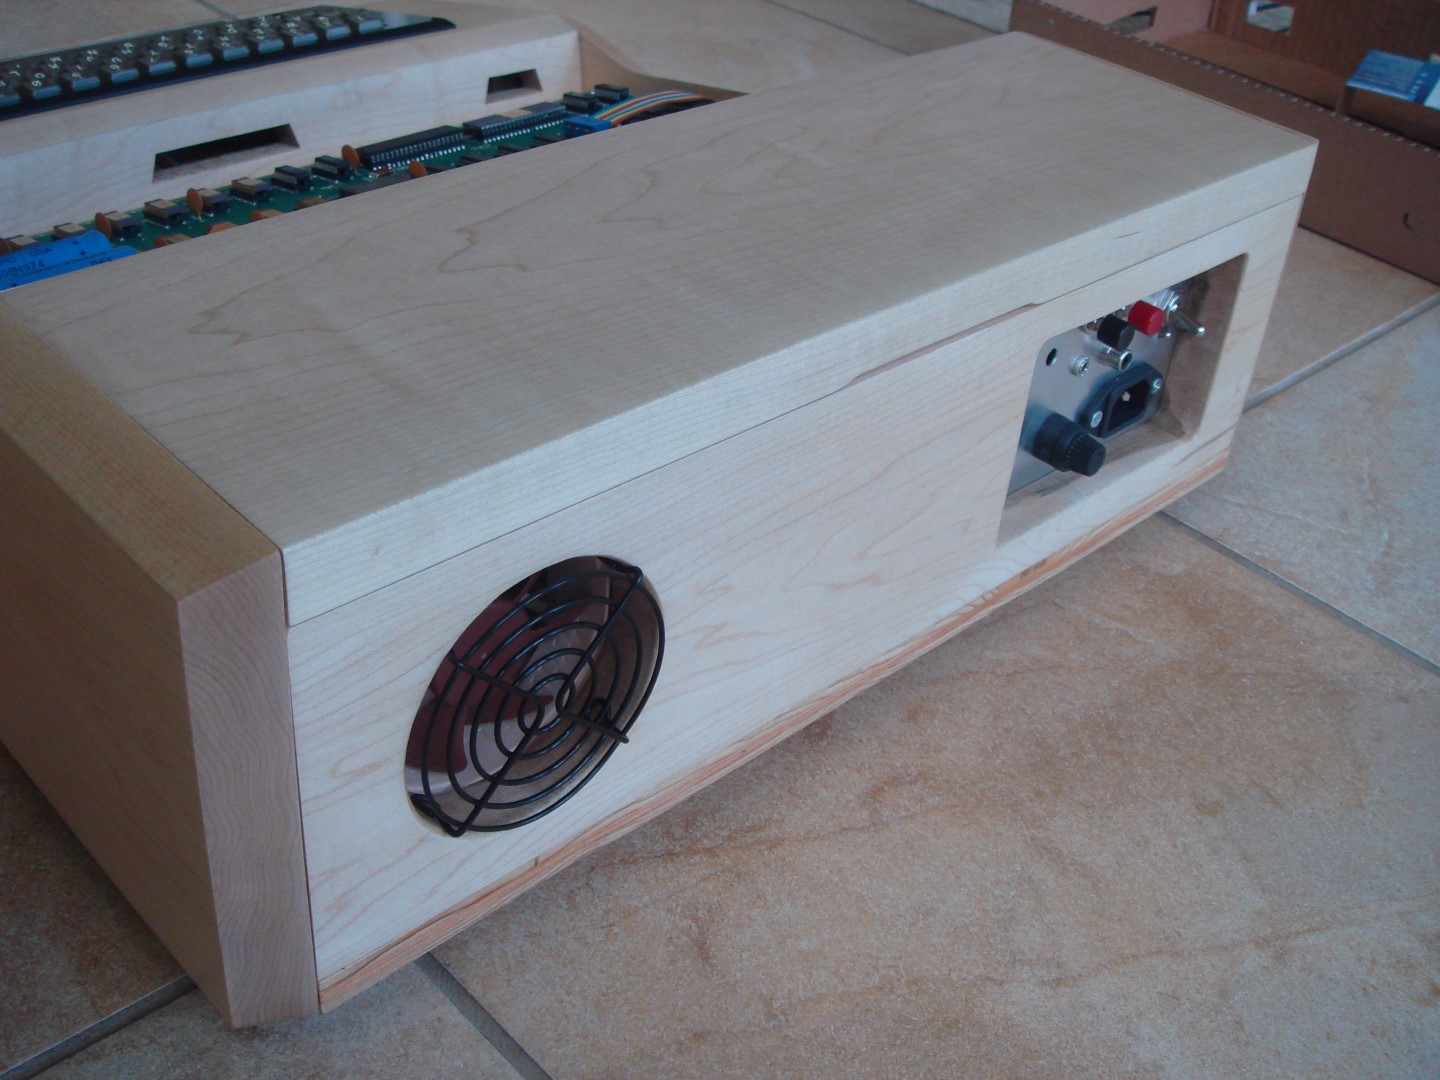
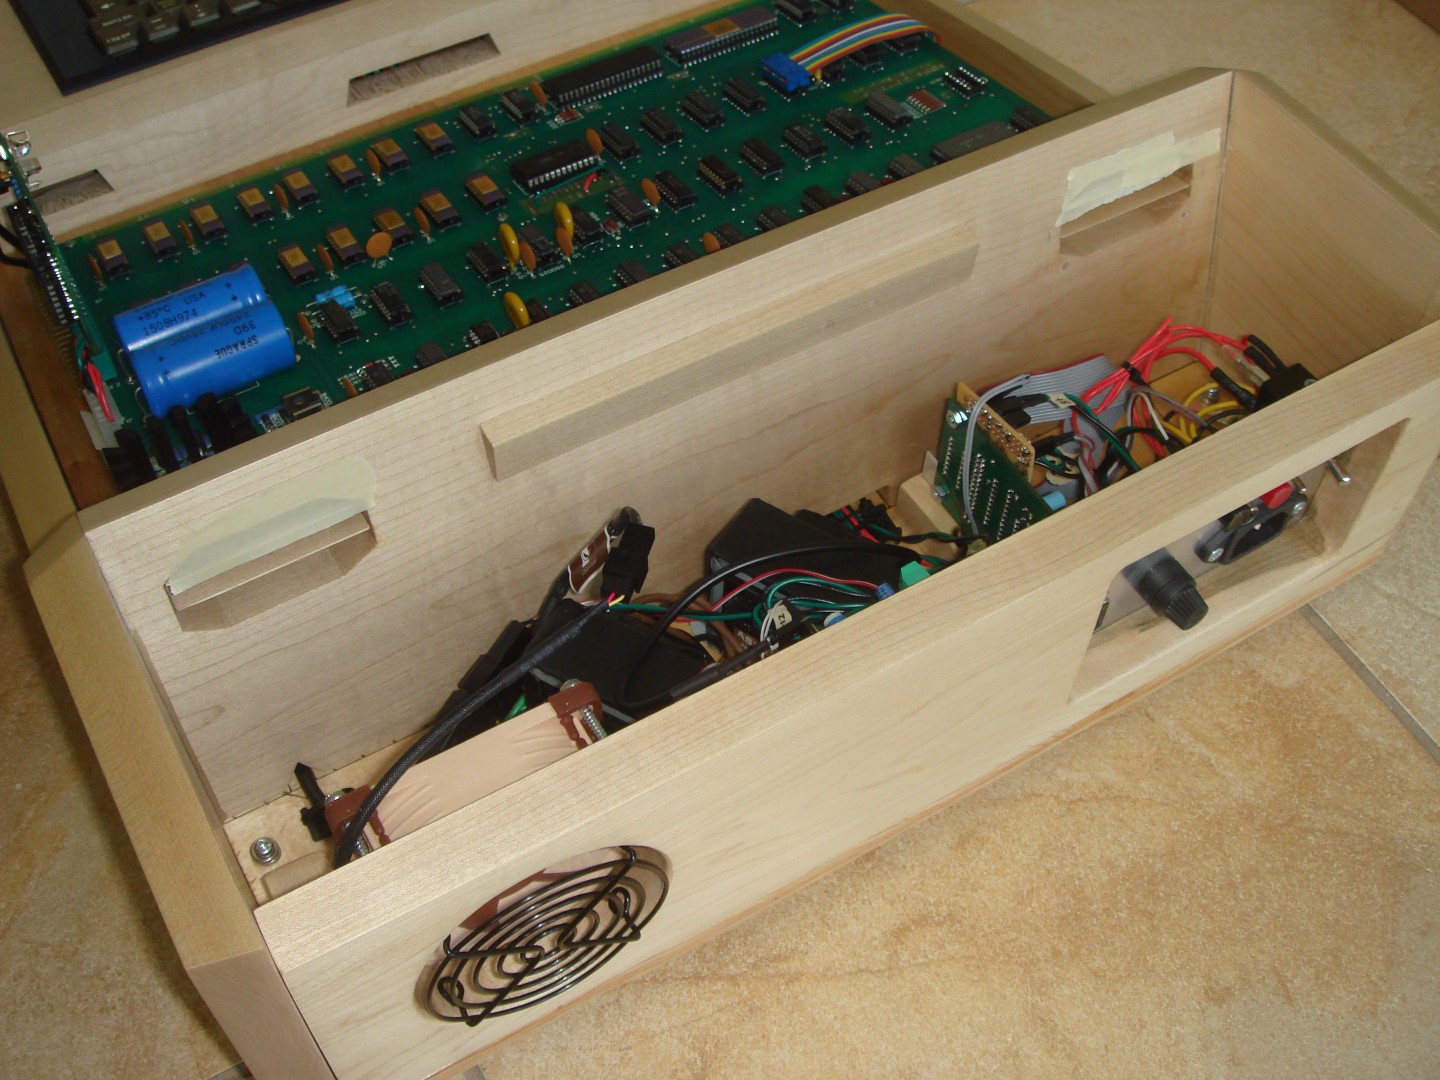
I've pretty much finished my enclosure, now that I've got the finish on it, and I've made the louvers for the vents in the back. I decided to do some testing to see if the vents/fan/cooling setup works like I want it to.
So I've done a bunch of temperature testing on the Mimeo 1 setup in the enclosure.
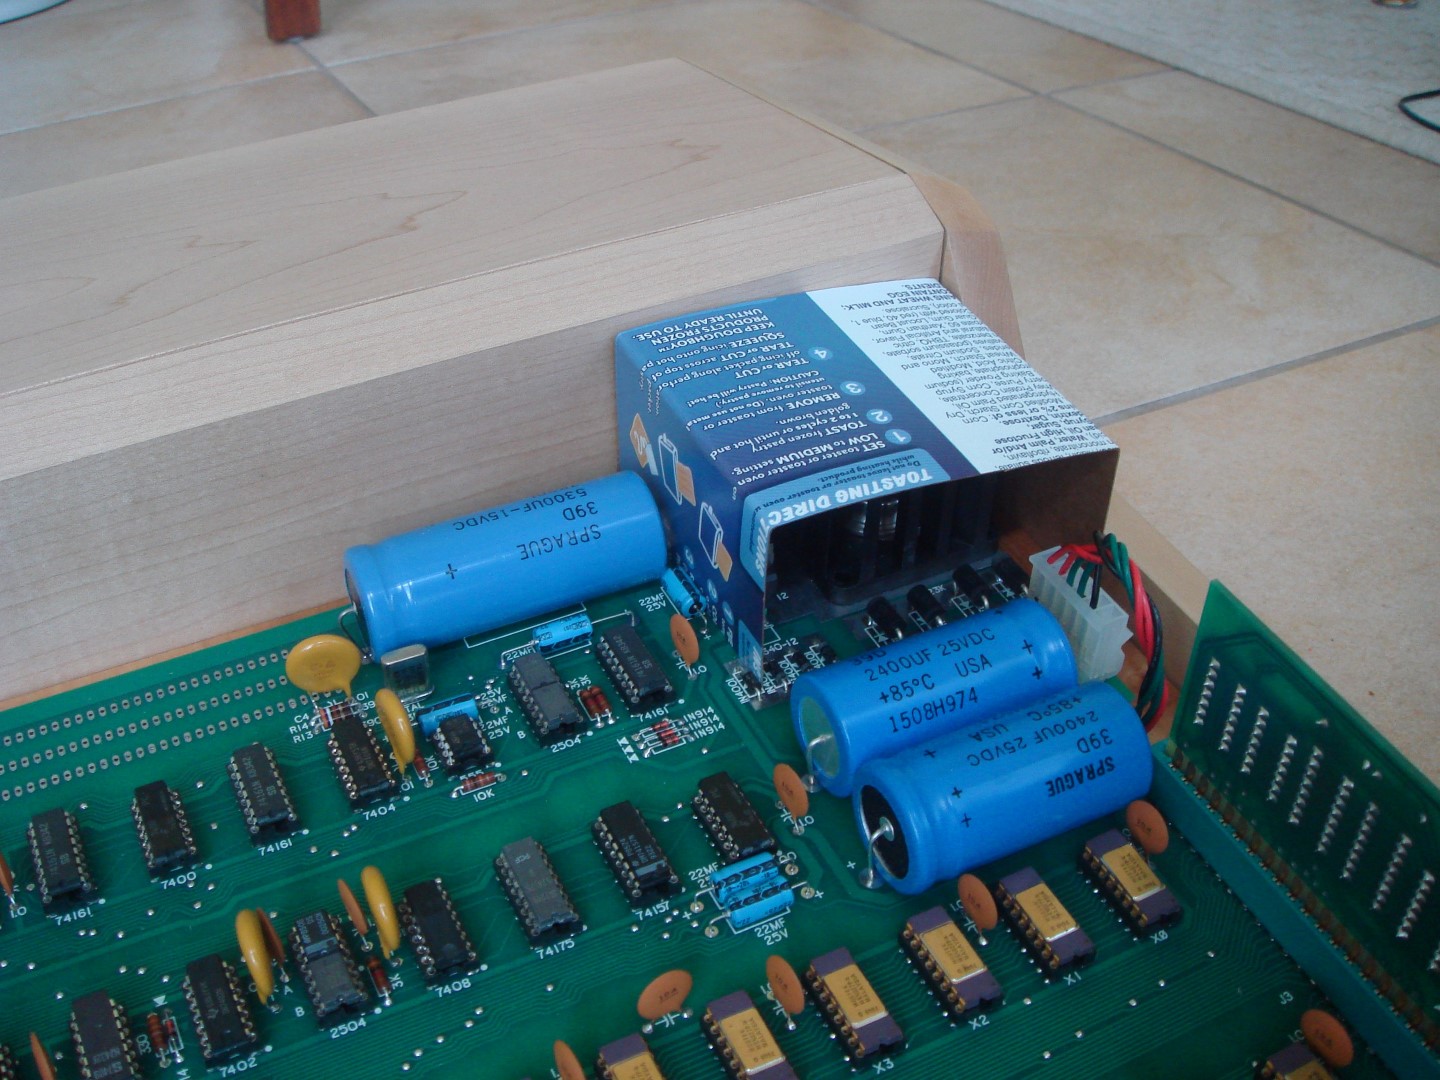
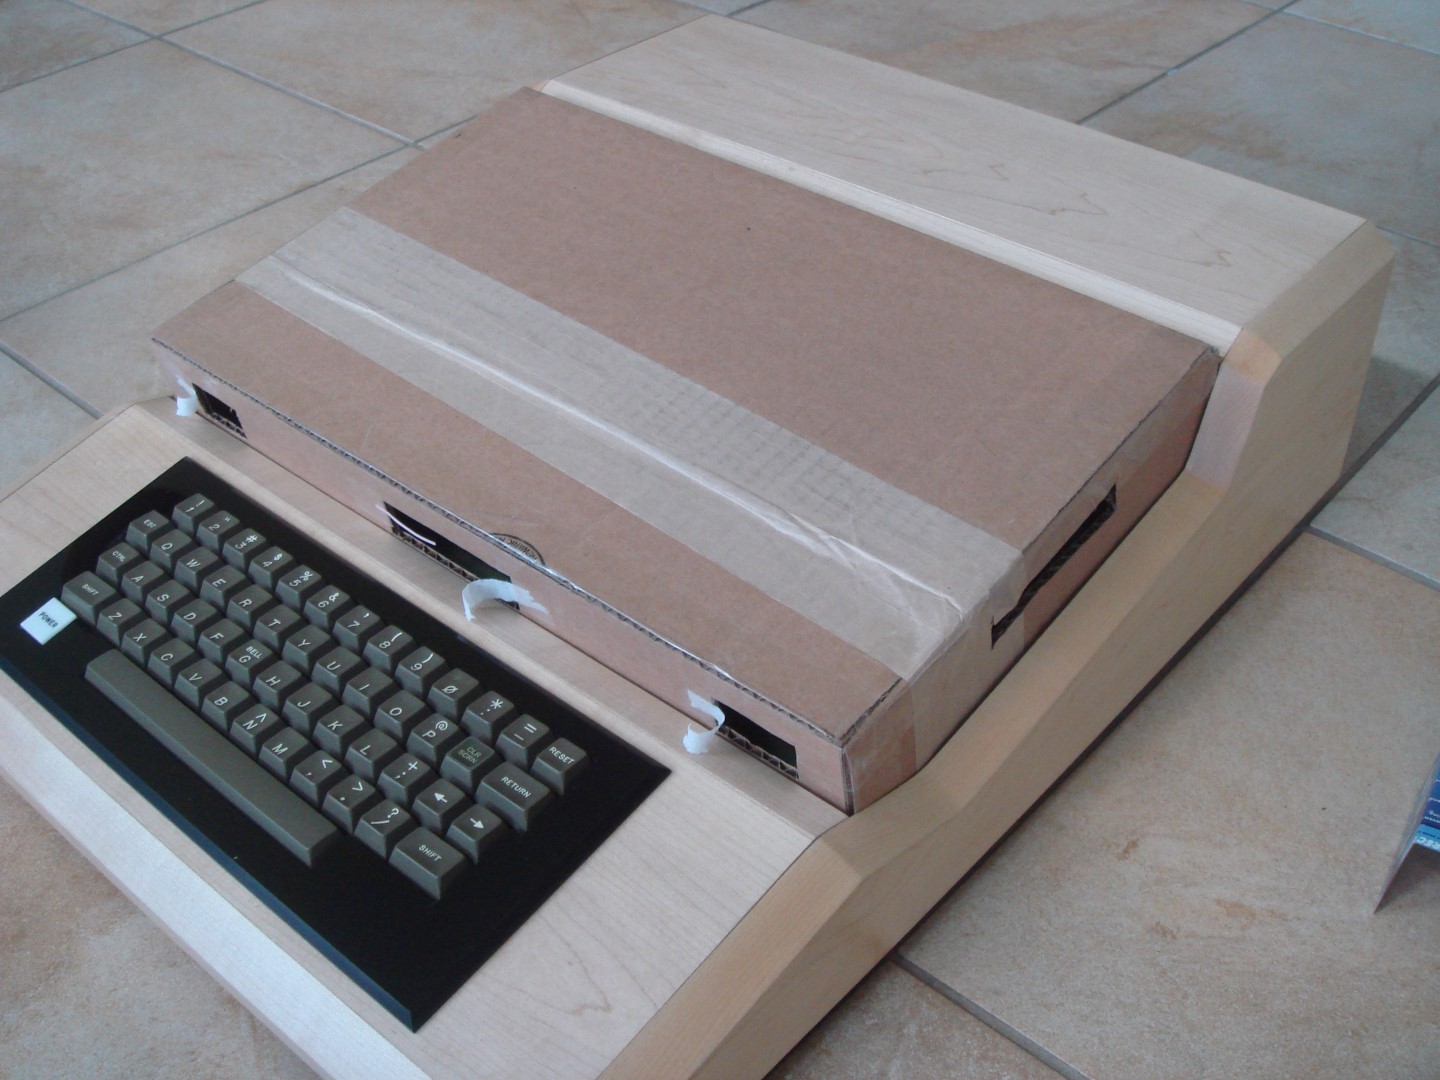
Originally, I had planned on cutting holes in the acrylic enclosure (that goes over the Mimeo), so it could run with the acrylic cover on. So I wanted to make sure this setup would actually cool the Mimeo, so I built a cardboard duplicate of the acrylic cover, with cutouts where I had planned (one in the back right behind the LM323K heat sink and three in the front to pull the air in). On my enclosure, I had always planned on only opening up the vent right behind the LM323K heat sink, since that seems to be the big heat source when running the Mimeo 1.
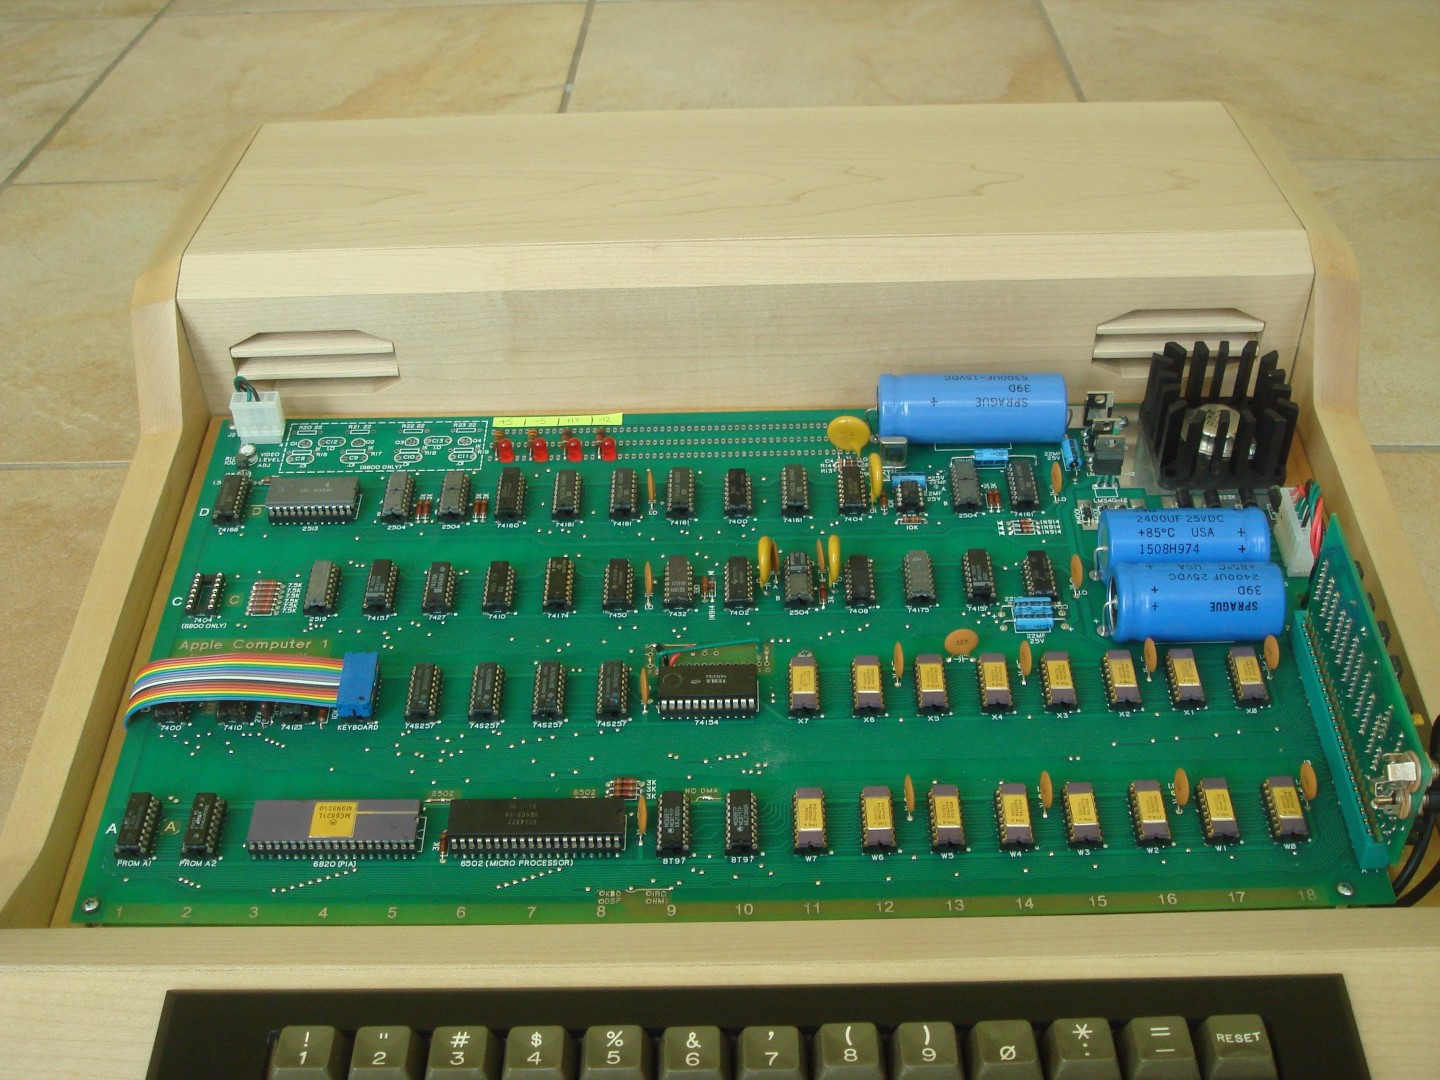
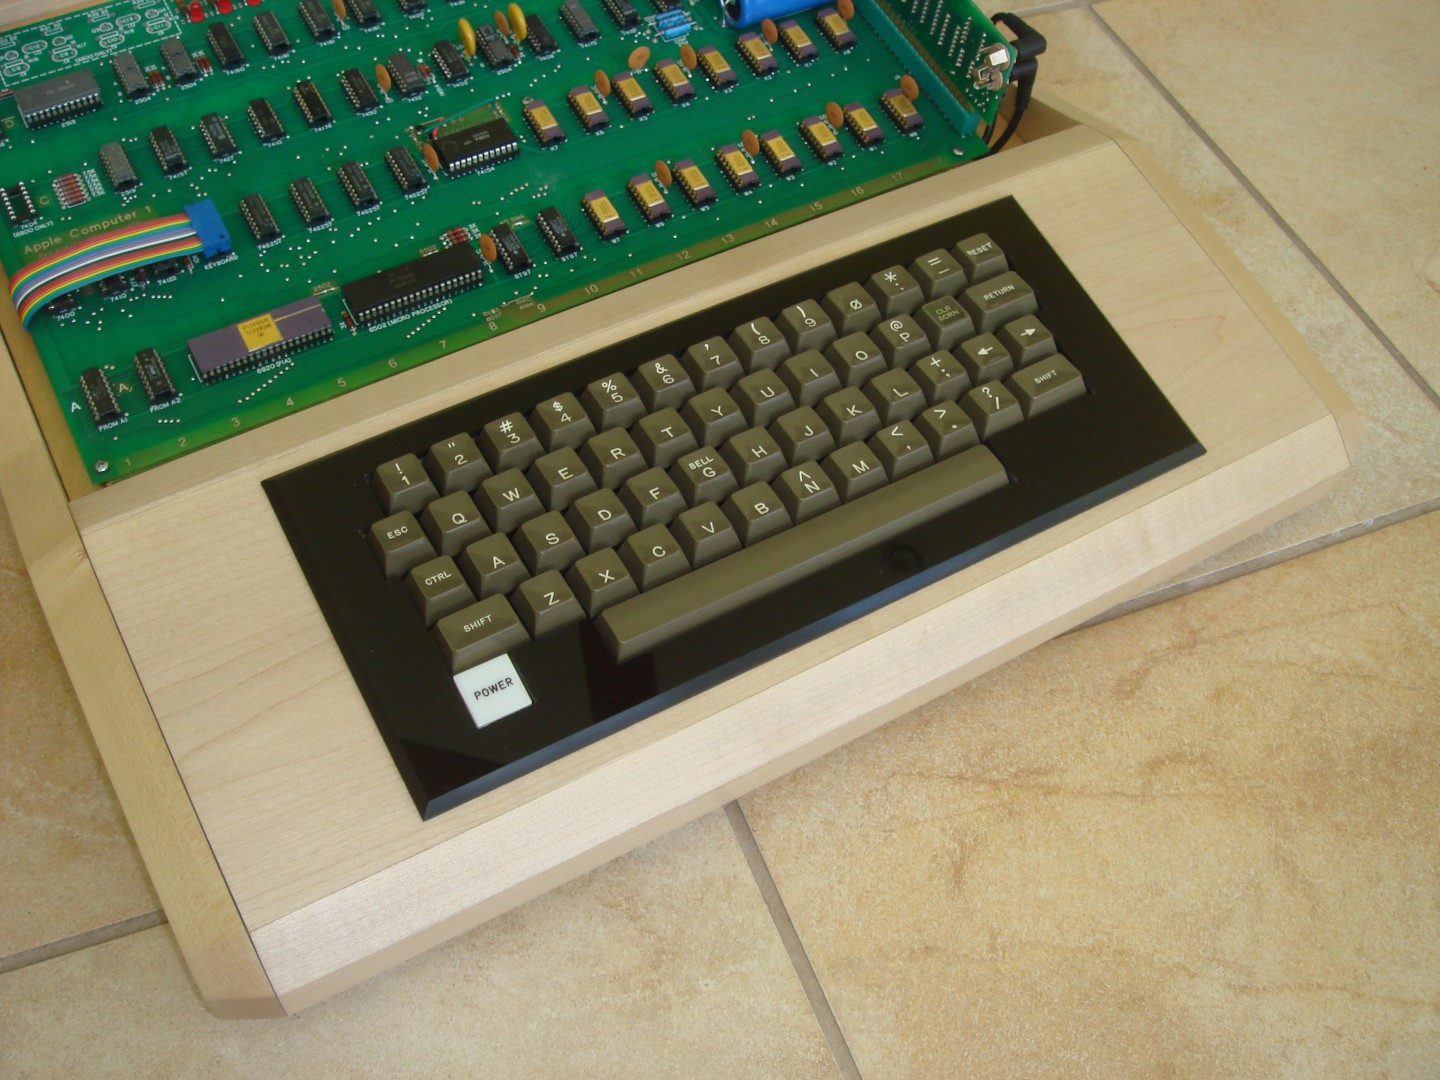
First, here's a final pic of my setup, so you can refresh your memory on it:

In my testing, all temperature measurements were done with a handheld laser remote temperature gun, held at 12-14 inches from the target, and taking multiple readings and mentally averaging them together. In all tests, the "Apple 30th Anniversary Demo" was being run in continuous loop. In all tests, the Mimeo was in my enclosure. Ambient temperature was 74-75 deg F. The non-LM323K vent was blocked in most of the testing, so the majority of the air was coming through the vent behind the LM323K. I'm running a pretty normal setup, with the cassette adapted installed, but I'm using all gold Mostek 4027p4 memory chips, which use more current than the normal ones. All my accessory devices (Mike W's PS/2 Keyboard adapter, amplifier, Corey's keyboard multiplexer) are running off an auxiliary power supply.
So here we go:

- no acrylic cover, no fan: 165 degrees F (phew! This is hot. I think SpeedyG once called the LM323K heat sink a "barbecue" or something similar!)

- cardboard Mimeo cover with cutouts, fan on (in "pull" configuration blowing air out the back and "sucking" air in from the vent): 120 deg F
So this is a big improvement over no fan. It got me wondering about how the setup would run with just the fan on (in "pull" config), but with no Mimeo 1 cover at all.
- no Mimeo cover, fan on (pull config): 120 deg F
Hmm. So the cardboard mock-up didn't worsen the basic cooling of the enclosure at all, so it might be a nice option if I wanted to run it with the cover on. 120 degrees was still pretty warm, and I kind-of wished it actually improved cooling, so I started working on other things. I built a small cardboard hood to sit over the LM323K that fit flush with the vent, and served to focus all the air flow to just around the heat sink.

- no Mimeo cover, LM323K cardboard hood on, fan on (pull config): 110 deg F
So this was much better than the mock Mimeo 1 cover, and the no-cover tests! The main issue with this was it would require building the hood. I could try doing it in clear acrylic, so it would not look too intrusive to the setup, but to tell you the truth I wasn't relishing embarking on this further project.
----------------------
I got to thinking that the main issue with the cooling is focusing the airflow onto the problem area, the LM323K. I then thought about switching he fan from "pull" config, to a "push" config, as the blowing of air can be focused better than the "pulling" of air.
I switched the fan around, and tried it out.
- no Mimeo cover, fan on (push config), non-LM323K vent blocked: 98 deg F
So this was the best of all! The best part was I didn't have to build anything else. Happy with this, I just started checking other components on the Mimeo 1 for temperature readings.
- A1 PROM: 104 deg F
- A2 PROM: 100 deg F
- 6502: 100-103 deg F
- other ICs: 80-90 deg F
Hmm, those PROMS seemed to be quite hot, so it would be nice to get air to them as well. So I unblocked the non-LM323K vent, and ran a test. So in this setup, I have air blowing forward from BOTH vents onto the Mimeo.
- no Mimeo cover, fan on (push config), BOTH vents open: 105 deg F (for LM323K)
This was higher as I expected it to be, but still better than all of the "pull" config fan setups. I also tested the temp of some other components with this arrangement:
- A1 PROM: 96 deg F
- A2 PROM: 96 deg F
- LM340-12 regulator: 96 deg F
- other LM regulators: in 90's deg F
- components in the PEM area (transformers, etc) stayed quite cool, only 5-10 degrees F over ambient temperature
So this setup was the best balance of cooling!
I think I'll stick with this final arrangement, as it provides airflow over the whole board, and does not require any further building on my part, and keeps the hottest parts of the Mimeo nice and cool! I also don't mind running my Mimeo with the acrylic cover off.
-------------------------------
So the take-home message for me was if you want to cool something specifically, it's better to focus air ONTO it (as long as you don't care where the heated air is going like in my open-air setup), rather than try to pull air across it. Anyway, maybe this will help someone who may be working on a similar setup.
Here are the final pictures of my enclosure and setup.


Thanks to everyone's support and help in getting me to the end of this project! I never would have made it without you.
I also want to send out a special thank-you to Mike Willegal, for creating his fabulous Apple 1 replica. I never dreamed this project would be so interesting to me, and I was a bit apprehensive about starting it, thinking "how much is this going to cost?". I think for me it's because at the bottom of it, it really feels like you're building the real thing back in the 1970's (although they were never sold as kits), but I keep having to remind myself that it's a replica, and that it's not worth $250,000+!
Thanks everyone!
Absolutely fantastic work! If you ever think of cutting the pieces for folks like myself that can "do it yourself assemble", let me be your first customer!! (serious!)
REALLY nicely done and well presented. Thank you for sharing, and let us know if you decide to build case kits for assembly.
PS Your keyboard surround is awesome!
Thank you! If I ever figure out a way to put it together as a kit, I'll let you know.
The keyboard acrylic turned out really nicely, and I'm very happy with it. I basically ordered a 1/4" thick bit of black acrylic from ebay. Some of the sellers out there will cut it to size for free. So that helped, since they have the equipment to cut it straight. I comes with paper stuck on the front and back, so it's easy to transfer an outline of the keyboard cutout onto it. Then I drilled it with a set of nice sharp titanium drill bits, making sure to go up very slowly in size, until the hole was big enough to get my jigsaw bit into it. I used a fine-cut jigsaw bit to cut out the interior of the acrylic roughly, leaving about 1/8-1/4" left from the edges I needed to finish. Then I just hacked at it with a cheap Harbor Freight file with it clamped to my Workmate. The outside bevel was a bit harder. I just clamped it down to my workmate again, and filed it by holding the file at a 45 degree angle, and kept filing it down bit by bit. To get the nice smooth edge, I finished it by wrapping progressively finer sandpaper around a block of wood, and this takes it down to where it's very smooth. Then, for the final touch, I took some felt, smeared some polishing compound on it, and used this impregnated felt pad to polish away all the scratches from the sandpaper. Originally, I had gotten some spinning felt pads to use the dremel on it, but the dremel simply burrows some areas deeper than others unless you can pass it evenly over the entire edge, and I never could get it working right, so I eventually did it by hand, and it turned out great.
This is one of the many lessons I learned in making this enclosure. The great thing about the black keyboard surround area is that it's totally removable. It is held in place by the keys of the keyboard, and so you can pull it off just like that, and it doesn't move while on there.
Absolutely amazing, well done, looks fantastic and is really a source of inspiration for me (and others I'm sure!)
Thank you very much!
This is gorgeous! What an impressive design/display piece!
Thank you for sharing!
Jason
Thank you!