How to: DIY 40/80 column auto softswitch
Following my other DIY (Do It Yourself) hardware project (keyboard beeper circuit) I thought I'd post info about another board (and very useful IMHO) I made a while (some decades!) back: a 40/80 column autoswitch for use with a Videx 80-column card (it probably works with other 80-column cards as well). I don't know its source or have any more info than what I'm posting below, but can say it works great.
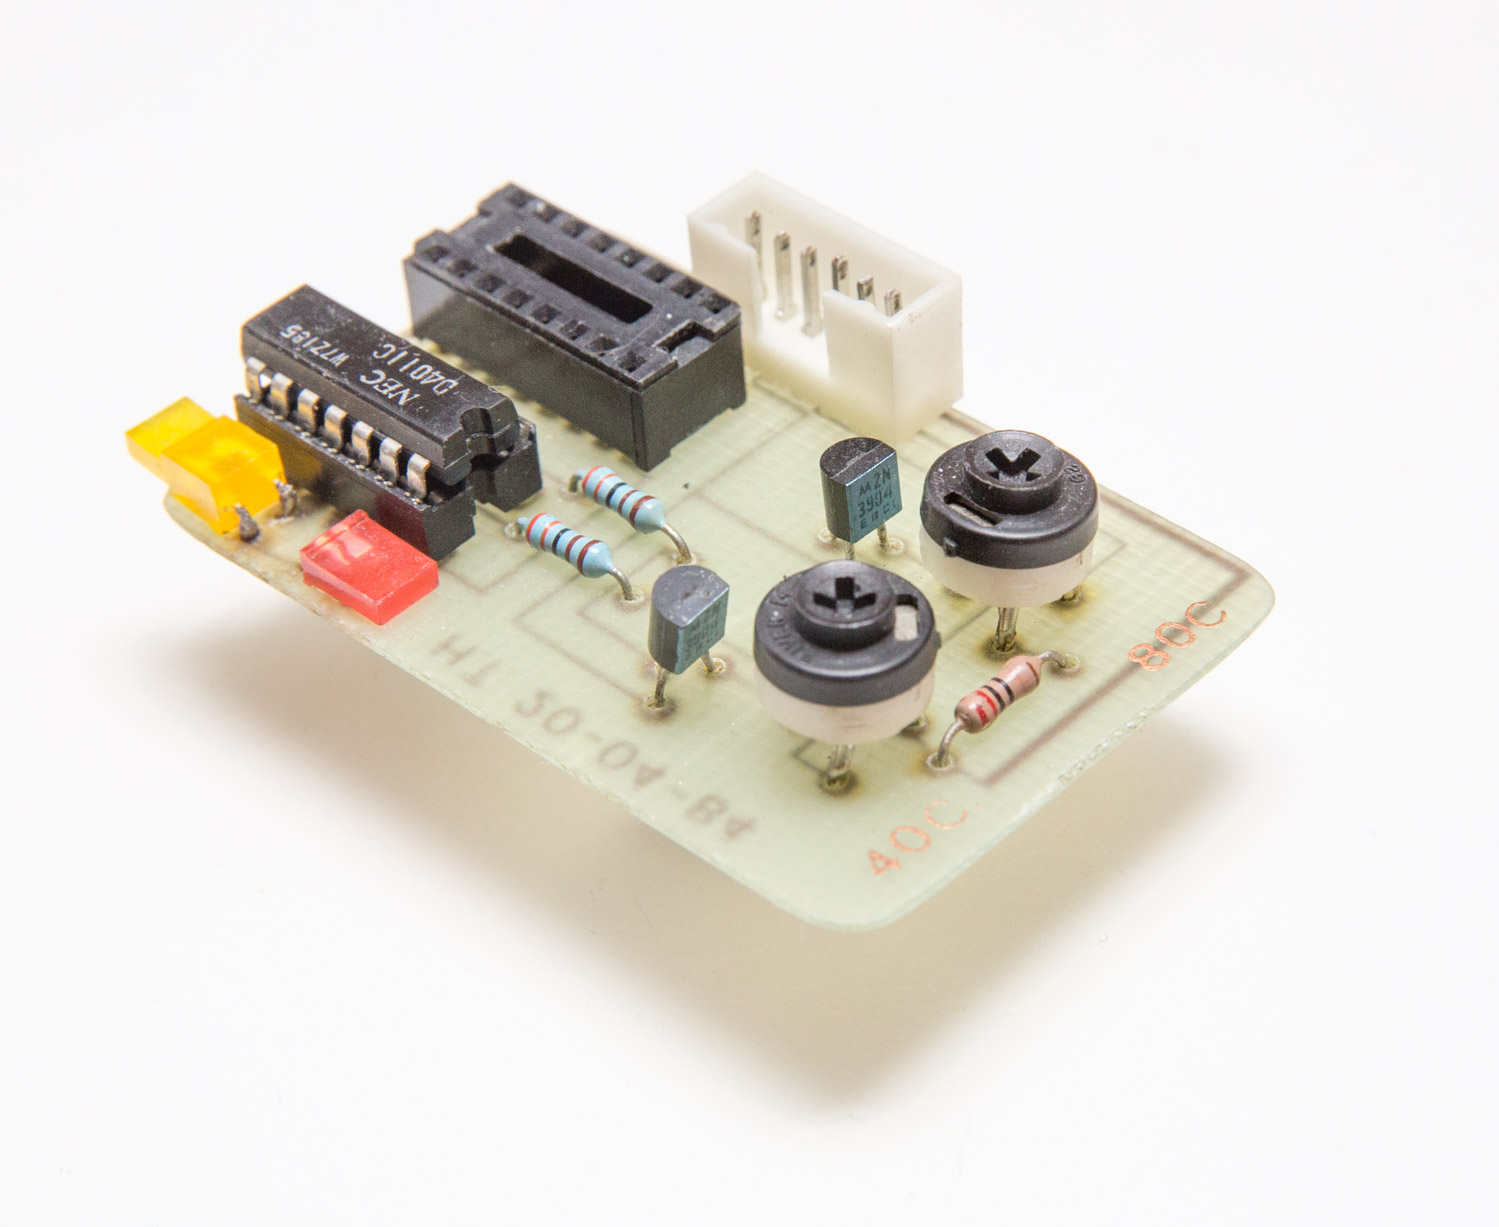
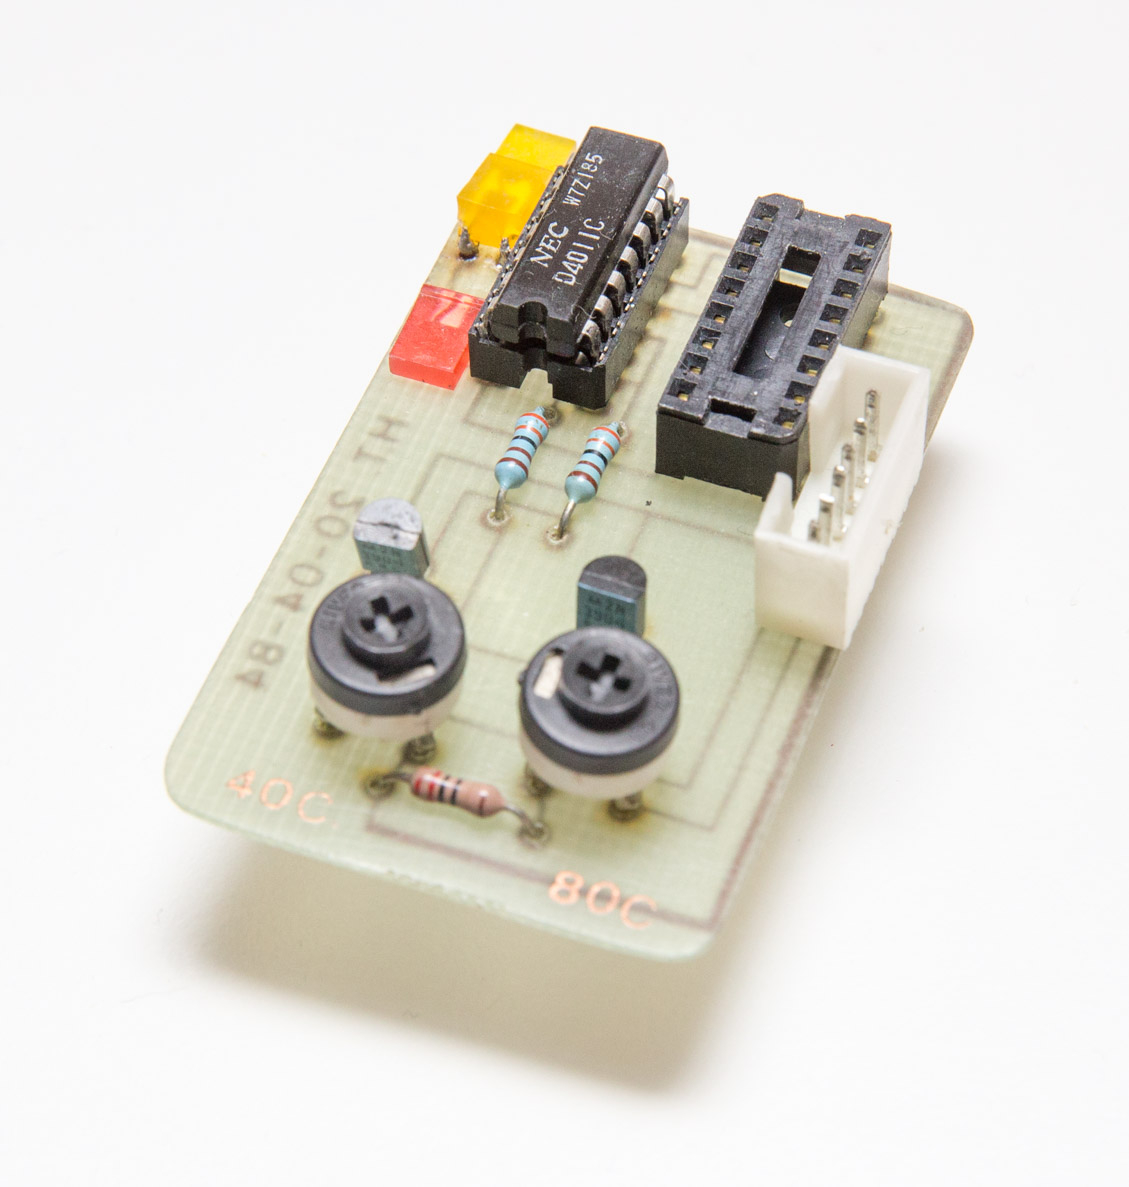
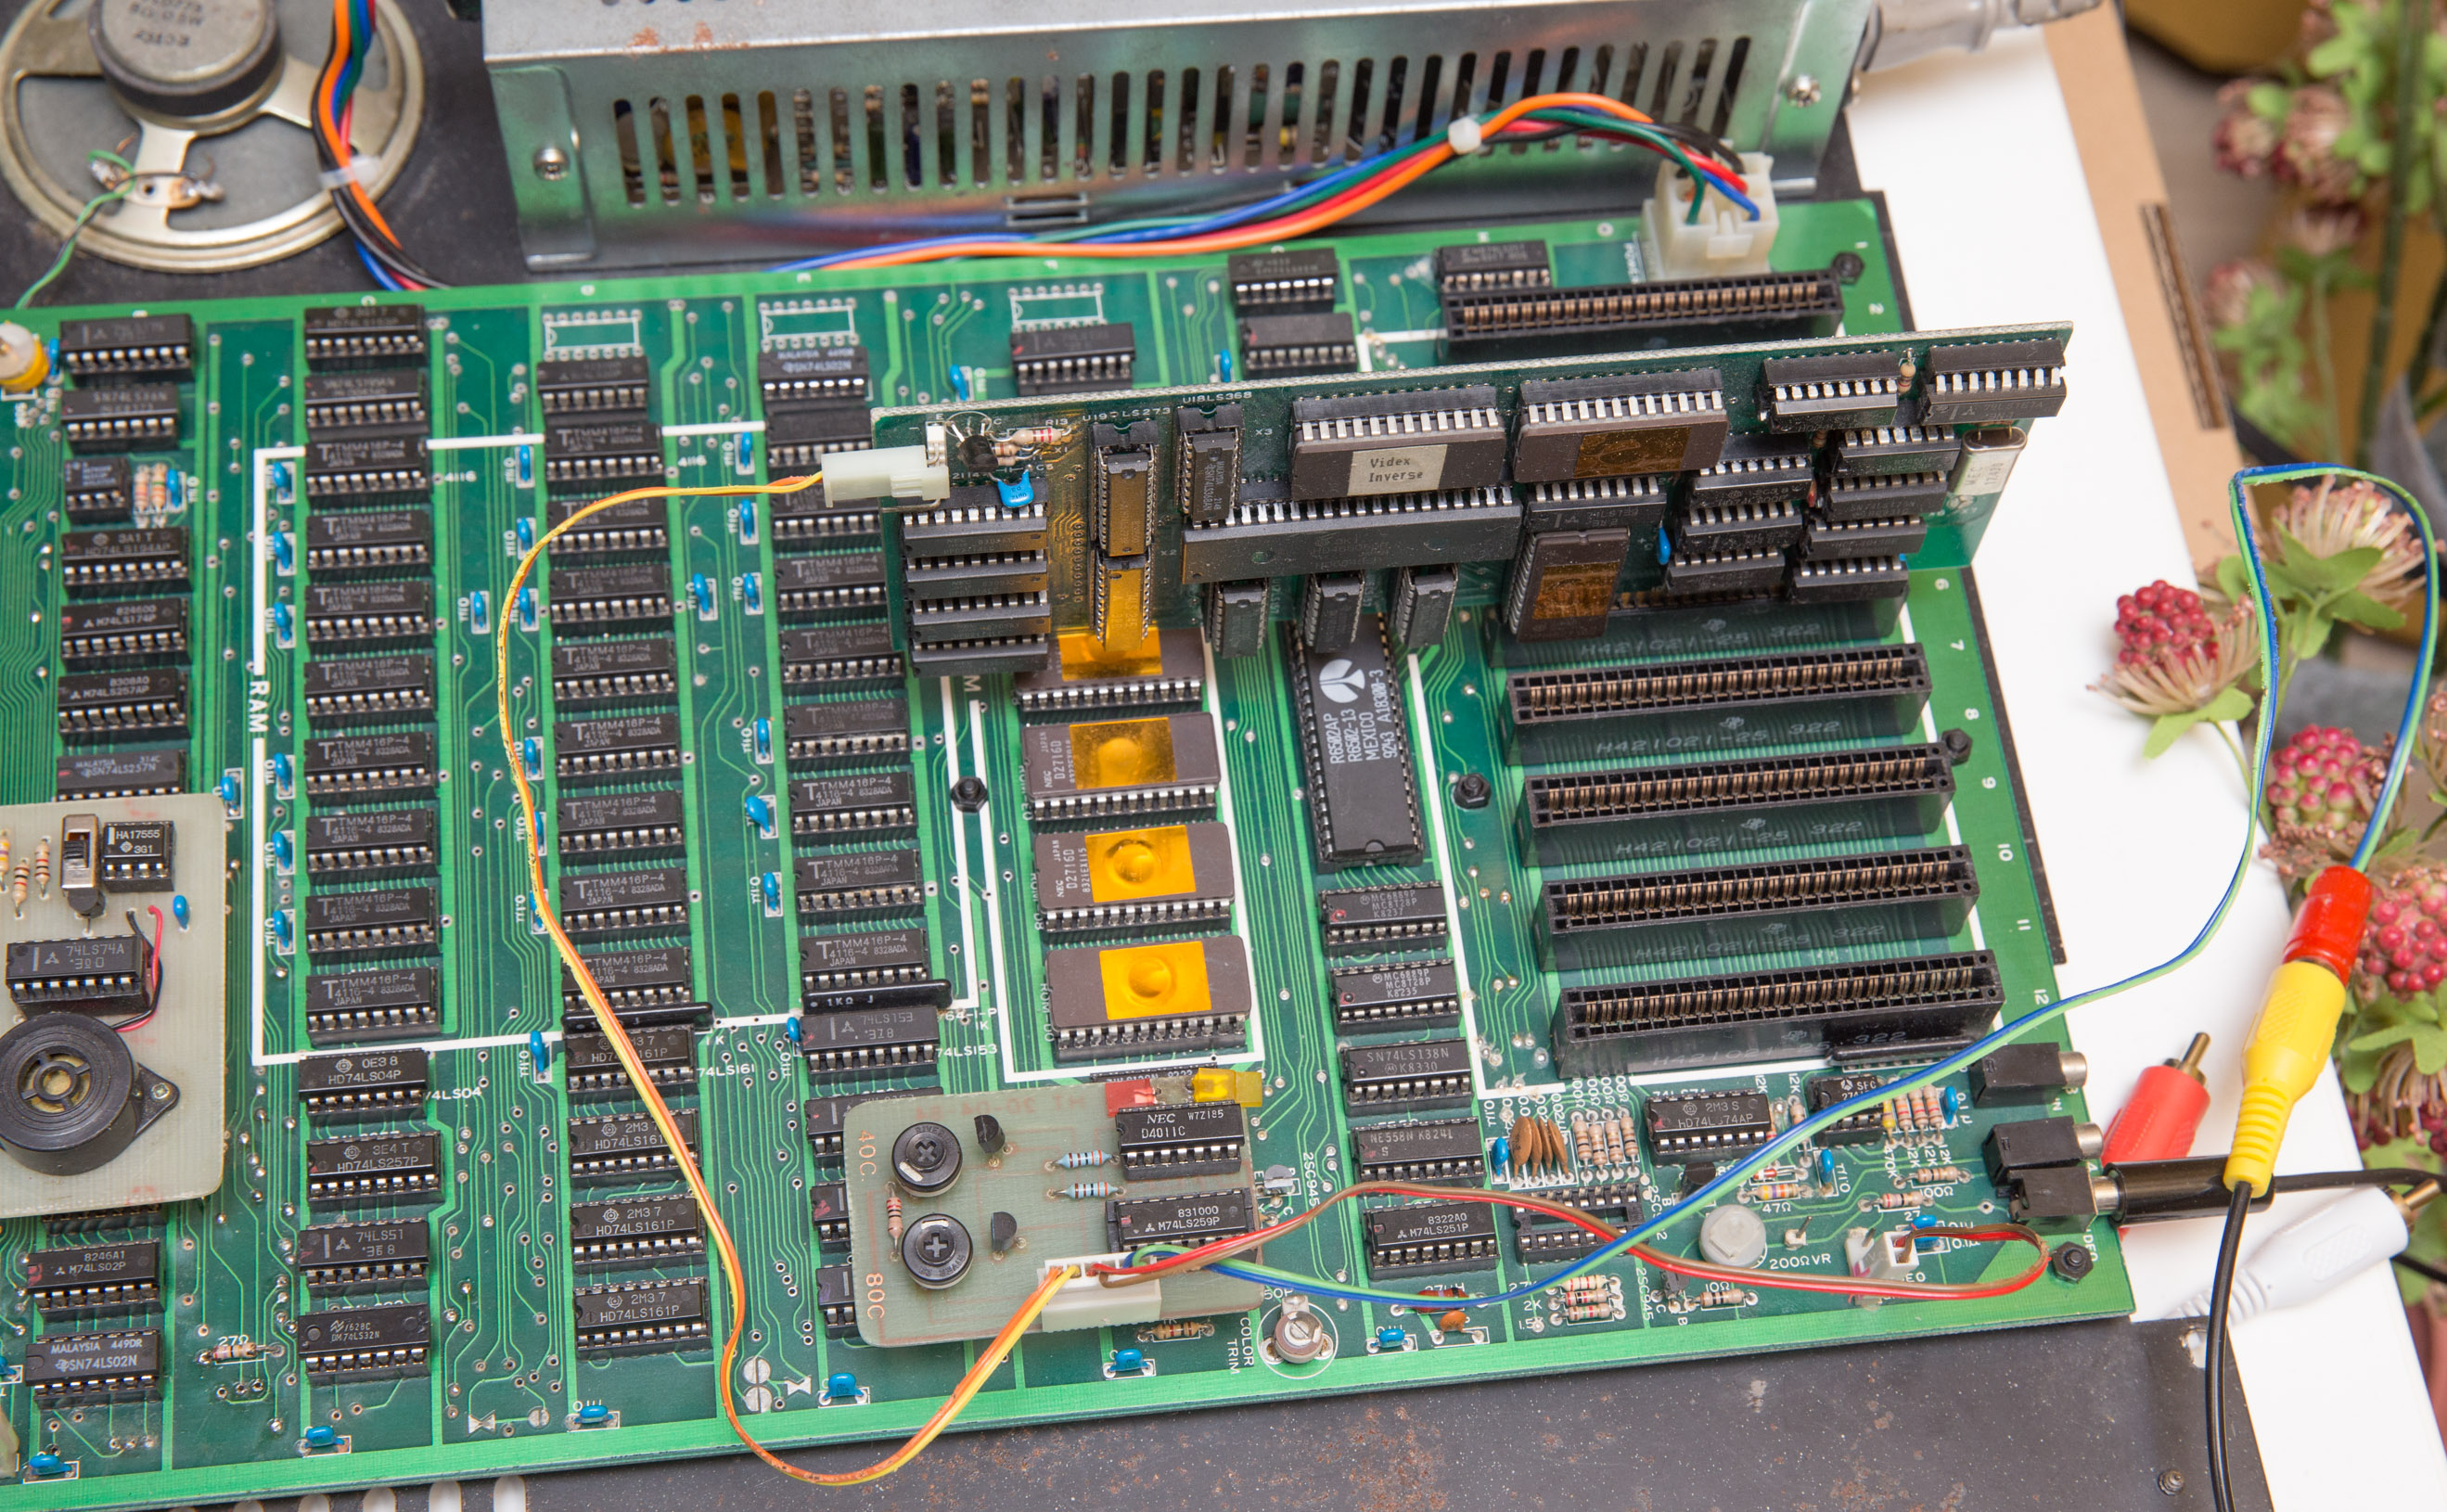
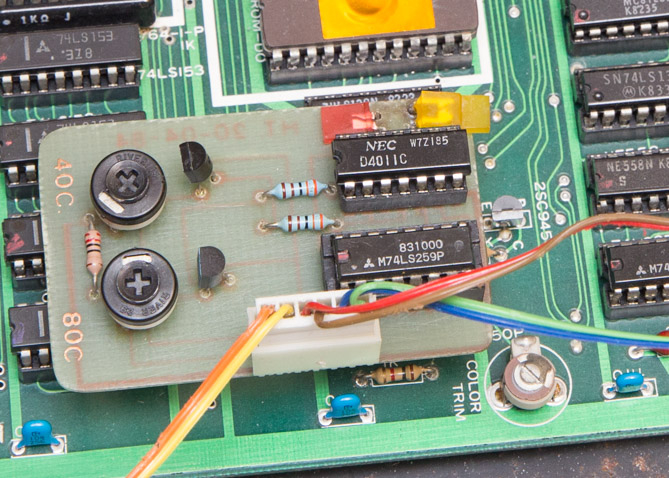
I've used it with an Apple II+ clone along with a Videx Videoterm clone. It plugs into the Apple II F14 position IC socket and in turn takes the IC from there in its own "through" socket .
What is it?
The Videx 80-column card has its own video output, and so does the Apple II (40 columns). After selecting the desired output in software (i.e. PR#3) you also need to change the cabling to the monitor. This is traditionally done with a mechanical switch, but the autoswitch eliminates this completely so any chosen video output just appears on the screen by itself. Two LEDs indicate which column-mode the switch is in.
Parts list
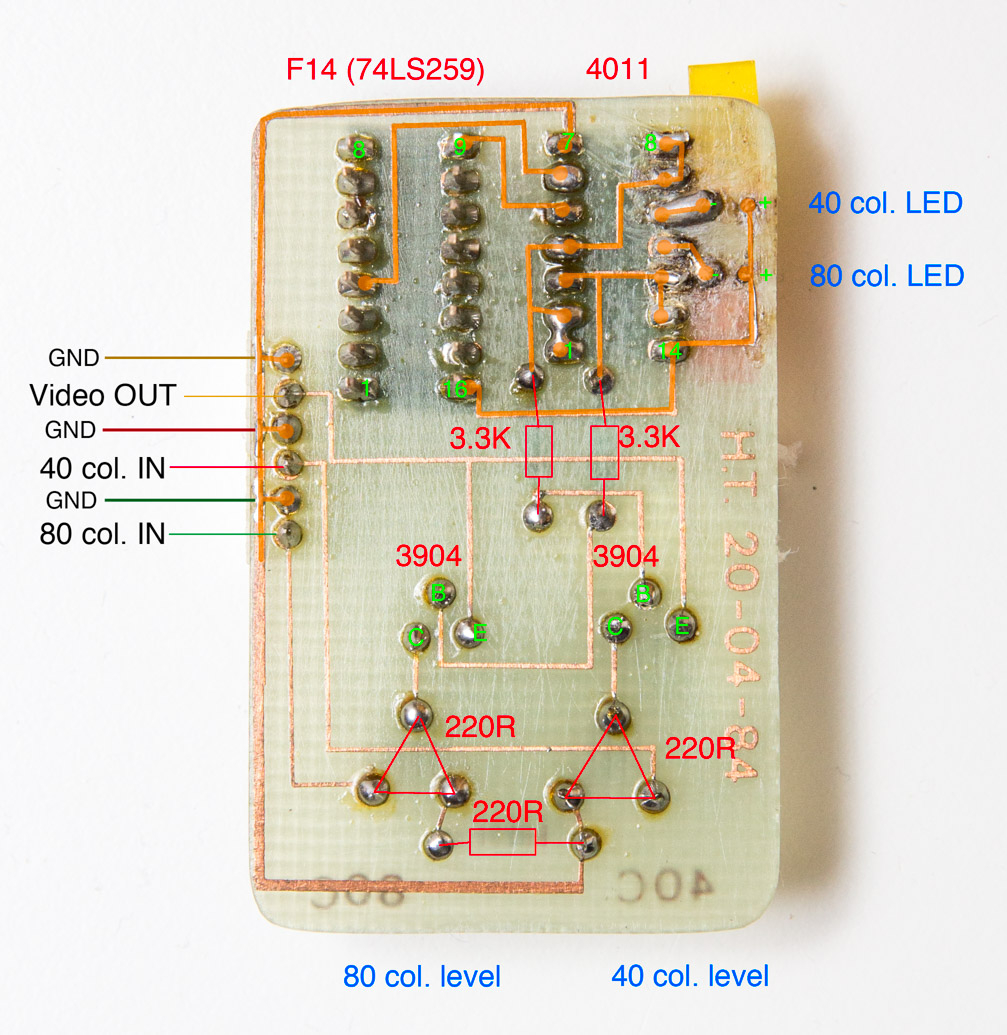
- 3904 transistor (2 pcs.)
- LED (2 pcs.)
- 16-pin wire wrap IC socket (2 pcs.)
- D4011 IC
- 14-pin IC socket (optional -for the 4011)
- 220 Ohm resistor trimmer
- 220 Ohm resistor (2 pcs.)
- 3.3K resistor (2 pcs.)
- 6-way socket
- 6-way header
- 2-way headers (2 pcs. -for inserting into Videx card and video/GND pins on Apple II board)
- phono socket (for insertion of monitor cable)
- connecting wire (suitable lengths for connecting between board and Videx card, monitor etc.)
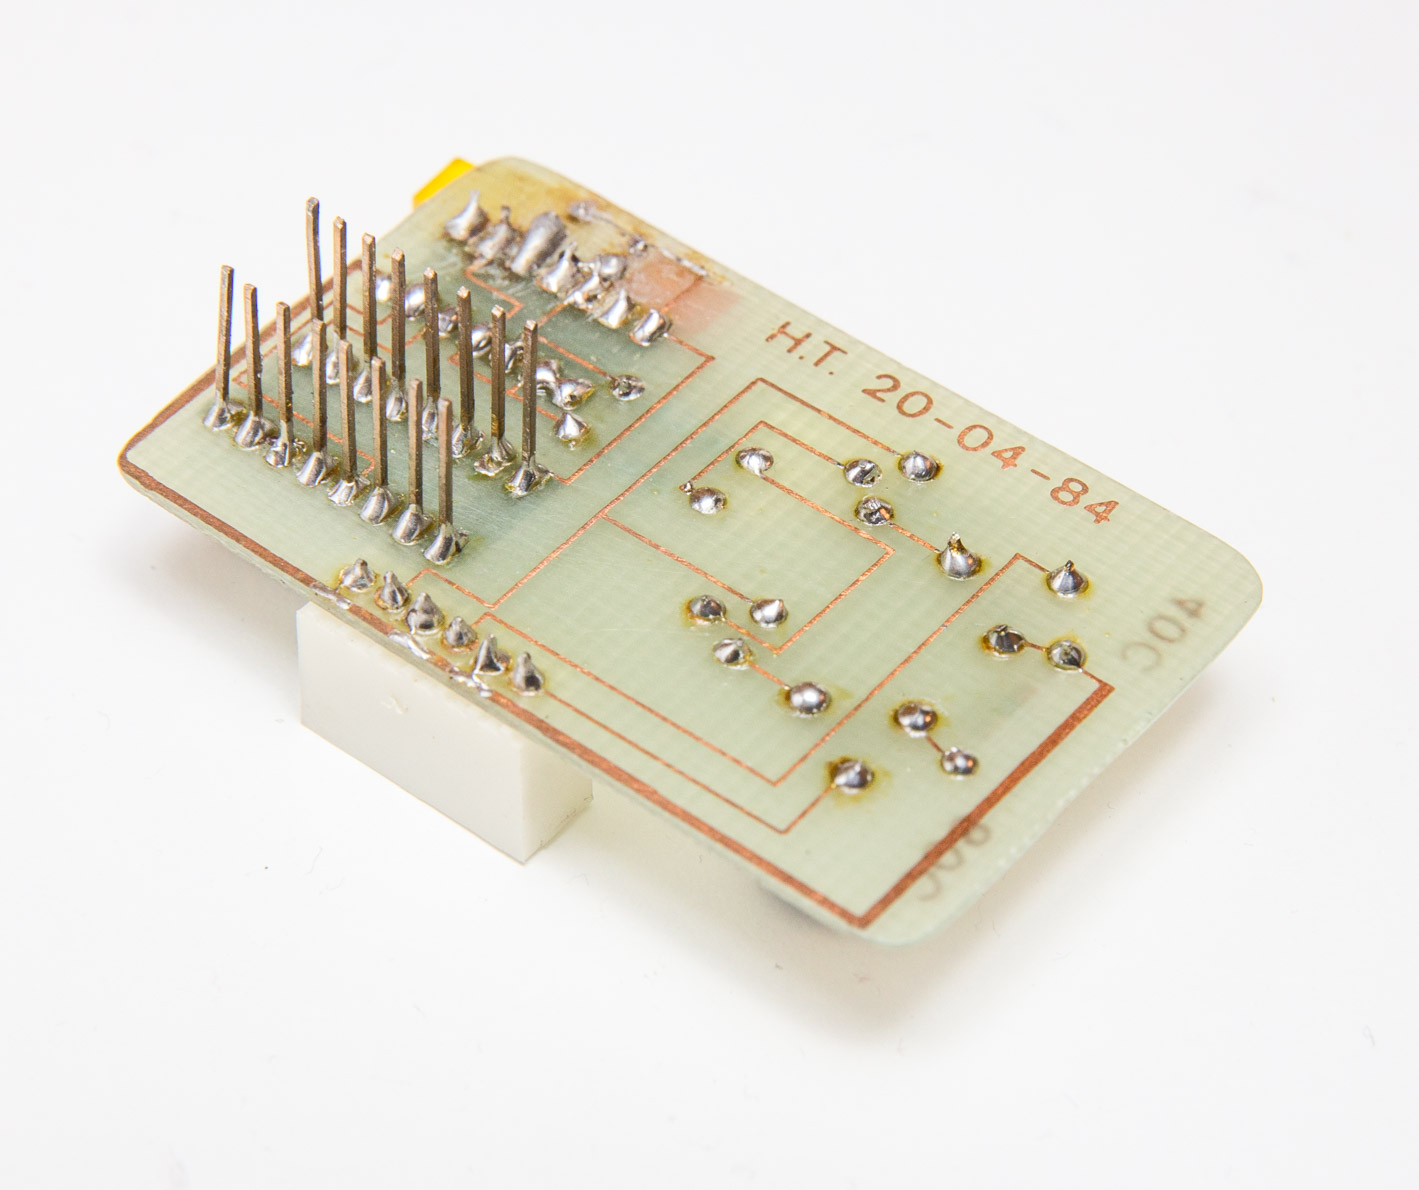
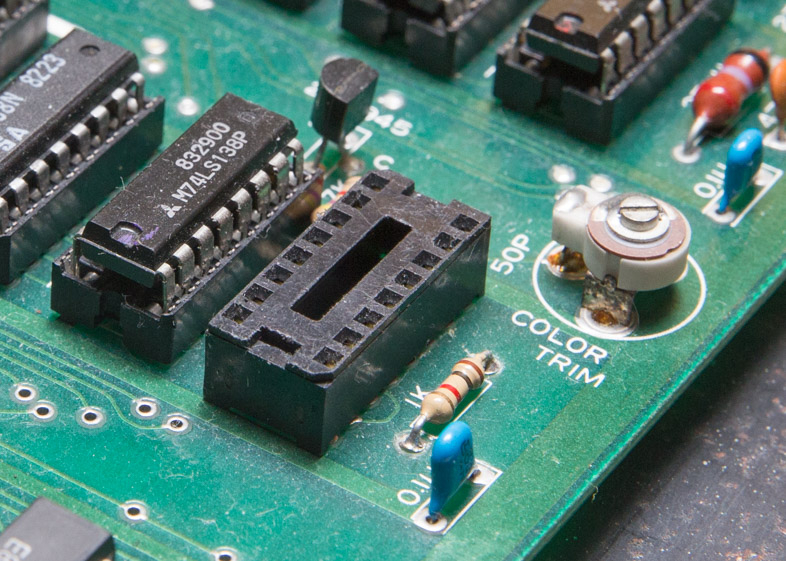
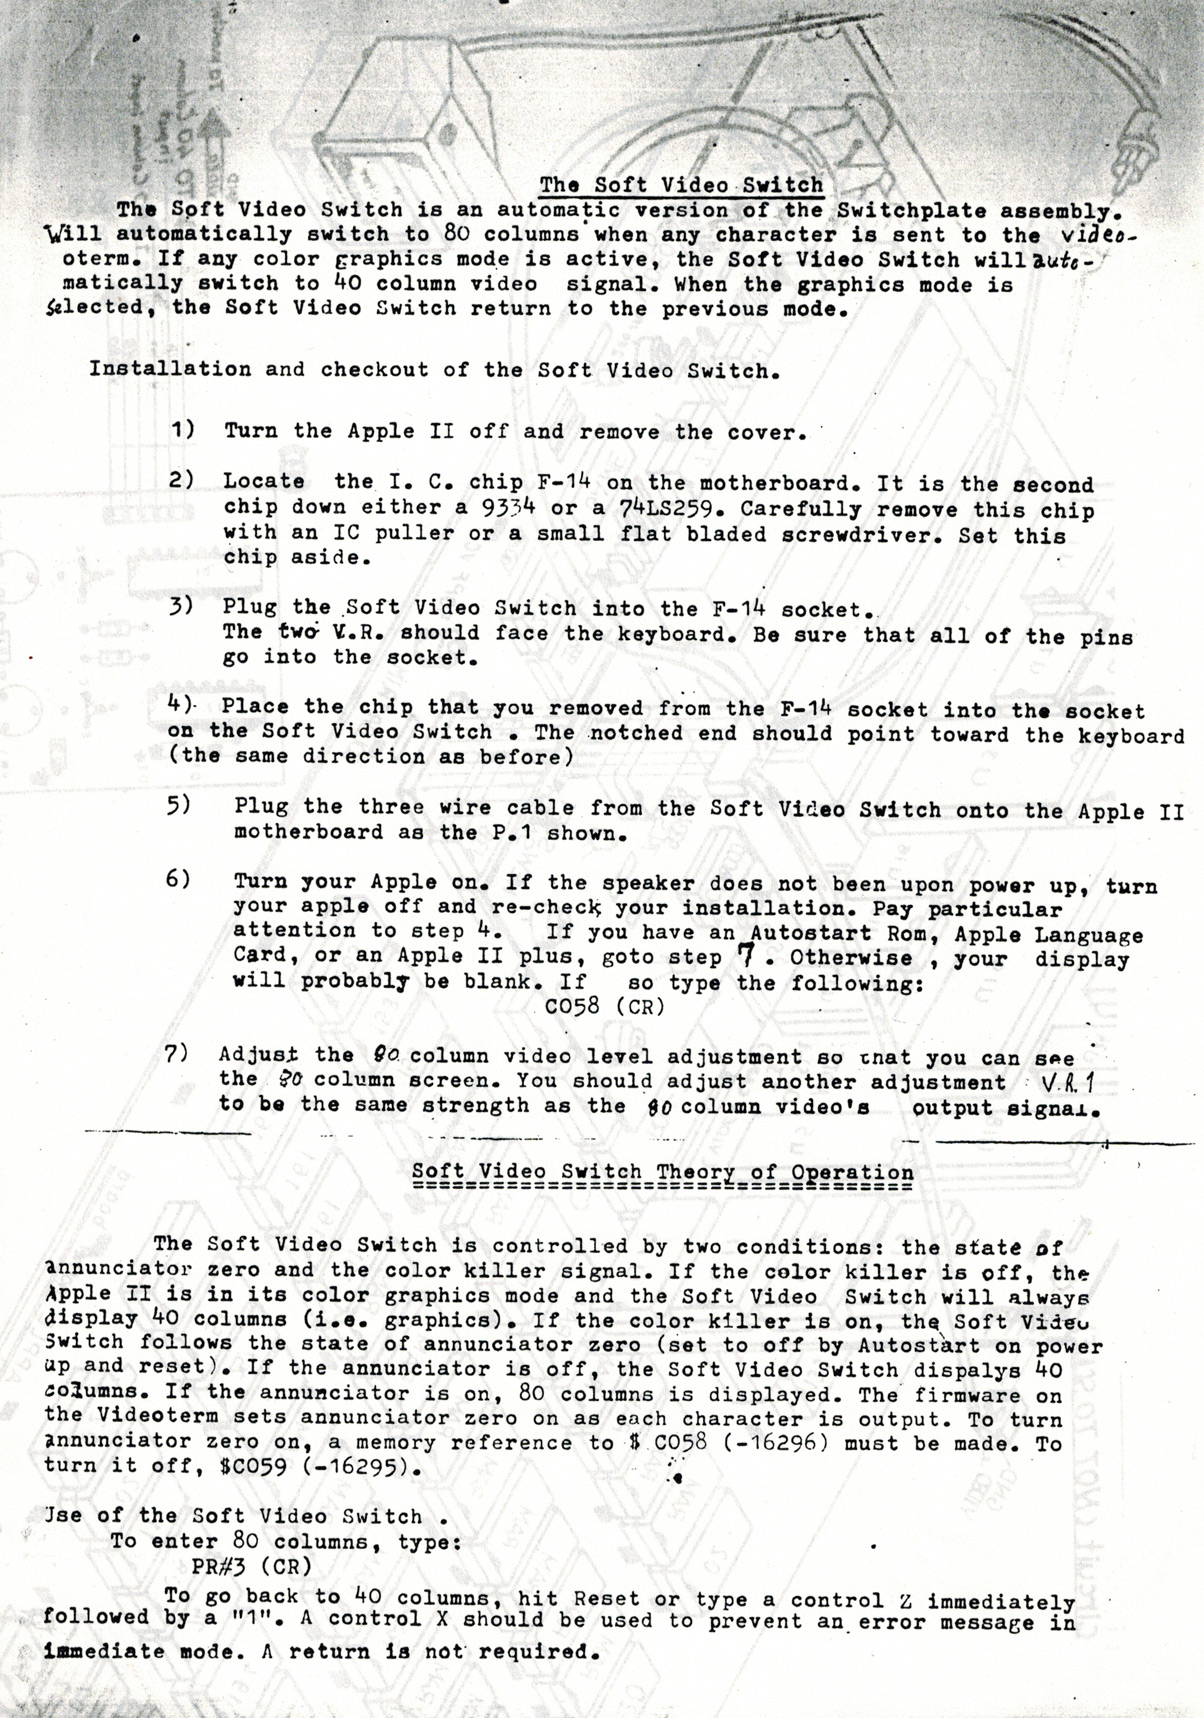
F14 (Apple II) IC-socket replacement
As with my Apple II Keyboard beeper board I would suggest you start off by replacing the Apple II position F14 IC-socket with a wire-wrap socket. F14 should be a 74LS259 or a 9334) and is a 16-pin socket. Failing to use a wire-wrap socket (or similar -you can use two 8-pin Arduino stackable headers instead) means that the board will fit very loosely and possibly even fall over, short circuiting your computer!
Follow the instructions/photos for the Keyboard beeper (scroll down to "B10 socket replacement (Apple II main board)" on how to do this (only remember to use a 16-pin socket (or two 8-pin Arduino headers) here instead of 14-pins!

How to build/set up
The project is pretty straight forward. Back in the day I hand drew/used rub-on circuit decals and painstakingly etched my own PCB, but if I were to do it today I'd redraw it in some CAD software such as Eagle or KiCAD, then have it professionaly made (if someone were to do that here I suggest sharing the design files by uploading them in this thread).
Be sure to place the two ICs the right way. As for the LEDs -you're free to use different colours for each mode (40 and 80-columns) or the same. It makes no practical difference but might be handy for troubleshooting/indication purposes or visually appealing.
The 6-pin connector has video signals from (a) the Videx 80-colum card, (b) video signals from the Apple II main board and (c) the video output which goes to a (preferrably green/monochrome) display monitor. Make sure you get the polarities right!
The usual video out jack on the back of the Apple II isn't used at all with the auto-switch, but in my case I have a separate colour monitor attached to that output and use it for games, and a green monitor which is connected to the auto-switch output and is used for "serious" software (80-column word processing, CP/M, programming and so on). The best of both worlds without the hassle.
The two trimpot resistors on the soft-switch allow you to adjust the video levels so you can match both modes instead of having to reach for the monitor's "brightness" control each time you change a mode. The video output trimmer on the Apple II (close to the game port socket) makes no difference here -it only adjusts the video level for monitors attached to the rear Apple II video output jack.


- Fuji's blog
- Log in or register to post comments
Comments
Excellent post...
Excellent post... These are the type of projects I love to see.
Hardware projects like this are what makes the Apple ][ a true personal computer. Nicely done!
Thanks for posting. +1 more like this!
Thanks for those kind words!
Thanks for those kind words!
In the early 80s I built a lot of hardware for my II+ despite having more or less no theoretical understanding of electronics at all, but came across projects like these as well as playing with the game-port for instance.
I experimented so much with that port that I worried about its IC socket, so I built this expansion box with 6 sockets and a rotary switch to select the one to use, and an LED next to the selected socket would light up. Simple, but very handy! I also had an EPROM programmer, hacking the "APPLE ][" boot-up title to something else and designing different characters for the Videx 80-column card. I believe there was some special software for drawing/editing fonts for it, but I can't recall the name. Good times!
Fuji wrote:
[quote=Fuji]
Thanks for those kind words!
In the early 80s I built a lot of hardware for my II+ despite having more or less no theoretical understanding of electronics at all, but came across projects like these as well as playing with the game-port for instance.
I experimented so much with that port that I worried about its IC socket, so I built this expansion box with 6 sockets and a rotary switch to select the one to use, and an LED next to the selected socket would light up. Simple, but very handy! I also had an EPROM programmer, hacking the "APPLE ][" boot-up title to something else and designing different characters for the Videx 80-column card. I believe there was some special software for drawing/editing fonts for it, but I can't recall the name. Good times!
[/quote]
I've written a utility to display the font in a chargen ROM for either ][+ or //e. I've been considering writing one to edit the data. The code I've written is targetted to Linux, because that's my primary platform these days and where my current EPROM programmer works. My code should work on MacOS as well, and maybe even Windows, although I have basically zero insterest in anything Microsoft and don't have Windows to try it on.
Cool! Tell us when it's done.
Cool! Tell us when it's done.
Now that I think about it, the software I used to edit the Videx 80-column card characters (and burning them into an EPROM) might have been from Videx. Did they make any such Apple II software?
Fuji wrote:
[quote=Fuji]
Cool! Tell us when it's done.
Now that I think about it, the software I used to edit the Videx 80-column card characters (and burning them into an EPROM) might have been from Videx. Did they make any such Apple II software?
[/quote]
I don't know. You can find the utility to display the font in an Apple II CHARGEN ROM image on my github page:
https://github.com/softwarejanitor
There are a few other little utilities there which might be of interest to Apple II enthusiasts.
I'd like to try it out, but
I'd like to try it out, but it looks like the files are uncompiled -is there a ready to use Apple II binary available somewhere?
I found the EPROM files I made for my Videoterm 80-column card on a 5.25" Apple II disk, and also the editor I used, on a disk called "Videx Videoterm utilities". I had forgotten that it even has an EPROM burning function built in! So with my AP-64e EPROM burner card I can burn those files directly.
Fuji wrote:
[quote=Fuji]
I'd like to try it out, but it looks like the files are uncompiled -is there a ready to use Apple II binary available somewhere?
I found the EPROM files I made for my Videoterm 80-column card on a 5.25" Apple II disk, and also the editor I used, on a disk called "Videx Videoterm utilities". I had forgotten that it even has an EPROM burning function built in! So with my AP-64e EPROM burner card I can burn those files directly.
[/quote]
That's pretty cool. I don't have an EPROM burner that directly attaches to an Apple II. The one I have I use under Linux. However, it should be possible to run the Videx utility on an emulator and then copy the ROM image file out to Linux and then burn it. A little more convolutions, but doable.
I'm still planning to write a CHARGEN ROM editor that can handle both ][+ and //e style images (interestingly they are not the same and kind of backwards of each other). I need the //e one for a project I've had sitting on the back burner for a while which is a switchable multi-font board for a //e using a higher density EPROM.