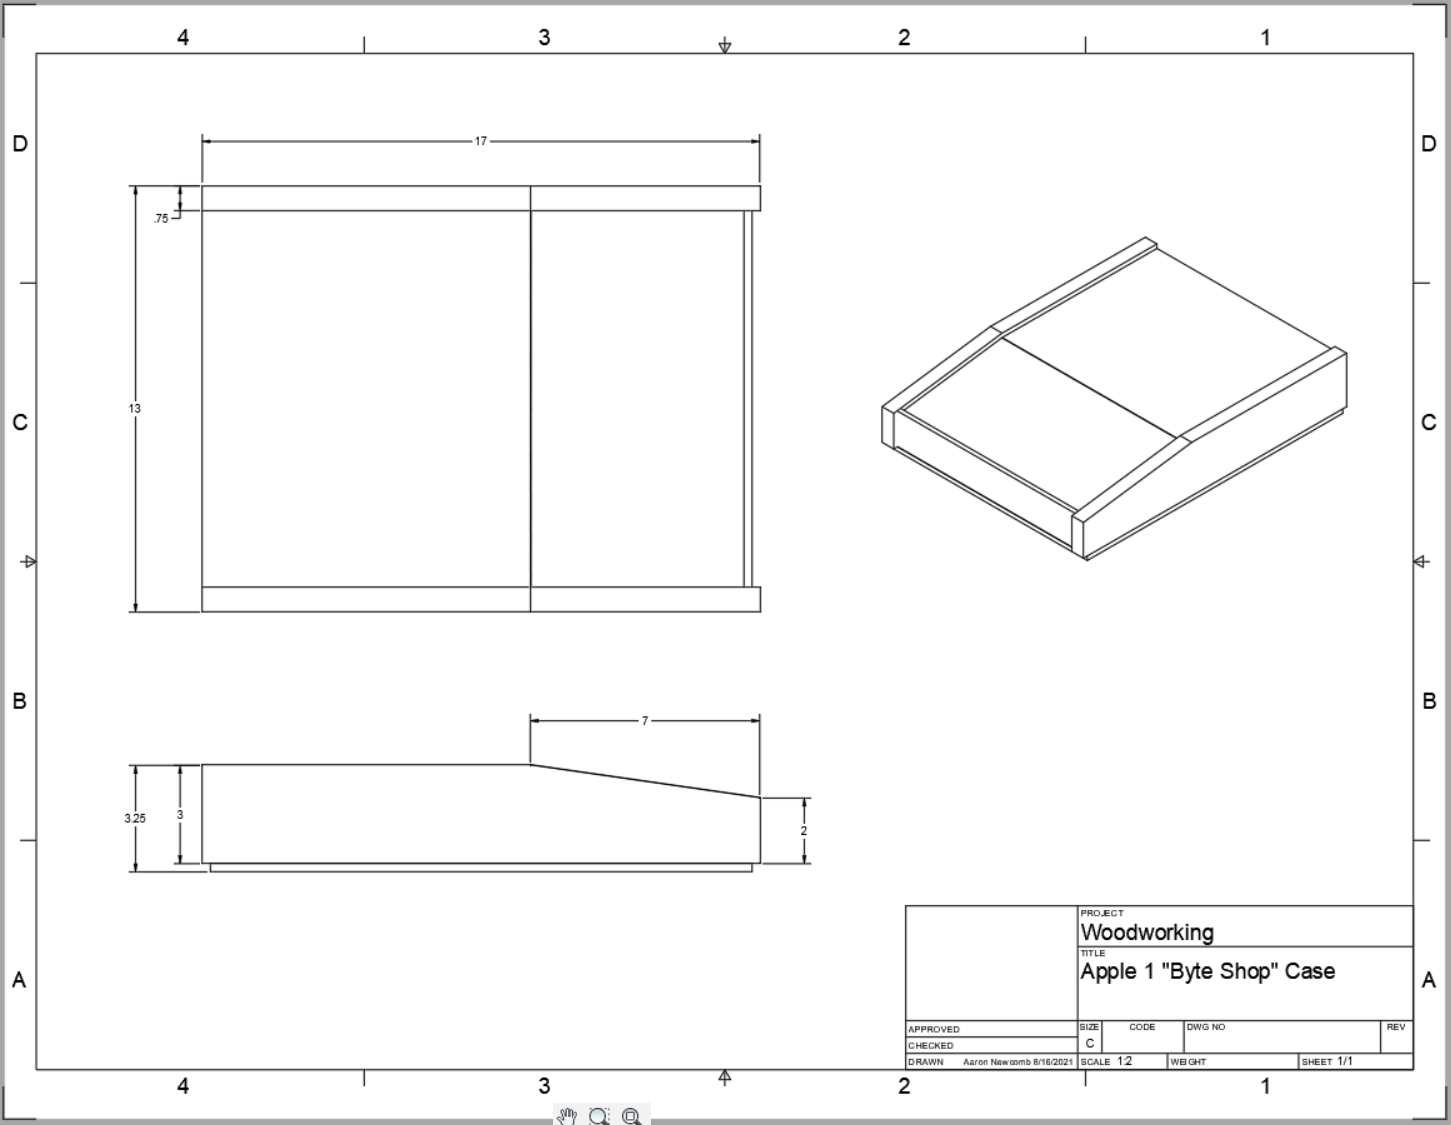
I eyeballed some measurements for my Apple 1 case based of the "Byte Shop" koa case (I am not using koa wood for mine) and modeled it up in Fusion 360. Here is a drawing in case anyone that has actually seen one of these cases has any feedback. I will keep modifying and post the final drawings here when I am finished. I am using 3/4 inch for the sides and 1/4 inch for everything else with routed slots for the 1/4 parts.
Anonymous
User login
Please support the defense of Ukraine.
Direct or via Unclutter App
Active forum topics
Recent content
Navigation
No Ads.
No Trackers.
No Social Media.
All Content Locally Hosted.
Built on Free Software.
We have complied with zero government requests for information.
So, I have already noticed a few issues.
1) If I leave the height of the back part of the case at 3 inches, that leaves no tolerance for the ACI which (in my case) is just small enough to fit when I take into consideration the height of the solder joints.
2) It looks like the 1.5M Apple 1 on ebay has a recessed bottom plate, so I will probably need to account for that in my design as I didn't on the first pass.
3) Thinking of adding in some air flow, what do folks think about the airflow of the ebay Apple 1?? Looks like it has a screen in the back and cutouts in the bottom panel. I will attach some pictures.
s-l1600 (4).jpg
s-l1600 (3).jpg
s-l1600.jpg
Here is my next revision. I think this must be pretty close. Now the back is 4" while the front is 2". There is room enough for either the Stancore transformers or a 3" wide switching power supply on the left of the MB with enough left over for the video cable as well. Depending on how the bottom panel is mounted (wood strips or mounting brackets) there could be even more room, but this should suit either approach.
Image 15.png
Great effort, and yes the revised design appears pretty close to the original Byte Shop case. For my Apple-1 I'm looking for a case design that permits it to be run with the lid open so they board can be viewed. I also want forced cooling because I'm concerned passive cooling is not sufficient as the regulator gets hot.
In post #4, "fingerz" wrote:
" I also want forced cooling because I'm concerned passive cooling is not sufficient as the regulator gets hot. "
Uncle Bernie's comment:
The problem with this is if you design a case for active cooling, the pattern of air flow will be different from the convection cooling case, meaning some differences in some panel(s).
The Byte shop case is a very poor design from a convection cooling standpoint. Note that there are no slots above the LM323K heat sink other than the gaps of the ill fitting, crudely made panels, which don't qualify as cooling slots at all. Terrible !
This is how you can do it right: have a wide intake slot (or several smaller slots in a row) near the bottom of the front panel (or in the bottom panel) at the front of the PCB. If that slot is in the bottom panel, you must use rubber feet to elevate the bottom panel a bit, so air can flow into the slot. On the back side, the best approach would be to have an outlet grille (or a pattern of slots) in the top panel just over the LM323K heatsink. Which would look ugly, so we won't do it that way, it's for the matter of discussion. The whole thing works like this: the LM323K gets hot and creates an updraft (you can actually feel this if you put your hand over the heatsink of a running Apple-1). This hot air rises and escapes via the outlet opening. This creates a slight underpressure in the rest of the case which sucks in cool air from the front slot(s). If these are properly placed, this incoming air will flow over the PCB towards the LM323K, and not below the PCB. Some air flow fence near the PCB front edge mounted to the bottom panel can help with that.
Now if we want to avoid the uglyness of slots in the top panel, we could put an outlet slot at the upper edge of the back panel, just at the LM323K. Some slanted baffling (i.e. thin sheet metal) could be installed over the LM323K heatsink to encourage the airflow to go in the right direction (up and towards the rear). I think an airflow stop fence mounted on the top panel just before (or partially around) the heatsink which is open towards the slot could have the same effect. Whether this air flow baffling / fencing is needed at all can easily be found out by putting a temperature sensor on the LM323K heatsink. The test baffles for the measurements could be made out of cardboard (not suitable for the final product).
This would make a really nice, silent Apple-1 following the late Steve Jobs' "Zen" principles.
As far as I am concerned, I absolutely hate fan cooled equipment as I have spent considerable time of my life near these nasty and loud instruments or computers and they greatly disturb my mental concentration and focus. Later I used to wear headphones running a MP3 of pink noise to mask the howling of these terrible fans.
This said, if you want to turn your Apple-1 into the desktop equivalent of a F-16 jet fighter (noise wise), you need to put in a fan. The louder this fan is, the better ! You want bang (= noise) for your buck ! (/sarc off) But for this fan to work it must be placed on the back panel just behind the heatsink, which means a different kind of (hopefully CNC machined) cutout, not a slot. (Yeah I know there are 'silent' fans but as their rotor bearings nowadays are made out of Chinesium, they won't stay silent for long, and you have to buy a new one. And another one. And another one...)
You can now see why passive air cooling and forced (active) air cooling are not compatible when it comes to the design of the case, and why active cooling has drawbacks, such as costing more money (and nerves if it makes a noise).
There is yet another problem: how do you intend to power the fan ? You can't take the +12Vdc it (typically) needs off the regulated +12V bus of the Apple-1, as its 7812 regulator is thermally at the limit. (This is the hottest one, not the LM323K). So you would need to put some other little PCB in the case to make the +12Vdc for the fan. Yet another ugly complication.
So I would prefer to go with passive cooling, which at the low power levels in the Apple-1 can be done if the air flow pattern is properly designed.
And if you really want to run the Apple-1 as cool as possible, use a switchmode power supply. No fan needed, guaranteed ! (Cooling slots still needed as the TTLs also generate heat).
Looking forward to this cabinet project. Once you have programmed the CNC milling machines, it is much cheaper to make more than one parts set. The first one (the prototype) is the most expensive, I once got a quote over several thousand US$ from a local craftsman to make an Apple-1 cabinet for me (Ouch !). Well, this involved rare tropical woods and I did not make CAD drawings so he would have had to pay his CAD guy to work out the details. But after the prototype, and if using cheaper woods, a small production run of such cases would not incur excessive costs. There is a pitfall with cheaper woods, however: unlike tropical woods which have a nice look and feel in their natural form, the cheaper woods may need staining / spray paint overcoat(s) / polishing to make them look great. If you pay a true craftsman for this to get a really professional finish, this added work may cost more than using more valuable woods. If you try to apply this finish yourself, good luck. Unless you have the skills and the good professional spray painting and polishing equipment, the outcome will look bad.
So far my 10 cents of hints / advice. Comments invited ! Would be great to have a good source for nice Apple-1 cabinets !
Or, instead of adding another DC supply for a fan, use an AC fan.
I plan on testing this out with cardboard first before I cut out my case. I am going to start with something similar to the Ebay case in the pictures above, but I will probably move the opening on the back panel a bit more in line with the LM323K. That way I could add a "heat ramp" above that regulator if needed. I'll update after my testing. I also want to test out moving the inlet from directly underneath the PCB to a slot near the front of the case so the air naturally moves from front to back across all the ICs and the regulators. The natural slope of the keyboard panel should help in this case (pun).
I haven't been that active on the board for the last month, life happens, so I apologize as I'm getting caught up and now reponding to some threads....
UncleBernie is right, the real byteshop case doesn't have much ventilation without assistance from a fan. There are only a handful of surviving cases and about 1/2 have had AC fans added to them. I use an external Radioshack 120V AC computer case fan blowing though the square hole in the back when I operate my Apple-1 in the case. Mine wasn't modified for a fan and obviously I'm not modifying my case as it is a historical artifact. I have run my original Apple-1 for 12 to 14 hours in this case and the LM323K doesn't get super hot. With the fan blowing though the square hole, the hot air evacuates pretty well from the bottom vents, ACI cutout and the gaps in the keyboard cutout. I also have my board raised a slight bit to allow the air to pass underneath using some thin cork spacers.
In general I don't run my Apple-1 in the original byteshop case. This is not because of ventilation, but the fact that you can't see the board in the case. I have a separate Plexiglass case with a fan and use one of Wendell's keyboards.
Cheers,
Corey
Thanks for the feedback, Corey. I think having a separate plexiglass case for display is a good idea.
Those plans seem to work fine. I will probably re-make this case again because of the problems I had with the water-based stain. DON'T USE IT! Here is the video I made about the process.
https://youtu.be/zJLw2gyU59o
Hello there fellow enthusiasts, this is my first post here! What a great place this is to share and read.
I have a software background actually, but like electronics a lot too. Some time ago I ordered a Newton board from Mike, started collecting parts and soldering the ACI. This case will complete my project next year I think haha.
@Aaron, great video's! Truely an inspiration. I love woodworking myself as well, so eager to start off with the case, but better start with the contents first ;-).
Best regards from Holland,
Bobby
Beautiful case, and nicely done video.
Now that you have the keyboard outline entered into a CAD package, it might be a nice touch to include the outline in the design files for the wood case, in case anyone wants to CNC the parts.
Thank you for sharing this build!
Very often are now Apple ][ keybowrds used in Apple 1 replicas. I think I will go also this way on my replica system.
Now my question: Would it not be more "correct" to omit the power light under the keyboard cover? I never saw such a power light on the very first systems ...
I recently restored a small fan I thought needed replacement, and discovered something interesting. The silent sleeve bearings are of the "oilite" type with a sintered bronze bushing that absorbs oil and makes a thin oil film for the shaft to ride in. The problem is not the quality of the metal bushing (anyway, you want a bronze bushing to be soft, so the oil can be squeezed out as it runs). But fans are usually used horizontally; what keeps the oil from running out? As I discovered, the only thing keeping the bearing from running dry and squealing on some fans is a mylar sticker. A rubber plug seal would cost another 2 cents and might keep the fan in service longer, translating into fewer sales. Think of the tons of equipment that gets scrapped because it "broke", due to a loose sticker!
I restored the fan by flushing the bearing with brake cleaner. It is necessary to do this outdoors and always wear eye protection. The "strongest formula" BraKleen is pure perchloroethylene and will not damage fan plastics if used judiciously. Surrounding the bearing opening with paper towels will prevent overspray from reaching the fan electronics. Using the tube to direct the briefest possible burst into the bearing, a rocket of solvent shoots back out, carrying oil right into your face. It helps to observe the operation from the side.
I think the best results will accrue from repeating the cleaning flush around a minute later. That gives time for liquid solvent to penetrate the crypts of the bushing to dissolve old gummy oil and then be removed in the second flush. Perchloroethylene spreads very fast but the crypts are extremely small and will slow it down. Then let the bearing dry, but within a few minutes add a drop (for a small, 30mm fan) up to a few drops (for a 120mm fan) of light sewing machine oil—I like the Gunk brand. 3-in-1 Oil is labeled for large electric motors and must therefore contain detergents for dissolving carbon buildup, which we don't want here. We want to put the new oil in while the bushing is still slightly wet with solvent, because that will help pull it into the crypts of the bushing without needing to heat it.
The amount of oil used should be just enough to "float" the shaft in the bearing. Oil that pools above the bearing is too much. Turn the fan by hand a few times to distribute the oil and see if it turns smoothly (it won't spin freely because the permanent magnets lock the rotor). You could use heat at this point, but I didn't find it necessary. Using heat, you run the risk of softening the plastics and the fan will never spin true after that.
Then the terrible mylar sticker seal needs to be reapplied. You can try to clean the failed PSA (pressure sensitive adhesive) off with alcohol, and apply a glue that won't squeeze out. A glue stick (waxy material) seems to work OK. Press the sticker onto the correct place so it fully seals the bearing area, and you're back in business. You do not need to replace any outer product label, and I wouldn't, because it can disturb the inner sticker seal which was the cause of the whole mess.
This even works without disconnecting the fan from the equipment, which means it can restore machines with hard-wired fans that would be difficult to remove. Just turn the device so the fan bearing is facing up.
Use Watco danish oil for the stain. It's period correct, available at Home Depot and will look correct. It will take a few weeks to really harden up.
I don't generally provide case details for obvious reasons related to someone creating a copy and trying to pair it with a real one to increase its value since the cost of real Koa wood is cost prohibitive for a replica today.
That being said, the cases were sold with and without transformers from the byte shop. If you bought the triad transformers from byteshop, they were mounted on a glued in piece of wood for strength with bolts though it, it's hard to see in the public pictures because the piece of wood is skinner than the transformers. If those transformers come loose they will destroy the board when moving the case. I'm mentioning this to protect your board in the future.
Thanks for the CAD & wealth of information on this forum. The build video was great. I'm embarking on my own replica case, and found an interesting tidbit on case dimensions - if you look at the Science Museum of London collection listing for the Apple 1, they list the dimensions as 114 x 387 x 457 mm or 4.5" x 15.25" x 18".
Assuming that's the total volume of the case including the bottom board w/ feet, so maybe the sides are 4", a standard board width you could pick up? https://collection.sciencemuseumgroup.org.uk/objects/co503422/personal-computer-model-apple-i-personal-computer
Byte Shop Replica
Looks nice, do you have any more pics of the finished item, inside and out? Thx
Case_6.JPG
Case_2.JPG
Case_1.JPG