| Attachment | Size |
|---|---|
| 83.76 KB | |
| 187.22 KB |
Greetings from San Francisco! I own a working Apple 1 replica originally purchased from a member here who lives in Italy. The board contained most correct features, chip makers and date codes that closely approximated a pre-NTI Apple 1 board. I purchased the board to achieve my hobby’s goal of displaying a replica that exactly duplicated the original. It was clear before my purchase that I would have to improve the accuracy of the board to create an exact copy. The more I reached out to members on this board, I realized that this goal would either take many, many years of sourcing chips and that some may be completely out of my price range. My wife is very understanding of my hobby but she does have her limits.
Continuing my investigation, I began to read discussions that focused on the ethical nature of duplicating an exact Apple 1 board. Folks were concerned that these boards would make their way to eBay for a 30K sale and fool the buyer into thinking they bought the real thing. This debate seems to have cooled since members have pointed out that turning a replica board over will reveal the PCB marker, in my case a Newton-1. Or other micro-differences that are not being publicized which reveals their true origin.
The only remaining confusion seems to be the question of why? Again, other members have shared that it is simply one part of our hobby that some folks enjoy the challenge and the process of recreating an exact replica. You either get it or you don’t. For me personally, it’s a hoot. So, I will soldier on.
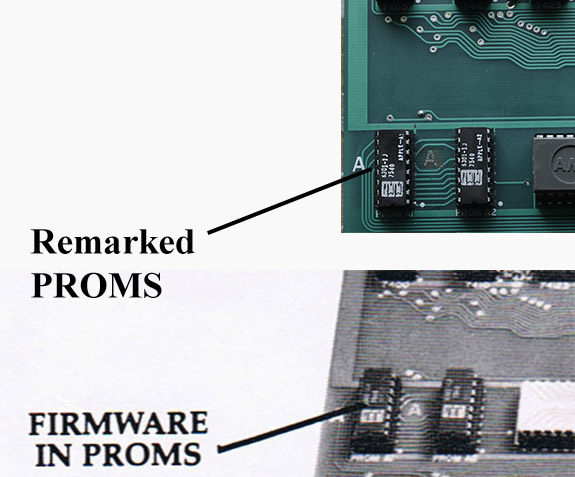
Then I read other members posts who had decided to re-mark chips due to originals being completely unavailable. My two Proms needed this attention. In another post, I shared pictures of my Apple 1 Prom re-marking project to further accurize my Apple 1 replica. I personally did not sand the surfaces of the donner PROMS nor did I apply the stencils via the Toner Reactive Foil method. Rather, I replied on the help of members here to help me with skills that they perfected. The result was PROMS that looked exactly like the Apple 1 Prototype that appears the 1976 Apple 1 two-page flyer. I was delighted with the look that these PROMs gave my board and furthering my goal of exactly duplicating the look of a Apple 1 board.

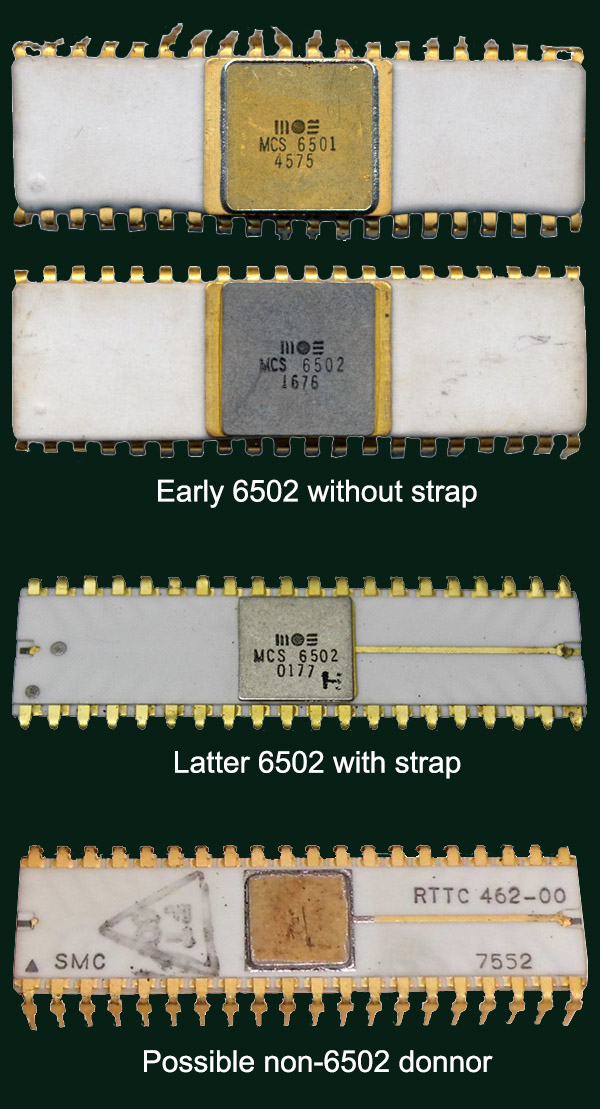
My next goal is to remark a 40 pin chip that resembles a MOS 6502 CPU. The current resale prices are just below or above, $2,000 and completely unattainable for me. If a member here can make this available to me for under $500 I can Segway on to another project for my board. As I will not be holding my breath for that to happen, I have outlined my plan in this thread. The early MOS 6502 white ceramic CPUs were very plain with minimal gold shoulder areas at the top of the legs. Latter versions featured gold grounding straps along the center of the top surface.
Which brings me to the next topic, does it need to work? If it does, then a compatible 40 ping CPU need to be found. I would like to make a list of white ceramic 40 pin CPUs that would lend themselves to a remarking project. However, it the goal is to display your board in the most original configuration possible, but for those rare times that you are going to power up and demo Apple Basic or other short program, why not pull the remarked CPU and quickly insert your working 6502? My preference would be to have a working remarked ceramic CPU but that will depend on how difficult and expensive it is to find a compatible chip. In the the photo below is an example I purchase to experiment with. Obviously this 7552 is not intended to be functional.

Please give me your thoughts and observations.
Regards,
Theodore
Well my first thought is to just put a case over it so no one sees what kind of 6502 you have...
Seriously though maybe you could paint a plastic case white, age it, then see about getting a little brass plate with rounded corners. Someone could mill or stamp that, then age it as well. Glue it on top and print the MOS markings.
As for the pins, maybe these could be electroplated? But I don't know if you could electroplate the legs without ruining the 6502 circuitry. Maybe there's conductive paint that you could use instead.
Actually I would not do what "Macky" suggests, if you keep pulling the 6502 in and out you will have socket problems, those TI sockets suck and I believe his board uses them.
Dog Chow, I like your idea, if your not going to spend 2k to get the right CPU, then simply take a plastic CPU, use ceramic paint, make a metal "name plate" and use a cheap "Wizard" disposable gold plating pen on the pins. I think the voltage is <5V so it should be fine plating the pins. I use the non-disposable version to touchup pins when I have to do a repair on a white 6502 leg.
From the side the painted plastic chip will never look the same as the real thing since it will be thicker, but from the top is should look good and more importantly it should work...
Cheers,
Corey
Excellent advice Corey, as always. I am abandoning any plans to frequently place and remove the cpu in my board's TI sockets. Your suggestion to paint a working donor chip with ceramic paint is a good one. I agree the effect would be very convincing.
However, why not use a MOS 6502 compatible cpu that already has a ceramic finish with gold DIP pins that match exactly such as the AMI or Intel 8080? Then one would only have to remove the logo and print the MOS information on top of the gold surface? I also agree with you that the bottom of the chip should have a mark indicating that is is a recreation.
Regards,
Theodore
Are there any ceramic MOS 6502 compatible chips other than the synertek? A ceramic synertek is rarer than an MOS CPU.
I thought you would all enjoy seeing this picture of VCF's 6501.
Thank you evank for the excellent reference photo! A thing of beauty it is. I am committed to recreating the look of the MOS 6502 and once I get my procedure dialed in, I will share my recreations with members here.
Did you manage to recreate this? Would be interested in doing something similar..
Interesting project. I have been thinking of something similar but with a working 6502. The problem is to get a 6502 out of a package. I have wire bond tools, but the failure rate of hand bonding is not zero. Fortunately I can get hold of some later CMOS 6502, but I don’t think they will work well in an Apple. The alternative is to contact WDC to get 65C02S (which should be compatible), but the cost and work is going to be considerable.
I do not know anything about markings, but such remakes could be marked on the underside to differentiate them from the real thing. In any case the metal composition of the gold/metal will not be the same The cost per chip is probably still going to be in the ~500$ range.
Is there any interest for such remakes here?
I finally finished my white 6502 project, which I had put on the back-burner for some years.
I basically took a normal, plastic 6502, sanded it down to round it off. I filled in the notch with some filler (I think I used JB weld), and sanded it down smooth.
I then painted it white, spray-painted the pins with gold modeling paint.
I stuck the IC into some anti-static foam so the paint would not cover the lower parts of the legs.
I made the metal plate by removing a sliding cover for a 3.5" floppy, and cutting it out/sanding it.
I tried doing an iron-transfer for the label, and some of it transferred, but I think the imprint is so small that only a little of the toner transferred.
I think it turned out pretty nicely! It's good enough for a casual observer, and I think it puts the final touch on my Mimeo 1.
And the Mimeo 1 still works with it in!
DSC00033.jpg
DSC00049.jpg
20250806_145107.jpg
20250820_092051.jpg
Hard to tell from the photos, but did you do anything to mark pin 1 on the painted 6502? Seems like just drilling a slight depression in the plastic prior to painting would have worked. But is it still a nice job!
Good point!
I only discovered this after repainting the IC, but I was able to figure it out. There is a factory label printed on the underside of the IC, and I had enough pictures during the process that I was able to piece together where pin 1 was. Now I have marked it on the underside with a dot.
Thanks!
Just an idea, but maybe you can use rub-on lettering to make the MC6502 imprint. (?)
Just an idea ... https://www.ebay.com/itm/376432375289
Or trY one of this technics https://youtu.be/LrheAAnUpjs?si=9RZ8CSsJWzmbXIcQ
Thanks for the suggestions.
I do have some dry-transfer lettering, and it's really difficult to get it aligned for me, and I've not been too happy with results in the past. Also, I want to match the font, and the "MOS" is a custom graphic.
I checked out the video - thanks. There's a cool technique that he uses by printing onto a vinyl sheet backing, and I never heard of that. I think that will work well, and I will try that.
You can get transparent sticker material that you can print on with an inkjet or laser printer. That would let you replicate the look by using a pic of the lettering/logo and cleaning it up, removing the background, etc., and then printing it the right size.
As for the pin 1 marking, just using a sharpie to make a black (or maybe dark grey, you can get different color sharpies) dot by pin 1 wouldn't look that different from what is on a lot of those chips.