
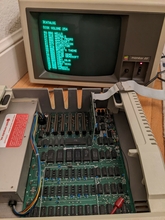
I've been having difficulties with my old Apple ][+ and got some excellent advice from https://www.applefritter.com/comment/96037#comment-96037.
Even after replacing all the caps in my PSU, my monitor would show random green squares. Many have suspected a faulty RAM chip (or multiple faulty chips), so I reseated all the chips and still had the problem. Next I pulled out all the RAM except for the row closest to the keyboard. Since I still had the problem, I replaced that row of RAM with the chips that were previously the second row... and it worked! I plugged the floppy card back in and that worked, too!
Next, I plugged previous row 3 into row 2 and it still worked. Finally I plugged the original row 1 into row 3 and had a problem. So, there's a bad chip in the original row 1.
When reseating, I noticed that many of the pins looked corrupted. So, perhaps not wisely, I tried to filing off the corrosion with a fine emory board. I was able to do 5 or 6 with not problem, producing a result like this:

I must have been a little too confident, or perhaps I got a too aggressive with the filing, or perhaps one of the pins was just too corroded, but I now have a couple chips that look like this:
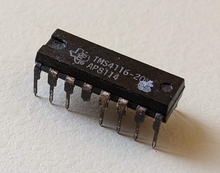
Great. So now I need some replacement RAM. The chips say TMS4116-20NL, however, underneath I read AP8114. Others have AP8118. Does it matter what's underneath? I found https://www.questcomp.com/part/4/tms4116-20nl/408290989 so I'm wondering if I should just grab a half-dozen of those. Or maybe I should grab 24 and replace them all. Any recommendations? Thank you!
They don't have to be TI branded. 4116 just indicates 4-> DRAM, 1->1 bit wide, 16-> 16kbits.
When I was fixing my europlus I'd just order big batches of generic 4116 RAM from AliExpress.
There's even an evil hack where you replace the 4116 RAM with 4164, by bending up the legs. 4164 is 4 times as big, and you end up wasting all that extra capacity, but 4164 is a) more readily available and b) only uses one volt rail rather than 3, so it runs cooler.
That RAm you have indicated will work fine.
As for cleaning component legs, I clean them with an ink eraser as it's a lot more gentle. It is possible to solder new legs on. It's fiddly but I've done it quite a few times.
Chesh
This is excellent info, so thank you very much! I think I'll stick with the 4116 RAM, so I'll just buy myself a set of 24. It's only $83 + S&H. Maybe I'll use them all or perhaps just a few.
I thought about soldering on a leg. The one in the pic is broken, but I have another where it's hanging on by the tinyest thread. Your suggestion to use an ink eraser is good. For whatever reason, I didn't think the pins would be so fragile. I'm feeling irritated at myself right now, but I should be able to get back on track. Thanks again!
4116_ram_replace.jpg
Wow. That's quite a hack. I just ordered 24 4116s, but this is great to know. Thank you for sharing!
I have also broken off a leg from a dram chip sometime.
I took a cut off leg from a LED and soldered it onto the broken leg of the chip.
I chose the leg from a LED because it's flat.
It worked well, so an otherwise fine working dram chip was saved.
You are much more skilled that I. (And probably have better equipment. :-) ) Anyway, I tried to fix this:
PXL_20220215_014153369.jpg
But it ended up like this:
PXL_20220215_021659279.jpg
I think it's time to just buy another chip. Hopefully the ones I ordered will work fine. Fingers crossed!
I inserted the chip into an empty socket I had.
With a plyer I inserted the new leg into the hole of the socket where the broken off leg should have been.
Then it was really simple to apply solder so that the new leg was attached to the chip.
After I took the chip out of the socket I saw that the new leg was a bit longer than the other legs, so I trimmed it a bit shorter.
Quite simple really.
Of course this is only worth the effort if the chip is actually working properly.
Thank you, Tolderlund. That sounds pretty smart. I think I'll first see if the replacement RAMs work. Then perhaps I'll give your idea a try. I no longer have the broken leg, but perhaps I can use something else, like the earring post. I'll update here if I get it working.
Most of us use the bits cut off from mounting resistors and capacitors for replacement legs. The best replacemnt leg I have found so far was from resistor packs, which, if sold in tape packs (For automation) have these strange, wide legs you cut off before inserting. The bits cut off make excellent replacements for chip legs. They're exactly the right shape...
IMG_20220107_114221.jpg
You can also use breadboard to hold the legs while you solder. They're spaced at the correct pitch for chips...
Hope this helps!
Chesh
when using the cut off bits from resistors and capacitors.
They tend to be more soft and bend easily.
Which is why I used the leg from a LED, they are usually more rigid.
RAM is cheap. Even 4116 which is getting scarce is still cheap.
Not worth mucking around with fixing legs and such.
As you discovered, the lower 16K is critical to startup of the Apple II. If there is a RAM fault in the lower 16K the machine will not start.
If you put it in the second or third bank the machine will start but give errors.
A 4116 tester is a good tool to have. A 4164 tester is also a good tool to have.
Both can be built for very little money.
I used to put all suspect RAM chips into a bowl. When that bowl got to 40 or 50 chips I decided to build a couple of testers and go through that bowl chip by chip.
I ended up with only 6 bad ones - the rest good, so the testers paid for themselves that day.
This is very interesting. Any information on how to build one? (By the way, I bought a pack of 4116, but one day I might want to see if I can repair the old ones. My bowl has 2 chips in it for the moment. :-) )
I built the 4116 tester here designed by Muttley Black.
http://www.mediafire.com/file/884tyy88pp4wywr/4116_tester.rar/file
Youtube video here:
https://www.youtube.com/watch?v=F2GORWsW5_k
The bill of materials in that file archive actually sucks, so I made a better one with Digikey and Mouser part numbers.
I have a bare PCB on hand if you'd like one - $15.
If you want to build a 4164 / 41256 tester they are way simpler (because they only use one voltage instead of three) and use the same type of Arduino nano as the 4116 tester but with modified code. Have a look here at a project I uploaded to github:
https://github.com/baldrick1/4164-41256-DRAM-Tester
No PCBs on hand for this one, sorry. But the circuit is so simple you can easily hack one together on a breadboard in about 10 minutes.
I picked up this tester a little while ago
https://www.ebay.ca/itm/124726020732?_trkparms=ispr%3D1&hash=item1d0a400a7c:g:odYAAOSwI2phVsQ1&amdata=enc%3AAQAGAAACkPYe5NmHp%252B2JMhMi7yxGiTJkPrKr5t53CooMSQt2orsSxXDXcCydCuSj2Tq2S%252F3Gngpto4TbRcTk94NSK13BAL09KXUdTrVUzcfXVORwOkJSvVL7l5iogY5%252BWz9RkJ36JCwuwbtG0hXRuk3kcXDJ8pu0kPG60LVrsMqR5%252F0%252BBFpvdsXOijAn2MkGp4VmSv05agOz3F2BPPVVmC9GVvAa3AxFqv43qAiOwEa7G2u4KbJ0Y4RDxtJ0yoOrUQblLDGWdEvfR6MGy1w8h5nBO1e0oRA80HqNv3HEbs14k46jY6%252FdvYfzVjnErHpZlry7sW8uuWhQiOCsSxZ%252FMXfRBaNcYi8cFpRCwU3hofRjyxcF%252BHAQv%252F4ENCLUeLRARHmuz6pJI3YcHl3Eo8%252F%252BSnO8KDoKiCIkzYNsjg1U129lNq6aOlDBdcQPyqGkSuKucl%252Fp18mHgKAbV1l%252BcOLeVAi3ROV94RLeiC%252FHCaG4UhO3eEQ8eUkjef7nEiY6dydCOdt4l8ZmmOVOqaXitR5sqdsoryOwZ12EJZtxXKnypj4ps1pnYYk2mml4ikovDSeikGtHmyy61jxOhovWzDfzZ7ZLUCgimZ%252Fu9GwjV%252B2Z6whbXmNHSL5lNLeLvisNU%252FKQy8kndtIFlXzpKCZfQmX20%252FM1razt9l5FvgATfGOQIfqtApToGVBVmT54KCnU9RjquM9vwVG26xKDRm7hj6%252Blq7CxRlKf2xh83RJxcay%252BdhBY%252FTTB9%252B7on8pyZ211RI225YCjinL%252BwBy3JAhbuiyTksiWgDRWD9wOe%252FMHTXzpfUTU1cklmWufxaQpUhhzgsW4Tld18x6naSPkgGoalbyaYNmZK52n86mWoW6kL3DXhbk7wDke2m7%252F%7Cclp%3A2334524%7Ctkp%3ABFBMtvqg2eFf
That is very cool. Thank you for sharing!
Muttley Black's tester works well. I built one and use it too.
I've been struggling with my RAM (corrosion, weird erros, etc.) so I finally decided to just replace everything. Folks here have had great advice on how to clean up and fix the chips as well as how to detect those that are bad, but I decided to just pop in the 24 brand new TMS4116-20NL. I'm happy to say that the machine appears to be working like a charm. I made a floppy and even wrote a small program.
After playing around with it for ~30 min I turned it off. It was then I noticed a faint burning smell. I realize that this is very old electronics, but should I be worried about this? I just replaced all the cap in the PSU (https://www.applefritter.com/comment/96036#comment-96036) so I'm thinking that it's probably not that. Any ideas?
Then my money would be on a capacitor in the monitor.
Ugh. OK, the next time I use the machine I'll see if I can identify the source of the smell. If it is the monitor, I'm also assuming that I could replace those caps just like I did with the PSU. I did have a 'capacitor-like' odor to it, but the monitor functioned perfectly well. I hope nothing blows. Thank you for the input!
Looks like you are using a Monitor III? I don't have one and have never personally looked in one. But I don't think it used any RIFA caps that would blow and stink. Infact, I've opened several Apple monitors (monitor II, monitor //c, //c color, color composite IIe, and IIgs RGB) and never found a RIFA in any of them. Apple monitors of that vintage tended to use the chonky orange film caps anytime there was mains filtering. Probably because they were often made by Hitachi, as where the PSUs with rifa caps were often Astec. Different engineers, different approaches.
I'm basing that purely off this very blurry schematic and looking at a couple tear down videos of Monitor IIIs. I also googled for Monitor III and RIFA, and all the results only talked about people replacing the RIFA in the computer PSU, never mentioning one in the monitor.
So I could be wrong. As you noted, a closer sniff test would help narrow it down. Or if you are comfortable with opening a CRT and know the safety protocols for doing so, take a peek and confirm.
If you want to hack in 4164, see here:
https://apple-crapple.blogspot.com/2016/10/apple-ii-64k-ram-refresh-and-addressing.html#more
https://www.applefritter.com/files/styles/95-percent/public/2022/02/12/4116_ram_replace.jpg?itok=j2o49QSZ
Not the same thing we're talking about. This uses just 8x4164 and allows that to replace RAM in all banks plus the language card...